# React Native Stallion — Full Documentation & Blog
OTA (over-the-air) updates for React Native. This file contains the full documentation and blog corpus in Markdown for LLM ingestion.
---
# Introduction
Stallion Software - React Native Stallion: The best React Native OTA (over-the-air) update platform. Get patch updates, advanced controls, and seamless integration. Perfect CodePush alternative for modern React Native apps.
# React Native Stallion
Welcome to **React Native Stallion**! An end-to-end testing and deployment framework to manage over the air React Native releases.
React Native Stallion is a production-grade OTA update platform for React Native apps. Ship patch updates, manage rollouts, monitor releases, and roll back instantly — without app store delays.
Once done with testing, the same bundle can be promoted to production to be consumed your users. Sending OTA updates has never been simpler!
### Open Source & Contributions
React Native Stallion SDK and CLI are **open-source**! 🎉 We believe in creating an accessible, collaborative platform that thrives on community contributions.
**Contribute**
Interested in helping us improve? Check out our [GitHub
repository](https://github.com/stallion-tech/react-native-stallion) to get
started! From feature suggestions to bug fixes, all contributions are welcome.
### Features Offered
**Note**
Please read the [CLI Docs](/docs/cli/introduction) as well to get a better
understanding of complete workflow
**React Native Stallion** is more than just another npm module. It's a **complete toolkit** designed for superfast OTA updates. Key features include:
- [**Command Line Tool**](https://github.com/stallion-tech/stallion-cli) **\:** Used to create a React Native bundle for a specific version of your code and upload it to Stallion servers along with release notes and other other meta information.
- [**Mobile SDK**](https://github.com/stallion-tech/react-native-stallion) **\:** Enables users to download and install a React Native update published by a developer without having to install a new app build(like apk/aab, ipa). React Native Stallion SDK provides an intuitive UX from where a tester can manage and test different versions of your app conveniently. SDK provides an exhaustive API to manage and customise production installation strategies.
- [**Console**](https://console.stalliontech.io/) **\:** To manage everything related to your app like React Native bundles, adoption analytics, manual rollbacks, organization settings, team members, access control and buckets (upload folders for bundles).
### Quick Links
- [Installation Guide](/docs/sdk/installation) - Get started with React Native Stallion in 5 easy steps
- [Stallion Hierarchy](/docs/stallion-hierarchy) - Organizations, projects, buckets, and releases
- [Patch Updates](/docs/patch-updates) - Revolutionary differential updates up to 98% smaller
- [Expo Integration](/docs/expo-integration-with-stallion) - Migrate from Expo Updates or EAS Updates
- [CodePush Migration](/docs/migrating-from-codepush) - Seamless migration from CodePush
- [Bundle Signing](/docs/bundle-signing) - Secure, tamper-proof OTA updates
- [Production Usage](/docs/sdk/production-usage) - Deploy to production with confidence
---
# Stallion Hierarchy
How Organizations, Projects, Buckets, Bundles, and Releases fit together in Stallion.
# Stallion Hierarchy
Stallion organizes your OTA workflow under a simple hierarchy. This page defines each layer and how they connect from upload to production.
## The hierarchy
```
Organization
└── Project
├── Buckets → Bundles (uploaded JS artifacts)
└── Releases (promoted bundles, targeted at an app version)
```
| Layer | What it is |
| --- | --- |
| **Organization** | Your team or company account. Holds members, access control, and projects. |
| **Project** | A Stallion app target. The native app connects to a project via `StallionProjectId` and `StallionAppToken`. |
| **Bucket** | A named folder inside a project where you upload bundles. Name and organize them however you want. |
| **Bundle** | A published JS OTA artifact stored in a bucket. |
| **Release** | A bundle that has been promoted for a specific **app version**. |
CLI upload paths follow the same shape: `org-name/project-name/bucket-name`.
## Buckets
Buckets are folders for organizing uploaded bundles — for example by feature, platform, or team. You choose the names and structure.
### Internal testing
Buckets are used by the [Stallion Testing](/docs/sdk/stallion-testing) modal. In your app:
1. Open the Testing tab.
2. Select a bucket.
3. Download and install any bundle from that bucket.
That lets your team try builds during development and QA without promoting them first.
## Promotion and Releases
The path from upload to production:
1. Publish a bundle into a bucket (`stallion publish-bundle`).
2. Promote that bundle (Console or `stallion release-bundle`).
3. Target a specific **app version** (the version users installed from the store).
4. That creates a **Release** under the project.
Once promoted, apps receive the Release based on the **project** they are configured with and the **app version** they are running (plus rollout percentage).
## How the SDK connects
The Stallion SDK reads **`StallionProjectId`** and **`StallionAppToken`** from the native build. Those credentials select the project. The SDK then checks for a promoted Release for the running app version.
## Multiple environments
For Dev, QA, Production, and similar app flavours, see [Handling Multiple Environments](/docs/handling-multiple-environments).
---
# Migrating from Codepush
Migrate from CodePush to React Native Stallion - Complete migration guide with step-by-step instructions. Seamless transition from CodePush to modern OTA updates.
# Migrating from CodePush to React Native Stallion
## Introduction
Switching from Codepush to Stallion is incredibly straightforward, you won't face a steep learning curve, as the installation and integration steps remain nearly identical.
#### Step 1: Removig Codepush and Installing Stallion SDK
Remove Codepush SDK from your app and all the related settings, API keys, `android/settings.gradle` and `android/app/build.gradle` settings.
Install Stallion SDK. For more info check [Installion Steps](/docs/sdk/installation/):
With npm:
```bash
npm install react-native-stallion
```
With Yarn:
```bash
yarn add react-native-stallion
```
#### Step 2: Do native changes in iOS and Android.
### Android Changes
Inside `MainApplication.java`, override and implement `getJSBundleFile` method :
```java:MainApplication.java
// ...other imports
import com.stallion.Stallion;
public class MainApplication extends Application implements ReactApplication {
// ...rest of the class
@Override
protected String getJSBundleFile() {
return Stallion.getJSBundleFile(getApplicationContext());
}
}
```
**If running on latest version of react-native (>v0.76)** \
Inside `MainApplication.kt` file edit the `reactNativeHost` method:
```kotlin:MainApplication.kt
// ...other imports
import com.stallion.Stallion
// ...other functions
override val reactNativeHost: ReactNativeHost =
object : DefaultReactNativeHost(this) {
override fun getPackages(): List =
//other methods...
override fun getJSBundleFile(): String? {
return Stallion.getJSBundleFile(applicationContext)
}
}
```
### iOS Changes
Inside `ios/AppDelegate.mm` file edit `bundleURL` method
```objectivec
// ...other imports
#import
@implementation AppDelegate
// ...other implemetations
- (NSURL *)bundleURL
{
#if DEBUG
return [[RCTBundleURLProvider sharedSettings] jsBundleURLForBundleRoot:@"index"];
#else
return [StallionModule getBundleURL];
#endif
}
```
If running on latest version of react-native (>v0.76).
Inside `ios/AppDelegate.swift` file edit the `bundleURL` method
```swift
import react_native_stallion
// ...other functions
override func bundleURL() -> URL? {
#if DEBUG
RCTBundleURLProvider.sharedSettings().jsBundleURL(forBundleRoot: "index")
#else
StallionModule.getBundleURL()
#endif
}
```
*Run **npx pod-install** to install the pods and complete Stallion native installion for iOS
#### Step 3: Add projectId and token in native
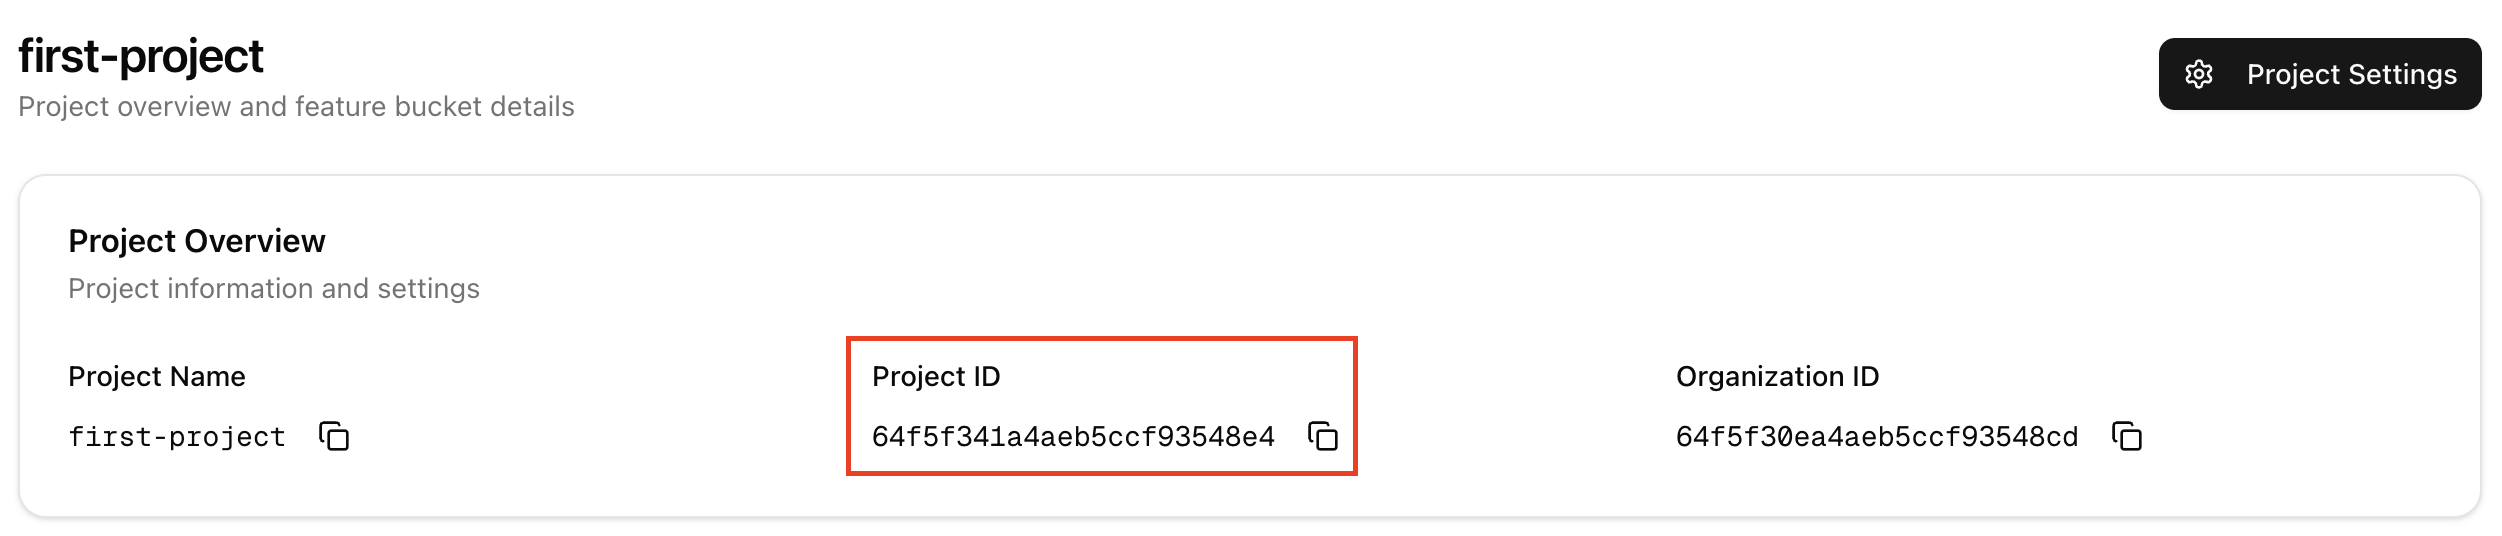
- **Get projectID from Stallion Dashboard :**
On project info page, copy project id.
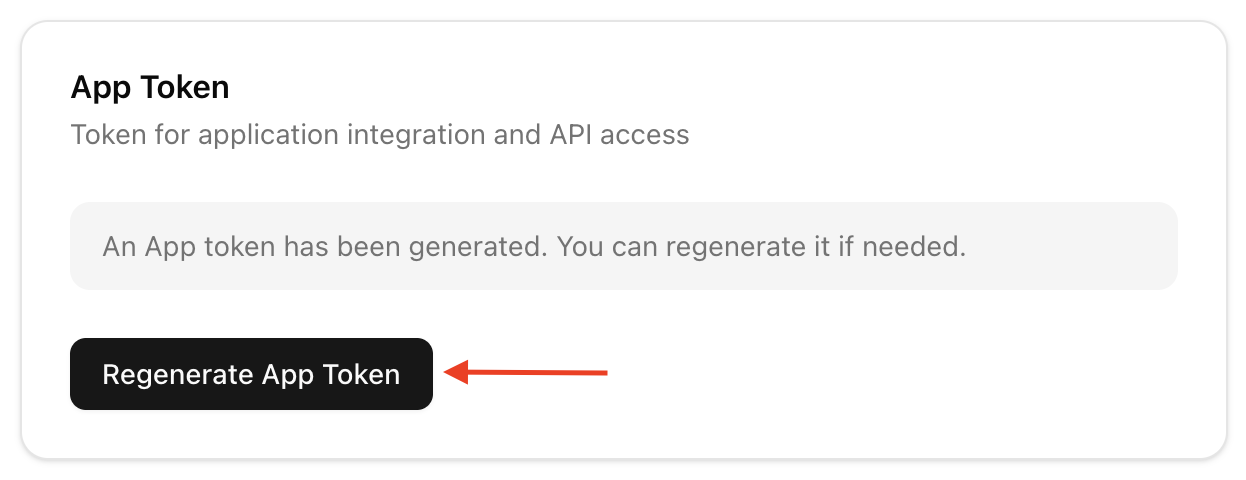
- **Generate App Token :**
On project settings page click on `Generate App Token` to create a new app token
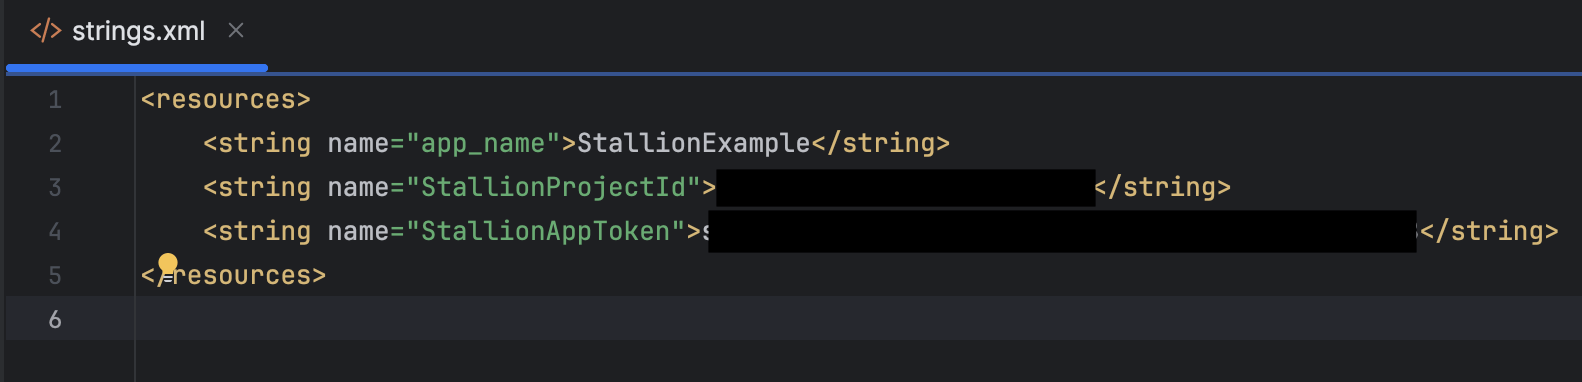
Add `StallionProjectId` & `StallionAppToken` as shown below -
- **iOS**: Add the copied App Token and projectId to `info.plist`

- **android**: Add the copied App Token and projectId to `strings.xml`
#### Step 4: Do React Native changes
### Wrap App.js inside withStallion()
```javascript
import { withStallion } from "react-native-stallion";
const MyApp = () => {
// Your App.js Code
}
export default withStallion(MyApp);
```
#### Step 5: Upload your react-native bundle
Sign in to the [Stallion Console](https://console.stalliontech.io) and set up your organization and project. Within your project, create a bucket—ideally, the bucket represents the feature you’re developing, and it will house all the associated bundles.
### Install stallion-cli as dev dependency
With npm:
```bash
npm install --save-dev stallion-cli
```
With Yarn:
```bash
yarn add -D stallion-cli
```
### Upload your bundle
```bash
npx stallion publish-bundle --upload-path=// --platform= --release-note="Migrated from CodePush"
```
#### Step 6: Promote your bundle
Return to the console and select the bucket where your bundle was uploaded. Then, choose the bundle you wish to promote, click on "Promote" and complete the necessary fields such as Target App Version and Release Note. Finally, click "Promote Bundle."
Initially, the bundle will be promoted but released to 0% of users. To test it, click on "Manage Release," change the rollout percentage to 100%, and then click "Update Release."
**Tip**
For more details on distributing a release, be sure to check out the
[Distribution Doc](/docs/sdk/distribution).
#### Step 7: Verifying the release
Generate a release flavor of your app to ensure that the Metro bundler doesn't override the Stallion bundle. Launch the app so that on its first run, it downloads any available released bundle. Then, restart the app to apply the changes.
With this, your migration to Stallion is complete, enabling you to instantly scale your releases to your valued users.
**Tip**
For greater control over your releases, be sure to explore the [React Native
OTA Best Practices](/blogs/react-native-ota-best-practices-stallion) blog.
---
# Expo integration with React Native Stallion
Integrate Expo + EAS Build with React Native Stallion OTA updates using expo-stallion-plugin. Learn how to configure the Expo plugin, export embedded bundles for iOS/Android, and publish them to Stallion.
**Minimum SDK version**
Full Expo support requires minimum **React Native Stallion SDK version 2.3.0**.
# Expo Integration with React Native Stallion
This guide shows the recommended Expo workflow with Stallion:
- Use the Expo config plugin [`expo-stallion-plugin`](https://github.com/stallion-tech/expo-stallion-plugin) to configure native iOS/Android to load the JavaScript bundle from Stallion.
- Generate embedded bundles with `npx expo export:embed` for each platform.
- Publish those bundles to Stallion using `npx stallion publish-bundle` with `--custom-bundle-path`.
## Requirements
- An Expo app that can run `npx expo prebuild` (or is already prebuilt)
- `react-native-stallion` installed in your app
- Access to Stallion credentials:
- `projectId`
- `appToken` (should start with `spb_`)
- (Recommended) Bundle signing private key. See [Bundle Signing](/docs/bundle-signing).
## Step 1: Install dependencies
Install the config plugin and the Stallion SDK:
```bash
npm install expo-stallion-plugin react-native-stallion
```
## Step 2: Configure the Expo plugin
Add the plugin to your `app.json` or `app.config.js`.
### app.json
```json
{
"expo": {
"plugins": [
[
"expo-stallion-plugin",
{
"projectId": "your-project-id",
"appToken": "spb_your-app-token",
"publicSigningKey": "YOUR_PUBLIC_KEY_HERE"
}
]
]
}
}
```
> If you use [Bundle Signing](/docs/bundle-signing), set `publicSigningKey` to the **base64-encoded** contents of `public-key.pem` (the long string between the BEGIN/END lines).
### app.config.js
```js
export default {
expo: {
plugins: [
[
"expo-stallion-plugin",
{
projectId: "your-project-id",
appToken: "spb_your-app-token",
// Optional: required only if you use Stallion Bundle Signing
publicSigningKey: "YOUR_PUBLIC_KEY_HERE",
},
],
],
},
};
```
**Migrating from Expo Updates / EAS Updates**
If you previously used Expo Updates, you can keep the package installed, but ensure your app is configured to use Stallion for bundle loading in production (handled by the plugin). Remove any Expo Updates settings that could confuse rollout/debugging.
## Step 3: Prebuild and build your app
Run prebuild so the plugin can patch native iOS and Android projects:
```bash
npx expo prebuild
```
Then create a development/production build as you normally do (for example with EAS Build):
```bash
eas build --platform ios
eas build --platform android
```
## Step 4: Create embedded bundles (iOS + Android)
Stallion publishes the bundle outputs you generate. Create the embedded bundle artifacts using `expo export:embed`.
### iOS bundle
```bash
npx expo export:embed \
--platform ios \
--dev false \
--reset-cache \
--bundle-output ./build-ios/main.jsbundle \
--assets-dest ./build-ios \
--bytecode
```
### Android bundle
```bash
npx expo export:embed \
--platform android \
--dev false \
--reset-cache \
--bundle-output ./build-android/index.android.bundle \
--assets-dest ./build-android \
--bytecode
```
**About --bytecode**
Use `--bytecode` when your app uses Hermes bytecode. If you’re not using Hermes, omit that flag.
## Step 5: Publish the bundle to Stallion
Use `stallion publish-bundle` and point `--custom-bundle-path` to the folder that contains the exported bundle + assets.
**Minimum stallion-cli version**
The `--custom-bundle-path` flag requires minimum **stallion-cli v2.4.3**.
### Example (iOS)
```bash
npx stallion publish-bundle \
--upload-path=stallion-test/expo/main \
--platform=ios \
--release-note="Release 1.0.0" \
--custom-bundle-path=build-ios \
--private-key=./stallion/secrets/private-key.pem
```
### Example (Android)
```bash
npx stallion publish-bundle \
--upload-path=stallion-test/expo/main \
--platform=android \
--release-note="Release 1.0.0" \
--custom-bundle-path=build-android \
--private-key=./stallion/secrets/private-key.pem
```
## Troubleshooting
### `expo export:embed` fails or is missing
- Use `npx expo ...` (recommended) instead of relying on a global Expo install.
- Ensure your app is on a recent Expo SDK that supports `export:embed`.
### Publish succeeds but app does not pick up updates
- Confirm you built the app with `expo-stallion-plugin` enabled (the plugin runs during prebuild / EAS build).
- Confirm you published to the correct `--upload-path` bucket and correct `--platform`.
- Confirm `--custom-bundle-path` points to the folder containing the generated bundle file:
- iOS expects `main.jsbundle` in `build-ios/`
- Android expects `index.android.bundle` in `build-android/`
## Related Resources
- [Installation Guide](/docs/sdk/installation) - Install React Native Stallion SDK
- [Production Usage](/docs/sdk/production-usage) - Production rollout strategy
- [Bundle Signing](/docs/bundle-signing) - Sign bundles to prevent tampering
---
# Installation
React Native Stallion installation guide - Get started with OTA updates in 5 easy steps. Install SDK and CLI for React Native apps. Complete setup instructions.
Setting up React Native Stallion is straight forward, just install the CLI and SDK and start using. React Native Stallion requires [react-native](https://reactnative.dev/versions/) version 0.69 or higher for optimal performance.
### SDK Installation
To get started, install the SDK using npm or yarn.
### Step 1: Install the React Native Stallion SDK and CLI
Begin by installing SDK in your react-native project:
```bash
npm i react-native-stallion
```
or if you are using yarn then
```bash
yarn add react-native-stallion
```
for steps to install the CLI checkout [CLI Installation Docs](/docs/cli/installation#installation)
### Step 2: Native Installation
After installing the SDK, you need to install pods for iOS and gradle sync android project:
```plaintext
npx pod-install
```
### Step 3: Add Stallion bundle support in Android and iOS projects
- **Android** - Inside `MainApplication.java`, override and implement `getJSBundleFile` method :
```java:MainApplication.java
// ...other imports
import com.stallion.Stallion;
public class MainApplication extends Application implements ReactApplication {
// ...rest of the class
@Override
protected String getJSBundleFile() {
return Stallion.getJSBundleFile(getApplicationContext());
}
}
```
**If running on latest version of react-native (>v0.76)** \
Inside `MainApplication.kt` file edit the `reactNativeHost` method:
```kotlin:MainApplication.kt
// ...other imports
import com.stallion.Stallion
// ...other functions
override val reactNativeHost: ReactNativeHost =
object : DefaultReactNativeHost(this) {
override fun getPackages(): List =
//other methods...
override fun getJSBundleFile(): String? {
return Stallion.getJSBundleFile(applicationContext)
}
}
```
**If running on React Native 82 and above** \
Inside `MainApplication.kt` file, override the `reactHost` property:
```kotlin:MainApplication.kt
// ...other imports
import com.facebook.react.ReactHost
import com.facebook.react.defaults.DefaultReactHost.getDefaultReactHost
import com.stallion.Stallion
class MainApplication : Application(), ReactApplication {
override val reactHost: ReactHost by lazy {
getDefaultReactHost(
context = applicationContext,
packageList = PackageList(this).packages,
jsBundleFilePath = Stallion.getJSBundleFile(applicationContext)
)
}
}
```
- **iOS** - Inside `ios/AppDelegate.mm` file edit `bundleURL` method
```objectivec
// ...other imports
#import "StallionModule.h"
@implementation AppDelegate
// ...other implemetations
- (NSURL *)bundleURL
{
#if DEBUG
return [[RCTBundleURLProvider sharedSettings] jsBundleURLForBundleRoot:@"index"];
#else
return [StallionModule getBundleURL];
#endif
}
```
**If running on latest version of react-native (>v0.76)** \
Inside `ios/AppDelegate.swift` file edit the `bundleURL` method:
```swift
// ...other imports
import react_native_stallion
// ...other functions
override func bundleURL() -> URL? {
#if DEBUG
RCTBundleURLProvider.sharedSettings().jsBundleURL(forBundleRoot: "index")
#else
StallionModule.getBundleURL()
#endif
}
```
### Step 4: Add ProjectId & AppToken in native
- **Get projectID from Stallion Dashboard :**
On project info page, copy project id.

- **Generate App Token :**
Navigate to `Project > Project Settings > Access Tokens`, and select `Generate` or `Regenerate App` Token to create a new token.

Add `StallionProjectId` & `StallionAppToken` as shown below -
- **iOS**: Add the copied App Token and projectId to `info.plist`
```xml
StallionProjectId66ed03380eb95c9c316256d3StallionAppTokenspb_FTLx5umZgKLTEyiMNf9-81BgANTOvx7pNhA-gFXbg9
```

- **android**: Add the copied App Token and projectId to `strings.xml`
```xml
my_app66ed03380eb95c9c316256d3spb_FTLx5umZgKLTEyiMNf9-81BgANTOvx7pNhA-gFXbg9
```

### Step 5: Import and add Stallion as HOC in App.js
- Import `withStallion` HOC
```javascript
import { withStallion } from 'react-native-stallion';
```
- Wrap root component (generally App.tsx or App.js) with HOC
```javascript
export default withStallion(App)
```
With this setup, you’ll have installed Stallion. I next section we will see how to use Stallion to deploy bundles and get realtime updates.
**Remember**
After installing Stallion in your React Native app, make sure to publish a
build (APK or TestFlight) with Stallion fully integrated. This is essential to
test and verify that OTA updates are being correctly installed via Stallion.
Note: If you're running your app in development mode connected to the Metro
bundler, Stallion's OTA changes will not be applied. To properly test OTA
updates, you must use a published app build.
---
# Stallion for Production
React Native Stallion for Production - Learn how to promote bundles to production with phased rollouts. Deploy OTA updates safely to millions of users.
# Production Usage
React Native Stallion enables you to promote thoroughly tested bundles directly to production, ensuring that your users receive the latest updates. With a single click, you can distribute your feature to millions of users.
And don't worry—we also offer a phased rollout feature to help you deploy smoothly without any hiccups.
**Prerequisite**
Before continuing, please verify that both the SDK and CLI are installed. If
they aren’t, consult our [Installation Guide](/docs/sdk/installation/).
#### Step 1: Publish bundle to Stallion
- Make some code changes in your React Native app. Make sure these are changes that can be validated easily.
- Build and push updated bundle to Stallion. Check [Publishing Bundle To Stallion](/docs/cli/usage-api-reference).
#### Step 2: Promote build to production
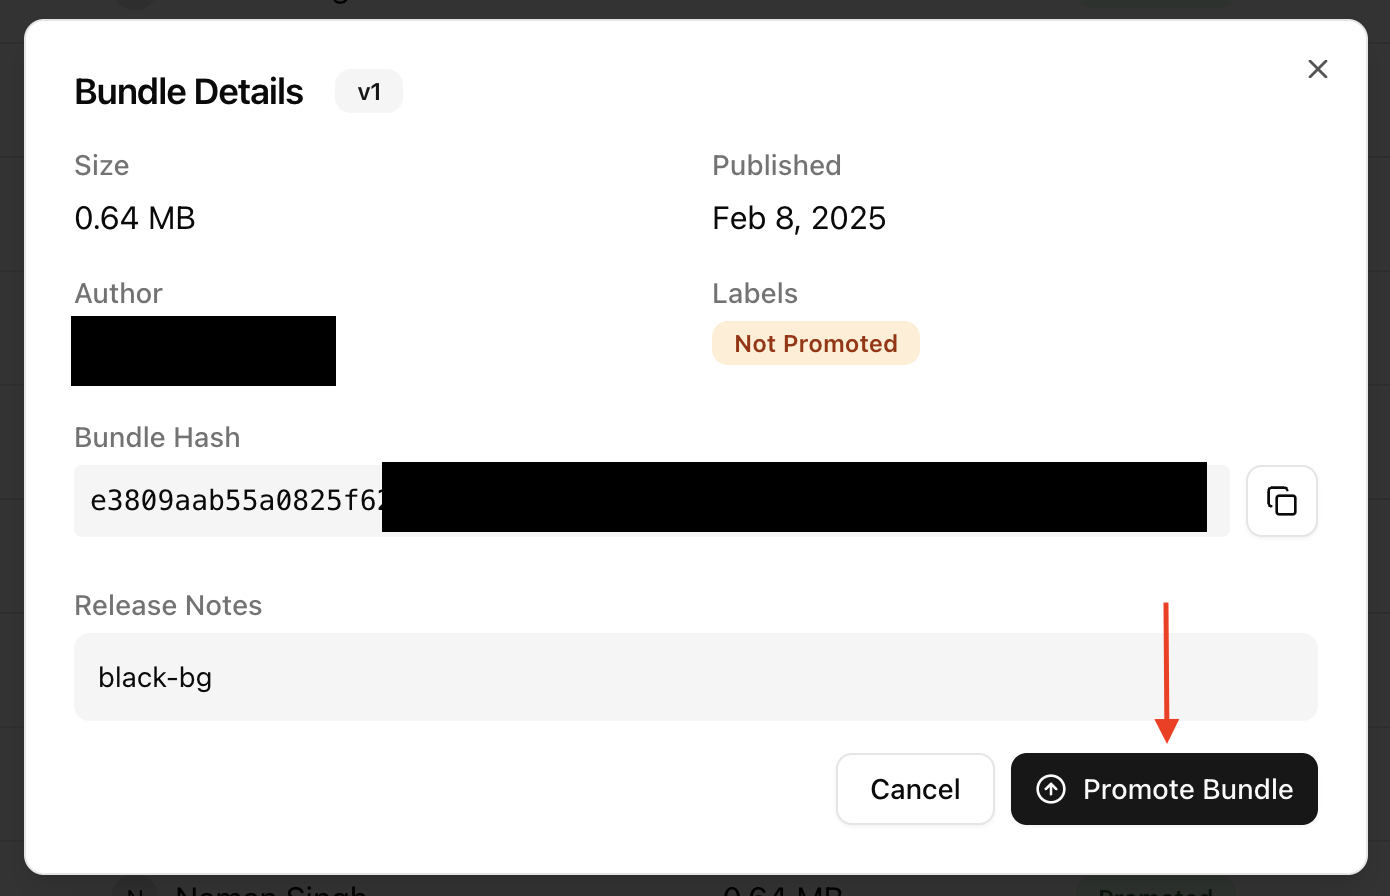
A Stallion build (uploaded bundle) can be promoted to production directly from the Stallion Dashboard.
Simply select the build you want to send to your users from a bucket and click on Promote Bundle.
Fill in the target app version for which you want to send the release, add the release notes and save.
Only users with admin privileges within the organization are allowed to
promote a bundle to production.
After promotion, apps receive the Release by **project + app version** (and rollout). See [Stallion Hierarchy](/docs/stallion-hierarchy).
{" "}
**Tip**
You can choose to promote the release to a **Higher App Version** and publish
release app builds with Stallion integrated on these high app versions to test
Stallion in production environment without impacting your real users.
**Tip**
By default, the rollout percentage for a release is set to 0%, meaning only
users logged into the SDK will receive the update initially. This feature can
also be leveraged for Beta testing releases internally in production
environments. Read more about SDK features
[here](https://learn.stalliontech.io/docs/sdk/stallion-testing).
Your promoted bundles are available under Releases section in the dashboard
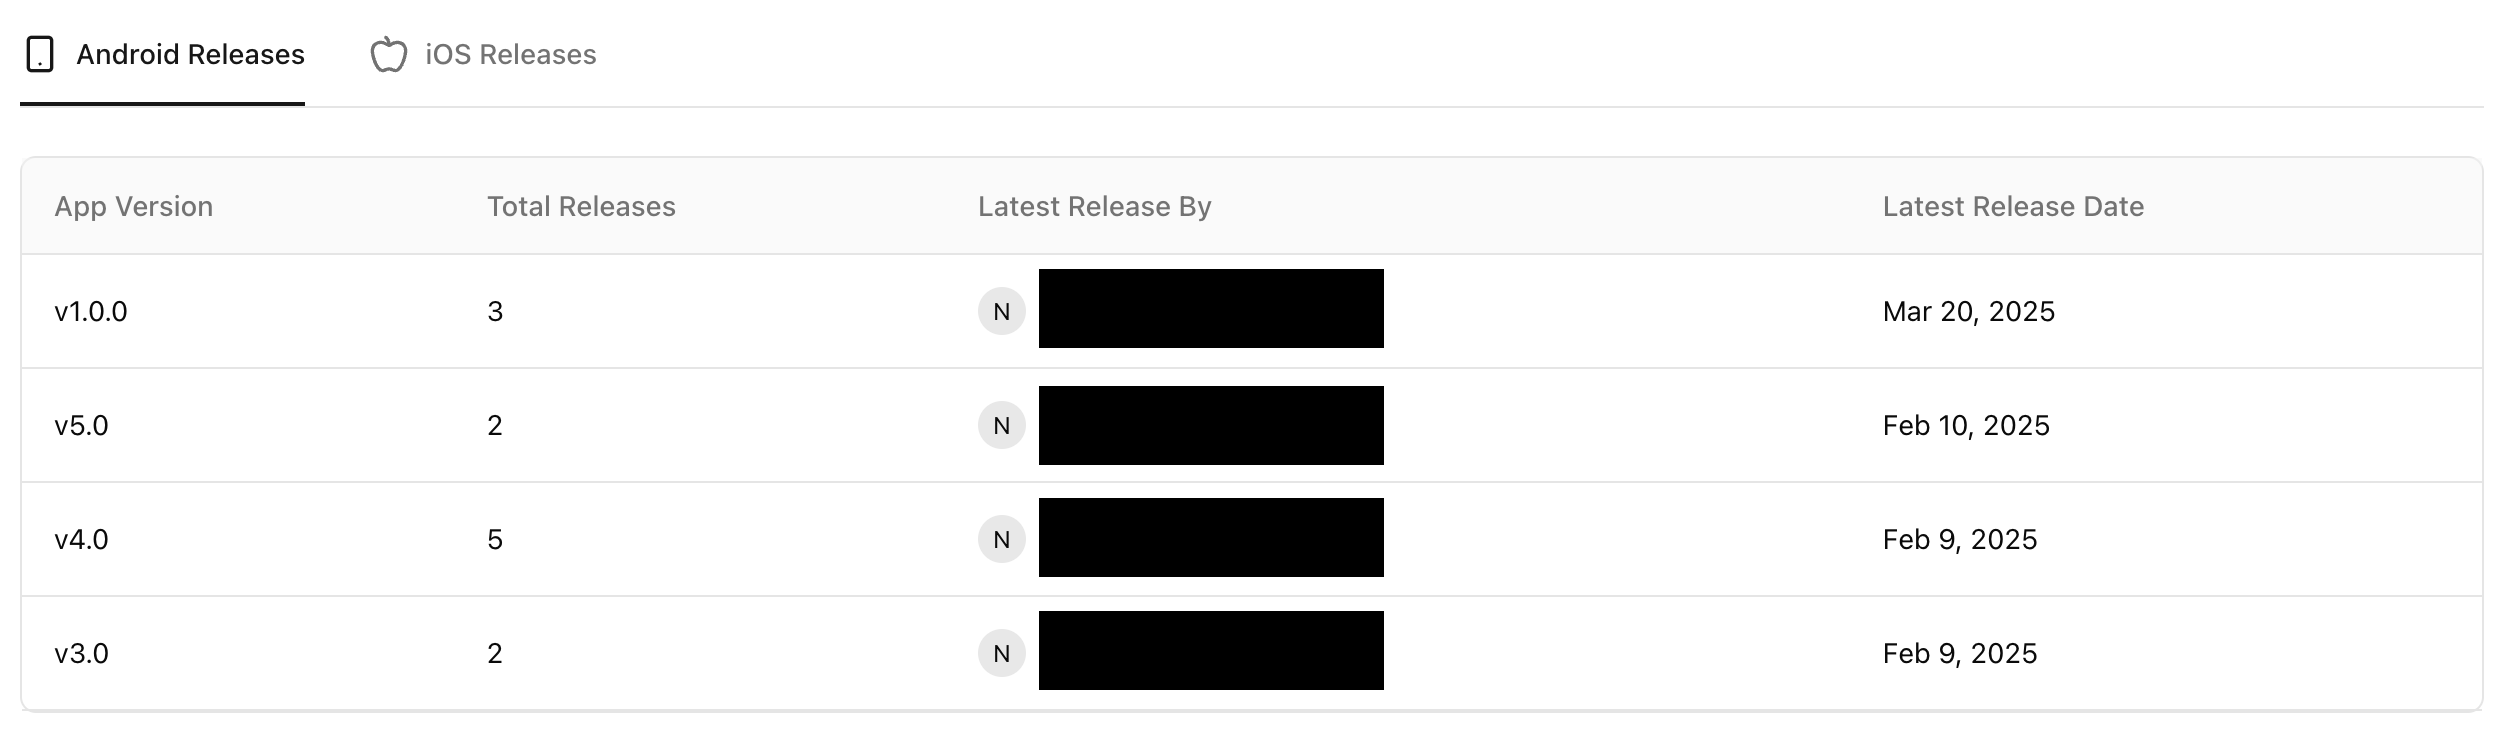
#### Step 3: Test the promoted changes in your app
**Prerequisite**
After installing Stallion, create app build (APK or TestFlight) with Stallion
integrated to test OTA updates. Note: OTA changes won’t apply in dev mode via
Metro bundler — use a published app build to verify.
- Open your React Native app built on the target app version.
- Stallion will check for a new update by default everytime app enters background to foreground state. Wait for the build to download then.
- To make sure that the build was downloaded properly you can verify the adoption numbers in the Stallion Console against your release.
- You can also integrate a custom UI to handle new release downloads. Know how here -
https://learn.stalliontech.io/blogs/react-native-over-the-air-updates-with-custom-ui.
- Finally restart the app, you should be able to validate the changes getting applied.
### Manually pause or rollback a release
A promoted release can be paused or rolled back from the Dashboard by editing the Releases section.
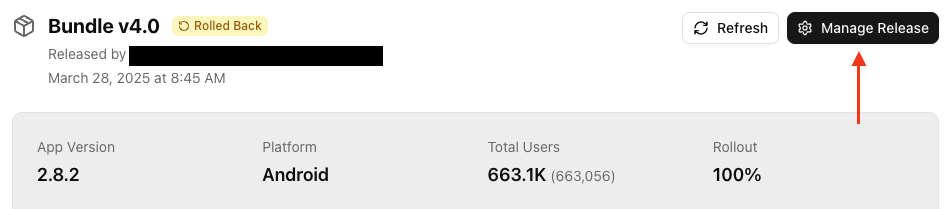
#### Pause
When a release is paused, it will no longer get downloaded for any new users in production. You can also unpause a release later.
#### Rollback
When a release is rolled back manually i.e. from dashboard, it will be removed from the memory and app will fall back to the previous stable release. **Remember that a rolled back release is also paused by default**. Does not get downloaded for any new users. \
\
Manual rollback is useful in case you accidentally send a faulty release to production.
---
# Javascript update API
React Native Stallion JavaScript Update API - Quick reference for the useStallionUpdate hook. Manage OTA updates programmatically with React hooks.
### `useStallionUpdate`
```tsx
import { useStallionUpdate } from "react-native-stallion";
const { isRestartRequired, currentlyRunningBundle, newReleaseBundle } =
useStallionUpdate();
```
| Property | Type | What it tells you |
| ---------------------------- | -------------------------- | ------------------------------------------------------------------------------------------------------- |
| **`isRestartRequired`** | `boolean` | `true` when a newer bundle has finished downloading and the app must restart to install it. |
| **`currentlyRunningBundle`** | `IUpdateMeta \| undefined` | Metadata for the bundle that’s **already running** (version, release notes, `isMandatory`, etc.). |
| **`newReleaseBundle`** | `IUpdateMeta \| undefined` | Metadata for the **downloaded** bundle waiting to be applied. `undefined` until an update is available. |
#### Minimal usage
```tsx
import React from "react";
import { Modal, Text, Button } from "react-native";
import { useStallionUpdate, restart } from "react-native-stallion";
const UpdatePrompt = () => {
const { isRestartRequired, newReleaseBundle } = useStallionUpdate();
if (!isRestartRequired) return null;
return (
{newReleaseBundle?.releaseNote ?? "A new update is ready!"}
);
};
```
That’s all you need—the hook re‑renders automatically when an update arrives. Keep your prompt simple, clear, and fast to act.
👉 **Want to see this in action?** Dive into our guide
[Custom Update UX with Stallion](/blogs/react-native-over-the-air-updates-with-custom-ui)
---
### `IUpdateMeta` Field reference
| Property | Type | Description |
| ---------------- | --------- | ----------------------------------------------------------------- |
| `version` | `number` | Incrementing version or build number of the bundle. |
| `author` | `string` | Username or identifier of the person who uploaded the release. |
| `bucketId` | `string` | Internal storage bucket ID where the bundle is stored. |
| `sha256Checksum` | `string` | SHA-256 checksum of the zipped bundle. |
| `releaseNote` | `string` | Human-readable notes describing what’s in this release. |
| `size` | `number` | Bundle size in **bytes**. |
| `platform` | `string` | Target platform (e.g., `"ios"`, `"android"`). |
| `isCIUploaded` | `boolean` | `true` if the bundle was uploaded via CI pipeline. |
| `isPromoted` | `boolean` | `true` if this bundle has been promoted to production. |
| `createdAt` | `string` | ISO-8601 timestamp when the bundle was created. |
| `updatedAt` | `string` | ISO-8601 timestamp of the last metadata update. |
| `id` | `string` | Unique identifier for the bundle. |
| `isMandatory` | `boolean` | If `true`, the update is mandatory and restart cannot be skipped. |
---
# Stallion Testing
React Native Stallion Testing - Easy distribution of builds to internal team and QA. Test OTA updates in under 60 seconds without rebuilding.
# Stallion Testing
## Why Stallion Testing?
Introducing Stallion Testing –
a product to slash dev-qa turnaround time! Instead of rebuilding for every little JS tweak (which eats up compute time and resources), you can now simply update your JS, deploy the bundle, and voilà – QA (or anyone in the org) can test it in under a minute! Yup, you read that right – less than 60 seconds from code change to live magic 🚀. How crazy is that?! 🤯
### Integrate Stallion Modal in your app
**Prerequisite**
Before continuing, please verify that both the SDK and CLI are installed. If
they aren’t, consult [SDK Installation Guide](/docs/sdk/installation/) and
[CLI Installation Guide](/docs/cli/installation/).
We need to integrate Stallion Modal in the app that gives a UI to manage and download your testing releases.
Add a custom entry point to Stallion Modal UI
Choose any custom entry point in your app. Import `useStallionModal` hook \
\
Trigger showModal from your custom component.
**Tip**
The Stallion SDK entry point is determined by you and is intended only for
**internal users**. Each app can hide this entry point behind more complex UI
elements or a feature flag.
```javascript:MyCustomPageComponent.tsx
import { useStallionModal } from "react-native-stallion";
//This is an example, you can call setShowModal from any custom component
const MyCustomPageComponent: React.FC = () => {
const { showModal } = useStallionModal();
return (
<>
// Other page level components
);
};
```
- Finally
Stallion SDK modal should open by using the custom entry point from above step. All your builds should be available in a list to download and install.
### Setup SDK Security Pin
You can see that when the modal opens, it asks for a security pin. This secuity pin is in place to avoid un authorized acces to your testing sdks.
To generate a new pin follow the following steps:
- Sign in to the Stallion Console and navigate to project settings
- Click on the "Access Tokens" and Set your desired pin
{" "}
**\*Make sure to regularly change the pin**
- Open the Stallion modal in your app and enter the pin.
### Send your first release through Stallion CLI
Publish your first release using Stallion CLI. Run the [Publish Bundle command](/docs/cli/usage-api-reference#publish-bundle).
The command should complete like the screenshot below -
#### Verify the newly published bundle inside the Console
Navigate to your bucket in the Stallion Console to confirm the published bundle. It should appear in the UI, where you can review its details and release notes.
#### Install the bundle inside your app
**Prerequisite**
After installing Stallion, create app build (APK or TestFlight) with Stallion
integrated to test OTA updates. Note: OTA changes won’t apply in dev mode via
Metro bundler — use a published app build to verify.
You can now install the published bundle in any released app where Stallion is installed.
In the Stallion SDK, navigate to the Testing tab to view all available buckets.
Select the desired bucket and download the appropriate bundle.
After the download completes, restart the app to install the newly downloaded build.
This bucket selection is part of the internal testing workflow. See [Stallion Hierarchy](/docs/stallion-hierarchy) for how buckets relate to projects and releases.
**Note**
Stallion lets you seamlessly switch between different versions of your app
without ever modifying the native build. Simply use the Stallion SDK—running
right inside your app—to toggle between builds on the fly. This accelerates
development and testing cycles, boosting overall efficiency.
---
# Distribution
React Native Stallion Distribution - Learn how to distribute and monitor releases. Track adoption metrics and manage OTA update rollouts with analytics. React Native dashboard for OTA updates.
# Distribution
## Rolling Out Release
**Prerequisite**
So far, you should have successfully promoted a bundle to production. If not,
refer to [Production Usage](/docs/sdk/production-usage/).
By default, when a bundle is promoted to production, the initial rollout is set to
0% and only users logged into the SDK will receive the latest update. Now we will
increase the rollout percent to users goto: **Release** > **App version** > **Manage
release**. Increase the slider to your desired percent and click **Update Release**.
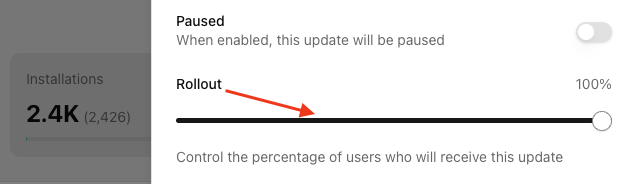
#### How does phased rollout works ?
Phased rollout operates on an algorithm that randomly selects UIDs, which are generated during app initialization by the Stallion SDK.
Each user is identified using their unique UID.
**NOTE**
UID does not persist across installations. This means that if a user
uninstalls and then reinstalls the app, a new UID will be generated for them.
### Release Adoption Dashboard
The React Native Stallion dashboard (also known as the React Native OTA dashboard or dash for React Native) provides powerful metrics of app adoption that gives you valuable insights about your release. The release dashboard is divided into 3 parts.
#### 1. User Count & General Info
The **User Count & General Info** section presents key details about the latest release:
- App Version
- Total Users
- Rollout
- Platform
- Bundle Hash
- Release Note
This information helps track the scope and status of the deployment.
#### 2. Adoption Stats
The **Adoption Stats** section summarizes the number of downloads, installs, and rollbacks:
- Downloads: Total download completes
- Installs: Total installs
- Rollbacks: Total Auto Rollbacks
This data indicates how many users have engaged with the release, successfully installed it, and reverted to a previous version.
#### 3. Adoption Graph
The **Adoption Graph** visualizes trends in **download count, install count, and rollback count** over a period of 1 Month.
---
# API Reference
React Native Stallion API Reference - Complete API documentation for Stallion SDK. JavaScript APIs, hooks, and methods for OTA update management.
### JS APIs
| Method | Description | Example |
| :------------------ | :------------------------------------------------------------------------------------------------------------ | :------------------------------------------------------------------------------------------------------------------------------------------------------------------------------------------------------------------------------------------------------------------------------------------------------------------------------------------------------------------------------------------- |
| `withStallion` | HOC method for Stallion wrapped app | `withStallion(App)` |
| `useStallionModal` | React hook to control Stallion modal | `const { showModal } = useStallionModal();`, then call `showModal` from anywhere |
| `useStallionUpdate` | React hook to get status of a production release | `const { isRestartRequired, currentlyRunningBundle, newReleaseBundle } = useStallionUpdate();`. `isRestartRequired` is a boolean which tells if a new release is available and app needs to be restarted to install the release. `currentlyRunningBundle`, `newReleaseBundle` are objects containing meta information about a Stallion Release like isMandatory, release notes, version etc. |
| `addEventListener` | Function to listen to SDK events related to a Stallion release | `Stallion.addEventListener(callback)`. Callback will return an event object with a `type` and `payload`. Events can be `DOWNLOAD_STARTED`, `DOWNLOAD_COMPLETE`, `INSTALLED_PROD`, `AUTO_ROLLBACK` etc |
| `sync` | Function to manually trigger Stallion workflow to check for a new available release and download it in memory | `import { sync } from "react-native-stallion";`. Trigger this method `sync` from anywhere in your app lifecycle to manually trigger a check workflow. Useful if you want to have a custom download strategy. By default Stallion.sync() is automatically fired everytime app is restarted or resumed. |
| `restart` | Function to manually trigger an app restart for React Native apps | `import { restart } from "react-native-stallion";`. Call `restart` method from inside your custom popups / user interfaces to trigger an app relaunch. |
### Android APIs
| Method | Description | Example |
| :---------------- | :---------------------------------------------------------------------------------------------------------------------------------------------------------------------------------- | :----------------------------------------------------------------------------------- |
| `getJSBundleFile` | Function to receive the JS bundle URL for your RN app. It expects 2 arguments. 2nd argument is optional - `getJSBundleFile(, )` | `Stallion.getJSBundleFile(getApplicationContext(), "assets://index.android.bundle")` |
### iOS APIs
| Method | Description | Example |
| :------------- | :------------------------------------------------------------------------------------------------------------------------------------------------------ | :------------------------------------------------------------------------------------------------------- |
| `getBundleURL` | Function to receive the JS bundle URL for your RN app. It expects 1 optional parameter - `[StallionModule getBundleURL:` | `[StallionModule getBundleURL:[[NSBundle mainBundle] URLForResource:@"main" withExtension:@"jsbundle"]]` |
---
# Stallion New CLI (v2.1.0+)
React Native Stallion CLI installation - Install Stallion CLI globally for React Native OTA updates. Supports npm and yarn installation. Global CLI setup guide.
**🎉 New Feature**
Stallion CLI now supports global installation! Install once, use everywhere.
React Native Stallion CLI enables you to push bundles that automatically creates a corresponding version that is available instantly to be downloaded and tested
### Global Installation Benefits
The global installation of React Native Stallion CLI offers several advantages:
- Access the CLI from any directory in your system
- No need to reinstall for each project
- Consistent version across all your projects
- Access stallion-cli directly using `stallion ` syntax
### Open Source & Contributions
React Native Stallion CLI is **open-source**!
Interested in helping us improve? Check out our [GitHub Repository](https://github.com/stallion-tech/stallion-cli) to get started! From feature suggestions to bug fixes, all contributions are welcome.
### Installation
You can now install the React Native Stallion CLI globally using npm or yarn for seamless access across your system.
With npm:
```bash
npm install -g stallion-cli
```
With Yarn:
```bash
yarn global add stallion-cli
```
### Usage
For usage and API Reference provided by React Native Stallion CLI check the [Usage Documentation](/docs/cli/usage-api-reference).
---
# Publish Bundle Usage & API Reference
React Native Stallion CLI Usage & API Reference - Complete CLI documentation for publishing bundles, managing releases, and automating OTA updates.
## Login
Before accessing any features, you must log in to the CLI while ensuring you are in a React Native project directory.
```bash
stallion login
```
Executing this command will launch a web browser where you need to log in. Once logged in, click **Copy Access Token**, then return to the terminal and paste the token.
## Publish Bundle
**Prerequisite**
Every published bundle is stored in a Bucket. Before publishing your first
bundle, make sure a Bucket is created in the [**Stallion
Console**](https://console.stalliontech.io/)
After successfully logging in, you can use the `publish-bundle` command to deploy packages for both Android and iOS.
**Note**: You can use only one platform at a time — either **ios** or **android**.
```bash
stallion publish-bundle --upload-path=orgname/project-name/bucket-name --platform=android/ios --release-note="notes"
```
Example:
```bash
stallion publish-bundle --upload-path=my-org/my-project/my-bucket --platform=android --release-note="my release"
```
**Tip**
You can access `orgname/project-name/bucket-name` required in command above
using the `Copy bundle path` shortcut in [**Stallion
Console**](https://console.stalliontech.io/) inside your bucket's lising page.
### Params
1. `--upload-path`
Specifies the target location for uploading the current bundle:
```bash
--upload-path=testorg/firstproject/featurebucket
# testorg is org name
# firstproj is project name
# featurebucket is bucket name
```
You can find and copy the upload path from the Bucket Overview page in the Stallion Dashboard Console.
2. `--platform`
Defines the platform for which the bundle will be published (android or ios):
```bash
--platform=android
```
3. `--release-note` **(Optional)**
Allows you to add release notes for the bundle:
```bash
--release-note="changed something"
```
4. `--hermes-disabled` **(Optional)**
This flag is set to false by default, but you can enable it if needed.
**Info**
Hermes is enabled by default in Stallion CLI. If you want to disable hermes
then set this flag to true.
```bash
--hermes-disabled=true
```
5. `--ci-token` **(Optional: For release automation)**
Used for overriding the user token, especially recommended for CI pipelines:
```bash
--ci-token="your-CI-token"
```
You can generate CI Token from the dashboard under project settings.
**NOTE:** This command will output the bundle hash which can be used for further automation commands check [**Release Automation**](https://learn.stalliontech.io/docs/release-automation)
6. `--private-key` **(Optional, v2.1.0+)**
**Available only in Stallion CLI v2.1.0 and above**
The `--private-key` flag is not supported in earlier versions of the Stallion CLI.
Make sure you’ve updated before using this feature:
Use this to sign the bundle with your private key before publishing. This enables secure OTA verification at runtime.
```bash title="Example"
--private-key="./stallion/secrets/private-key.pem"
```
7. `--custom-bundle-path` **(Optional)**
When provided, Stallion skips the React Native bundling step and Hermes conversion and directly packages/signs the directory you point to (for example, Expo embedded bundles).
Not allowed with: `--hermes-disabled`, `--entry-file`, `--hermes-logs`, `--hermesc-path`, `--sourcemap`, `--keep-artifacts`.
**Introduced in**
The `--custom-bundle-path` flag was introduced in **stallion-cli v2.4.3**.
```bash title="Example (Expo embedded bundles)"
--custom-bundle-path=build-ios
```
8. `--entry-file` **(Optional)**
Specifies the JavaScript entry file to bundle (default is `index.js`).
```bash title="Example"
--entry-file="index.debug.js"
```
9. `--keep-artifacts` **(Optional: used for CI/debugging)**
Controls whether Stallion keeps the produced bundle/sourcemap artifacts on disk so you can reliably pick them up later (for example, to upload to error tracking tools).
Only enabled when you pass the flag (otherwise artifacts won’t be written to `stallion-artifacts/`).
```bash title="Example"
--keep-artifacts=true
```
10. `--sourcemap` **(Optional: used for CI/debugging)**
Controls whether Stallion generates source maps during publish. When you also pass `--keep-artifacts`, you can upload the generated source maps in a deterministic CI step.
Only enabled when you pass the flag.
**Introduced in**
Source map export was introduced in **stallion-cli v2.4.0**.
```bash title="Example"
--sourcemap=true
```
11. `--json` **(Optional: for scripting)**
**Available in stallion-cli@2.6.0-alpha.2**
The `--json` flag is currently available in **stallion-cli@2.6.0-alpha.2**. Install it with `npm install -g stallion-cli@2.6.0-alpha.2`.
Prints only a JSON result on stdout (progress and diagnostics go to stderr), so the output can be piped directly into scripts:
```json title="Output shape"
{ "version": 12, "hash": "6c8a45…", "platform": "android", "uploadPath": "acme/my-project/featurebucket", "bucketCreated": false }
```
See [**CI Automation & JSON Output**](/docs/cli/ci-automation-json-output) for end-to-end pipeline examples.
## Generate Key Pairs
**Available only in Stallion CLI v2.1.0 and above**
The generate-key-pair command is used specifically for bundle signing in Stallion's OTA infrastructure.
To learn more about how bundle signing works—including signing, verification, and runtime enforcement—refer to the [**Bundle Signing**](https://learn.stalliontech.io/docs/bundle-signing) of the SDK documentation.
Generate a secure public-private key pair to enable **digital signing of bundles** in Stallion OTA workflows.
To generate a key pair, run:
```bash
stallion generate-key-pair
```
This command creates a .stallion directory in your working path, with signing keys stored inside:
```
stallion/secrets/
├── private-key.pem 🔒 Keep this secret. Used to sign bundles.
└── public-key.pem 🔓 Safe to distribute. Used to verify signatures.
```
## Logout
To switch accounts, you can log out of the CLI at any time.
```bash
stallion logout
```
---
# Release Bundle Usage & API Reference
React Native Stallion CLI Release Bundle API - Learn how to release bundles using Stallion CLI. API reference for OTA update releases.
**Prerequisite**
This command requires a CI Token. It will not function without one and is intended specifically for automated workflows.
## Generating a CI Token
Before using the `release-bundle` command, ensure you have generated a CI token via the Stallion Console by navigating to:
**Project Settings > Access Tokens > Generate CI Token**
## Releasing a Bundle
Once you have a valid CI Token, you can release a previously published bundle using the `release-bundle` command.
**Note:** The platform is automatically detected based on the platform specified during the bundle publishing step.
```bash
stallion release-bundle \
--project-id= \
--hash= \
--app-version= \
--release-note="Your release note" \
--ci-token=
```
### Example
```bash
stallion release-bundle \
--project-id=64f5f341a43eb5ccf93548e4 \
--hash=6c8a45dcf5a3e983e389afada81449b2b326b2540758a55ca2227902a55f7e2a \
--app-version=1.0.1 \
--release-note="First test CI release" \
--ci-token=stl_zKNKb6JvW80DemZNomJF8EgxHo-KNcVo_u
```
### Parameters
**1. `--project-id`**
Specifies the project ID. You can find this in the **Project Settings** section of the Stallion Console.
```bash
--project-id=your-project-id
```
**2. `--hash`**
The unique hash of the bundle that was published using the `publish-bundle` command.
```bash
--hash=your-bundle-hash
```
**3. `--app-version`**
The target app version that this bundle is associated with. It should match the version of your Android/iOS application.
```bash
--app-version=1.0.1
```
**4. `--release-note`**
A short description of what this release contains.
```bash
--release-note="your release note"
```
**5. `--ci-token`**
A required token used for CI/CD automation.
```bash
--ci-token="your-CI-token"
```
**6. `--is-mandatory` (Optional, default: false)**
Marks the release as mandatory. If not provided, the release is considered optional.
```bash
--is-mandatory=true
```
**7. `--is-paused` (Optional, default: false)**
Indicates whether the release should be paused.
```bash
--is-paused=true
```
**8. `--json` (Optional: for scripting)**
**Available in stallion-cli@2.6.0-alpha.2**
The `--json` flag is currently available in **stallion-cli@2.6.0-alpha.2**. Install it with `npm install -g stallion-cli@2.6.0-alpha.2`.
Prints only a JSON result on stdout (progress and diagnostics go to stderr), so the output can be piped directly into scripts:
```json title="Output shape"
{ "id": "6650a2c1…", "version": 12, "appVersion": "1.0.1", "hash": "6c8a45…", "projectId": "64f5f341…" }
```
See [**CI Automation & JSON Output**](/docs/cli/ci-automation-json-output) for end-to-end pipeline examples.
**Note**
Default rollout percent when a bundle is released is 0%. For updating the rollout percent please use `update-release` command.
## Release Automation Using GitHub Actions
To automate the release process using GitHub Actions, refer to the following documentation:
[**Release Automation using GitHub Actions**](/docs/release-automation#example-github-actions-workflow)
---
# Update Release Usage & API Reference
React Native Stallion CLI Update Release API - Learn how to update existing releases using Stallion CLI. Modify rollout percentages and release settings.
**Prerequisite**
This command requires a CI Token. It will not function without one and is intended specifically for automated workflows.
## Generating a CI Token
Before using the `update-release` command, ensure you have generated a CI token via the Stallion Console by navigating to:
**Project Settings > Access Tokens > Generate CI Token**
## Updating a Release
Once you have a valid CI Token, you can update an existing release — rollout percentage, pause state, rollback, and more — using the `update-release` command.
**Note:** The platform is automatically detected based on the platform specified during the bundle publishing step.
```bash
stallion update-release \
--project-id= \
--hash= \
--release-note="Updated release note" \
--rollout-percent= \
--is-mandatory= \
--ci-token=
```
### Example
```bash
stallion update-release \
--project-id=64f5f341a43eb5ccf93548e4 \
--hash=6c8a45dcf5a3e983e389afada81449b2b326b2540758a55ca2227902a55f7e2a \
--release-note="First test CI release" \
--rollout-percent=27 \
--is-mandatory=true \
--ci-token=stl_zKNKb6JvW80DemZNomJF8EgxHo
```
### Parameters
**1. `--project-id`**
Specifies the project ID. You can find this in the **Project Settings** section of the Stallion Console.
```bash
--project-id=your-project-id
```
**2. `--hash`**
The unique hash of the bundle that was published using the `publish-bundle` command.
```bash
--hash=your-bundle-hash
```
**3. `--release-note` (Optional)**
A short description of what this release contains.
```bash
--release-note="your release note"
```
**4. `--ci-token`**
A required token used for CI/CD automation.
```bash
--ci-token="your-CI-token"
```
**5. `--is-mandatory` (Optional, default: false)**
Marks the release as mandatory. If not provided, the release is considered optional.
```bash
--is-mandatory=true
```
**6. `--is-paused` (Optional, default: false)**
Indicates whether the release should be paused.
```bash
--is-paused=true
```
**7. `--is-rolled-back` (Optional, default: false)**
Indicates whether the release should be rolled back to a previous stable version.
```bash
--is-rolled-back=true
```
**8. `--rollout-percent` (Optional)**
Sets the rollout percentage of the release (0–100). Useful for phased rollouts — start low and ramp up.
```bash
--rollout-percent=50
```
**9. `--json` (Optional: for scripting)**
**Available in stallion-cli@2.6.0-alpha.2**
The `--json` flag is currently available in **stallion-cli@2.6.0-alpha.2**. Install it with `npm install -g stallion-cli@2.6.0-alpha.2`.
Prints only a JSON result of the updated fields on stdout (progress and diagnostics go to stderr), so the output can be piped directly into scripts:
```json title="Output shape"
{ "projectId": "64f5f341…", "hash": "6c8a45…", "rolloutPercent": 50, "isMandatory": true, "isPaused": false, "isRolledBack": false }
```
See [**CI Automation & JSON Output**](/docs/cli/ci-automation-json-output) for end-to-end pipeline examples.
## Release Automation Using GitHub Actions
To automate the release process using GitHub Actions, refer to the following documentation:
[**Release Automation using GitHub Actions**](docs/release-automation#example-github-actions-workflow)
---
# Account & Context Commands Overview
Stallion CLI account and context commands - Check who is logged in and set a default org and project so every command runs with fewer flags and prompts.
**Available in stallion-cli@2.6.0-alpha.2**
The account & context commands are currently available in **stallion-cli@2.6.0-alpha.2**. Install it with:
```bash
npm install -g stallion-cli@2.6.0-alpha.2
```
Stallion CLI commands operate on an **organization** and a **project**. Instead of passing `--org-id` and `--project-id` to every command (or answering prompts each time), you can save a default **context** once and let every subsequent command pick it up automatically.
Three commands manage your account session and context:
| Command | Alias | What it does |
| --- | --- | --- |
| [`stallion whoami`](/docs/cli/account-context-commands/whoami) | `me` | Show the logged-in user, their organizations, and the active context |
| [`stallion use`](/docs/cli/account-context-commands/use) | `u` | Set the default org and project used by other commands |
| [`stallion context`](/docs/cli/account-context-commands/context) | `ctx` | Show or clear the saved context |
## Typical Workflow
```bash
# 1. Log in (opens the browser)
stallion login
# 2. Pick your default org and project (interactive)
stallion use
# 3. Verify what is set
stallion whoami
# 4. Run any command — no --org-id / --project-id needed
stallion list-buckets
```
**Tip**
The saved context is a default, not a lock. Any command that accepts
`--org-id` or `--project-id` can override it for a single run, and you can
switch anytime with `stallion use`.
---
# whoami
Stallion CLI whoami command - Show the logged-in user, their email, organizations, and the currently active org/project context.
Shows who is logged in to the Stallion CLI, which organizations the account belongs to, and which context (org/project) is currently active.
```bash
stallion whoami
```
Alias:
```bash
stallion me
```
## Output
The command prints:
- **session** — whether your session token is valid
- **user / email** — the logged-in account
- **context** — the active project and org set via [`stallion use`](/docs/cli/account-context-commands/use), or `not set`
- **organizations** — every org you belong to, with its region and your access level; the org from your current context is highlighted
```txt title="Example output"
✔ session authorized
✔ user Jane Doe
✔ email jane@acme.com
● context my-project · acme
organizations
1. acme ap · admin ← current
2. acme-labs us · member
```
## Parameters
This command takes no parameters. It requires you to be logged in — run `stallion login` first if the session check fails.
---
# use
Stallion CLI use command - Set a default organization and project once so all other CLI commands run without repeating --org-id and --project-id.
Sets the default **organization** and **project** used by other CLI commands. Once a context is saved, commands like `list-buckets`, `list-bundles`, and `list-releases` run against it automatically — no flags, no prompts.
```bash
stallion use
```
Alias:
```bash
stallion u
```
Run without flags, the command walks you through two interactive pickers:
1. **Select an organization** — shows each org with its region and id
2. **Select a project** — shows each project with its enabled platforms and id
The org's region is detected automatically and saved as part of the context.
```txt title="Example"
✔ Context set: acme / my-project (ap)
Commands now default to this context. Override with flags, or change it with "stallion use".
```
## Parameters
Both parameters are optional — anything you don't pass is prompted for.
**1. `--org-id` (Optional)**
Skip the organization picker by passing the org id directly. Fails if the org is not part of your account.
```bash
--org-id=64f5f341a43eb5ccf93548e4
```
**2. `--project-id` (Optional)**
Skip the project picker by passing the project id directly. Fails if the project is not part of the selected organization.
```bash
--project-id=6650a2c1b7f93548e4d21a77
```
```bash title="Fully non-interactive example"
stallion use --org-id=64f5f341a43eb5ccf93548e4 --project-id=6650a2c1b7f93548e4d21a77
```
**Tip**
Check what is currently set with
[`stallion context`](/docs/cli/account-context-commands/context), and clear
it with `stallion context --clear`.
---
# context
Stallion CLI context command - Show or clear the saved default org/project context used by other Stallion CLI commands.
Shows the currently saved org/project context, or clears it. The context is what [`stallion use`](/docs/cli/account-context-commands/use) saved and what other commands fall back to when `--org-id` / `--project-id` are not passed.
```bash
stallion context
```
Alias:
```bash
stallion ctx
```
```txt title="Example output"
Context
Org acme
Org Id 64f5f341a43eb5ccf93548e4
Region ap
Project my-project
Project Id 6650a2c1b7f93548e4d21a77
```
If nothing is set, the command tells you to run `stallion use` first.
## Parameters
**1. `--clear` (Optional)**
Clears the saved context. Commands go back to prompting for org and project.
```bash
stallion context --clear
```
**2. `--json` (Optional)**
Prints the raw context as JSON — useful for scripting.
```bash
stallion context --json
```
```json title="Example JSON output"
{
"orgId": "64f5f341a43eb5ccf93548e4",
"orgName": "acme",
"region": "ap",
"projectId": "6650a2c1b7f93548e4d21a77",
"projectName": "my-project"
}
```
---
# List Commands Overview
Stallion CLI list commands - Inspect projects, buckets, bundles, releases, and patches straight from the terminal without opening the Stallion Console.
**Available in stallion-cli@2.6.0-alpha.2**
The list commands are currently available in **stallion-cli@2.6.0-alpha.2**. Install it with:
```bash
npm install -g stallion-cli@2.6.0-alpha.2
```
The list commands let you inspect everything you'd otherwise open the [Stallion Console](https://console.stalliontech.io/) for — projects, buckets, staging bundles, production releases, and delta patches — directly from the terminal.
| Command | Alias | What it lists |
| --- | --- | --- |
| [`stallion list-projects`](/docs/cli/list-commands/list-projects) | `lp` | Projects in an organization |
| [`stallion list-buckets`](/docs/cli/list-commands/list-buckets) | `lb` | Buckets in a project |
| [`stallion list-bundles`](/docs/cli/list-commands/list-bundles) | `lbd` | Staging bundles in a bucket (with the hash used for release) |
| [`stallion list-releases`](/docs/cli/list-commands/list-releases) | `lr` | Production releases for an app version |
| [`stallion release-info`](/docs/cli/list-commands/release-info) | `ri` | Full detail of a single production release |
| [`stallion list-patches`](/docs/cli/list-commands/list-patches) | `lpt` | Delta patches generated toward a release bundle |
## How They Behave
**Context aware.** Every list command resolves its org and project from the context saved with [`stallion use`](/docs/cli/account-context-commands/use). Anything missing is asked via an interactive picker, and any value can be overridden per-run with `--org-id` / `--project-id`.
**Capped output.** Listings show the **15 most recent** entries by default. Commands that support `--limit` can raise this to a maximum of **30**; for the full history, use the Console.
**Scriptable.** Every list command supports `--json` for raw machine-readable output, and most support `--ci-token` for non-interactive use in pipelines. See [CI Automation & JSON Output](/docs/cli/ci-automation-json-output).
## Typical Flow
```bash
stallion use # set org + project once
stallion list-buckets # find your bucket
stallion list-bundles # grab a bundle hash from staging
stallion list-releases # check what's live in production
stallion release-info # drill into one release's rollout & adoption
stallion list-patches --hash= # inspect delta patch sizes
```
---
# list-projects
Stallion CLI list-projects command - List all projects in a Stallion organization from the terminal, including enabled platforms.
Lists the projects in an organization, along with the platforms (android/ios) enabled for each. The project from your current context is highlighted.
```bash
stallion list-projects
```
Alias:
```bash
stallion lp
```
```txt title="Example output"
projects
1. my-project android·ios ← current
2. beta-app android
3. internal-tools —
3 projects
```
The 15 most recently updated projects are shown; if your org has more, the footer links to the [Stallion Console](https://console.stalliontech.io/) for the full list.
## Parameters
**1. `--org-id` (Optional)**
Organization to list projects from. Falls back to the saved context; prompts if neither is available.
```bash
--org-id=64f5f341a43eb5ccf93548e4
```
**2. `--json` (Optional)**
Prints the raw project list as JSON instead of the table — useful for scripting.
```bash
stallion list-projects --json
```
---
# list-buckets
Stallion CLI list-buckets command - List the buckets in a Stallion project, filter by name, and script it in CI with --ci-token and --json.
Lists the buckets in a project with their last-updated time. Buckets are upload folders where published bundles are stored — name them however you want. See [Stallion Hierarchy](/docs/stallion-hierarchy).
This is the fastest way to find the bucket name you need for `publish-bundle` or `list-bundles`.
```bash
stallion list-buckets
```
Alias:
```bash
stallion lb
```
```txt title="Example output"
Buckets
NAME UPDATED
featurebucket 2026-07-01T10:24:11.000Z
hotfixes 2026-06-28T18:02:45.000Z
2 buckets
```
## Parameters
**1. `--org-id` (Optional)**
Organization id. Falls back to the saved context; prompts if neither is available.
**2. `--project-id` (Optional)**
Project id. Falls back to the saved context; prompts if neither is available. **Required when using `--ci-token`.**
**3. `--name` (Optional)**
Filter buckets by name — case-insensitive substring match.
```bash
--name=feature
```
**4. `--limit` (Optional, default: 15, max: 30)**
Maximum number of buckets to show, most recently updated first.
```bash
--limit=30
```
**5. `--ci-token` (Optional: for CI pipelines)**
Runs the command non-interactively using a CI token instead of your user session. Requires `--project-id`.
```bash
stallion list-buckets --ci-token= --project-id=
```
**6. `--json` (Optional)**
Prints the raw bucket list as JSON instead of the table — useful for scripting. See [CI Automation & JSON Output](/docs/cli/ci-automation-json-output).
```bash
stallion list-buckets --json
```
---
# list-bundles
Stallion CLI list-bundles command - List the staging bundles in a bucket, including the bundle hash needed for release-bundle, with CI and JSON support.
Lists the staging bundles in a bucket — version, platform, whether the bundle has been promoted, author, release note, and most importantly the **bundle hash** you pass to [`release-bundle`](/docs/cli/release-bundle-api-reference) when promoting to production.
```bash
stallion list-bundles
```
Alias:
```bash
stallion lbd
```
If no bucket is passed, an interactive picker lists the buckets in your project.
```txt title="Example output"
Bundles
Version Platform Promoted Created author ReleaseNote Hash
12 android true 2026-07-01T10:24:11.000Z jane@acme.com fix crash 6c8a45dcf5a3e983e389afada8144…
11 android false 2026-06-28T18:02:45.000Z jane@acme.com new onboarding 9d1b32acf7e6d072c114bfe631200…
2 bundles
```
## Parameters
**1. `--org-id` (Optional)**
Organization id. Falls back to the saved context; prompts if neither is available.
**2. `--project-id` (Optional)**
Project id. Falls back to the saved context; prompts if neither is available. **Required when using `--ci-token`.**
**3. `--bucket` (Optional)**
Bucket name to list bundles from. Prompts with a picker if omitted.
```bash
--bucket=featurebucket
```
**4. `--bucket-id` (Optional)**
Bucket id — an alternative to `--bucket` when you have the id handy.
**5. `--platform` (Optional)**
Filter bundles by platform: `android` or `ios`.
```bash
--platform=android
```
**6. `--limit` (Optional, default: 15, max: 30)**
Maximum number of bundles to show, most recent first.
**7. `--ci-token` (Optional: for CI pipelines)**
Runs the command non-interactively using a CI token. Requires `--project-id` and one of `--bucket` / `--bucket-id`.
```bash
stallion list-bundles \
--ci-token= \
--project-id= \
--bucket=featurebucket
```
**8. `--json` (Optional)**
Prints the raw bundle list as JSON instead of the table — useful for extracting the hash in scripts. See [CI Automation & JSON Output](/docs/cli/ci-automation-json-output).
```bash title="Grab the latest bundle hash in a script"
stallion list-bundles --json --bucket=featurebucket | jq -r '.[0].sha256Checksum'
```
---
# list-releases
Stallion CLI list-releases command - List the production releases for an app version with rollout percentage and live/paused/rolled-back status.
Lists the production releases for a given app version — bundle version, who released it, rollout percentage, live/paused/rolled-back status, release note, and the **release id** you pass to [`release-info`](/docs/cli/list-commands/release-info).
```bash
stallion list-releases
```
Alias:
```bash
stallion lr
```
Anything you don't pass is prompted interactively: platform, then a picker of app versions (with release counts) for your project.
```txt title="Example output"
releases · v1.0.1
Version Released by Rollout Status Release note Release ID
v12 jane@acme.com ████████░░ 80% ✔ live fix crash 6650a2c1b7f93548e4d21a77
v11 jane@acme.com ██████████ 100% ✖ rolled back bad build 6650a2c1b7f93548e4d21a12
2 releases · v1.0.1
```
## Parameters
**1. `--org-id` (Optional)**
Organization id. Falls back to the saved context; prompts if neither is available.
**2. `--project-id` (Optional)**
Project id. Falls back to the saved context; prompts if neither is available. **Required when using `--ci-token`.**
**3. `--platform` (Optional)**
Platform to list releases for: `android` or `ios`. Prompts if omitted. **Required when `--app-version` is provided.**
```bash
--platform=android
```
**4. `--app-version` (Optional)**
The app version whose releases you want. Prompts with a version picker if omitted. **Required when using `--ci-token`.**
```bash
--app-version=1.0.1
```
**5. `--limit` (Optional, default: 15, max: 30)**
Maximum number of releases to show, most recent first.
**6. `--ci-token` (Optional: for CI pipelines)**
Runs the command non-interactively using a CI token. Requires `--project-id`, `--platform`, and `--app-version`.
```bash
stallion list-releases \
--ci-token= \
--project-id= \
--platform=android \
--app-version=1.0.1
```
**7. `--json` (Optional)**
Prints the raw release list as JSON instead of the table. See [CI Automation & JSON Output](/docs/cli/ci-automation-json-output).
```bash
stallion list-releases --json --platform=android --app-version=1.0.1
```
---
# release-info
Stallion CLI release-info command - Inspect a single production release in depth: rollout, total users, health status, and adoption metrics.
Shows the full detail of a single production release — bundle version and hash, rollout progress, health status, release note, and adoption metrics (downloads, installs, rollbacks, users).
```bash
stallion release-info
```
Alias:
```bash
stallion ri
```
Anything you don't pass is prompted interactively: platform, app version, then the release itself.
```txt title="Example output"
✔ build v12 · 6c8a45dcf5a3
✔ platform android
● rollout ████████░░ 80%
● total users 12,431
release note
fix crash on cold start
bundle hash
6c8a45dcf5a3e983e389afada81449b2b326b2540758a55ca2227902a55f7e2a
✔ healthy · no rollback configured
Adoption Metrics
DOWNLOADS INSTALLS ROLLBACKS USERS
11,204 10,988 14 12,431
```
A rolled-back release shows `rolled back · review required`, and a paused one shows `paused · rollout halted`.
## Parameters
**1. `--org-id` (Optional)**
Organization id. Falls back to the saved context; prompts if neither is available.
**2. `--project-id` (Optional)**
Project id. Falls back to the saved context; prompts if neither is available. **Required when using `--ci-token`.**
**3. `--platform` (Optional)**
`android` or `ios`. Prompts if omitted. **Required when `--app-version` is provided.**
**4. `--app-version` (Optional)**
The app version the release belongs to. Prompts with a picker if omitted. **Required when `--promoted-id` is provided.**
**5. `--promoted-id` (Optional)**
The release id, as shown in the **Release ID** column of [`list-releases`](/docs/cli/list-commands/list-releases). Prompts with a release picker if omitted. Requires `--platform` and `--app-version` when passed.
```bash
--promoted-id=6650a2c1b7f93548e4d21a77
```
**6. `--ci-token` (Optional: for CI pipelines)**
Runs the command non-interactively using a CI token. Requires `--project-id`, `--platform`, `--app-version`, and `--promoted-id`.
```bash
stallion release-info \
--ci-token= \
--project-id= \
--platform=android \
--app-version=1.0.1 \
--promoted-id=6650a2c1b7f93548e4d21a77
```
**7. `--json` (Optional)**
Prints the full release detail as JSON — including event counts — instead of the formatted view. See [CI Automation & JSON Output](/docs/cli/ci-automation-json-output).
```bash title="Check rollout percent in a script"
stallion release-info --json ... | jq '.rolloutPercent'
```
---
# list-patches
Stallion CLI list-patches command - List the delta patches generated toward a release bundle and compare patch size against full bundle size.
Lists the delta patches generated toward a release bundle — which older releases can patch-update to it, and how small the patch is compared to the full bundle. Useful for verifying that [Patch Updates](/docs/patch-updates/how-it-works) are being generated for your releases.
```bash
stallion list-patches --hash=
```
Alias:
```bash
stallion lpt --hash=
```
```txt title="Example output"
Patches
From To DiffSize PatchSize
v11 · 1.0.1 v12 · 1.0.1 1.82 MB 214.3 KB
v10 · 1.0.0 v12 · 1.0.1 2.10 MB 402.7 KB
2 patches · 6c8a45dcf5a3…
```
If no patches exist yet, that's expected for a brand-new release — patches are generated when a newer release can delta-update from this bundle.
## Parameters
**1. `--hash` (Required)**
The release bundle hash to inspect. Copy it from the **Hash** column of [`list-bundles`](/docs/cli/list-commands/list-bundles) or the bundle hash shown by [`release-info`](/docs/cli/list-commands/release-info).
```bash
--hash=6c8a45dcf5a3e983e389afada81449b2b326b2540758a55ca2227902a55f7e2a
```
**2. `--org-id` (Optional)**
Organization id. Falls back to the saved context; prompts if neither is available.
**3. `--project-id` (Optional)**
Project id. Falls back to the saved context; prompts if neither is available. **Required when using `--ci-token`.**
**4. `--ci-token` (Optional: for CI pipelines)**
Runs the command non-interactively using a CI token. Requires `--project-id`.
```bash
stallion list-patches \
--ci-token= \
--project-id= \
--hash=
```
**5. `--json` (Optional)**
Prints the raw patch list as JSON instead of the table. See [CI Automation & JSON Output](/docs/cli/ci-automation-json-output).
```bash
stallion list-patches --json --hash=
```
---
# CI Automation & JSON Output
Stallion CLI CI automation - Run every CLI command non-interactively with --ci-token and parse machine-readable results with --json in your release pipelines.
**Available in stallion-cli@2.6.0-alpha.2**
The `--json` flag and CI support for the list commands are currently available in **stallion-cli@2.6.0-alpha.2**. Install it with:
```bash
npm install -g stallion-cli@2.6.0-alpha.2
```
Two flags make the Stallion CLI fully scriptable:
- **`--ci-token`** — authenticates with a CI token instead of an interactive login session, so commands run headless in pipelines
- **`--json`** — replaces the human-friendly output with a single machine-readable JSON result on stdout
Together they let you build end-to-end release automation: publish a bundle, promote it, ramp the rollout, and verify adoption — all from a CI job.
## Generating a CI Token
Generate a CI token in the [Stallion Console](https://console.stalliontech.io/) under:
**Project Settings > Access Tokens > Generate CI Token**
## Non-Interactive Usage with `--ci-token`
Interactive prompts (org pickers, project pickers, version pickers) are unavailable in CI, so each command requires enough flags to resolve everything up front:
| Command | Required with `--ci-token` |
| --- | --- |
| `publish-bundle` | `--upload-path`, `--platform` |
| `release-bundle` | `--project-id`, `--hash`, `--app-version`, `--release-note` |
| `update-release` | `--project-id`, `--hash` |
| `list-buckets` | `--project-id` |
| `list-bundles` | `--project-id`, `--bucket` or `--bucket-id` |
| `list-releases` | `--project-id`, `--platform`, `--app-version` |
| `release-info` | `--project-id`, `--platform`, `--app-version`, `--promoted-id` |
| `list-patches` | `--project-id`, `--hash` |
## Machine-Readable Output with `--json`
With `--json`, **stdout carries only the JSON result** — progress bars, spinners, and status messages are kept off it (diagnostics go to stderr). That means you can pipe the output straight into `jq` or capture it in a variable without any cleanup.
Output shapes:
```json title="publish-bundle --json"
{ "version": 12, "hash": "6c8a45…", "platform": "android", "uploadPath": "acme/my-project/featurebucket", "bucketCreated": false }
```
```json title="release-bundle --json"
{ "id": "6650a2c1…", "version": 12, "appVersion": "1.0.1", "hash": "6c8a45…", "projectId": "64f5f341…" }
```
```json title="update-release --json"
{ "projectId": "64f5f341…", "hash": "6c8a45…", "rolloutPercent": 50, "isMandatory": true, "isPaused": false, "isRolledBack": false }
```
The list commands (`list-projects`, `list-buckets`, `list-bundles`, `list-releases`, `list-patches`) print the raw array returned by the API, and `release-info` prints the full release detail object including adoption event counts.
## Example: End-to-End Release Pipeline
```bash title="release.sh"
#!/usr/bin/env bash
set -euo pipefail
CI_TOKEN="$STALLION_CI_TOKEN"
PROJECT_ID="64f5f341a43eb5ccf93548e4"
# 1. Publish the bundle and capture its hash
PUBLISH=$(stallion publish-bundle \
--upload-path=acme/my-project/featurebucket \
--platform=android \
--release-note="$RELEASE_NOTE" \
--ci-token="$CI_TOKEN" \
--json)
HASH=$(echo "$PUBLISH" | jq -r '.hash')
# 2. Promote it to production at 0% rollout
stallion release-bundle \
--project-id="$PROJECT_ID" \
--hash="$HASH" \
--app-version=1.0.1 \
--release-note="$RELEASE_NOTE" \
--ci-token="$CI_TOKEN" \
--json
# 3. Ramp the rollout to 50%
stallion update-release \
--project-id="$PROJECT_ID" \
--hash="$HASH" \
--rollout-percent=50 \
--ci-token="$CI_TOKEN" \
--json
```
## Example: GitHub Actions Step
```yaml
- name: Publish OTA update
run: |
HASH=$(stallion publish-bundle \
--upload-path=acme/my-project/featurebucket \
--platform=android \
--release-note="${{ github.event.head_commit.message }}" \
--ci-token="${{ secrets.STALLION_CI_TOKEN }}" \
--json | jq -r '.hash')
echo "BUNDLE_HASH=$HASH" >> "$GITHUB_ENV"
```
For a complete workflow, see [Release Automation using GitHub Actions](/docs/release-automation#example-github-actions-workflow).
---
# Stallion CLI
Stallion CLI enables you to push bundles that automatically creates a corresponding version that is available instantly to be downloaded and tested
**Note**
Add **stallion-cli** as dev dependency as it's only for development purposes.
### Open Source & Contributions
Stallion CLI is **open-source**!
Interested in helping us improve? Check out our [GitHub Repository](https://github.com/stallion-tech/stallion-cli) to get started! From feature suggestions to bug fixes, all contributions are welcome.
### Installation
To install the CLI open terminal and navigate to the root of your project and run:
With npm:
```bash
npm install --save-dev stallion-cli
```
With Yarn:
```bash
yarn add -D stallion-cli
```
### Usage
For usage and API Reference provided by Stallion CLI check the [Usage Documentation](/docs/cli/usage-api-reference).
---
# CLI Usage & API Reference
React Native Stallion CLI Usage & API Reference (v2.0.2 and below) - Complete CLI documentation for publishing bundles, managing releases, and automating OTA updates. Deprecated version guide.
## Login
Before accessing any features, you must log in to the CLI while ensuring you are in a React Native project directory.
```bash
npx stallion login
```
Executing this command will launch a web browser where you need to log in. Once logged in, click **Copy Access Token**, then return to the terminal and paste the token.
## Publish Bundle
**Prerequisite**
Every published bundle is stored in a Bucket. Before publishing your first
bundle, make sure a Bucket is created in the [**Stallion
Console**](https://console.stalliontech.io/)
After successfully logging in, you can use the `publish-bundle` command to deploy packages for both Android and iOS.
**Note**: You can use only one platform at a time — either **ios** or **android**.
```bash
npx stallion publish-bundle --upload-path=orgname/project-name/bucket-name --platform=android/ios --release-note="notes"
```
Example:
```bash
npx stallion publish-bundle --upload-path=my-org/my-project/my-bucket --platform=android --release-note="my release"
```
**Tip**
You can access `orgname/project-name/bucket-name` required in command above
using the `Copy bundle path` shortcut in [**Stallion
Console**](https://console.stalliontech.io/) inside your bucket's lising page.
### Params
1. `--upload-path`
Specifies the target location for uploading the current bundle:
```bash
--upload-path=testorg/firstproject/featurebucket
# testorg is org name
# firstproj is project name
# featurebucket is bucket name
```
You can find and copy the upload path from the Bucket Overview page in the Stallion Dashboard Console.
2. `--platform`
Defines the platform for which the bundle will be published (android or ios):
```bash
--platform=android
```
3. `--release-note` **(Optional)**
Allows you to add release notes for the bundle:
```bash
--release-note="changed something"
```
4. `--hermes-disabled` **(Optional)**
This flag is set to false by default, but you can enable it if needed.
**Info**
Hermes is enabled by default in Stallion CLI. If you want to disable hermes
then set this flag to true.
```bash
--hermes-disabled=true
```
5. `--ci-token` **(Optional)**
Used for overriding the user token, especially recommended for CI pipelines:
```bash
--ci-token="your-CI-token"
```
You can generate CI Token from the dashboard under project settings.
6. `--bundle-name` **(Optional)**
Default bundle name for android `index.android.bundle` and for ios `main.jsbundle`. You can override these defaults:
```bash
--bundle-name="ios.bundle"
```
7. `--entry-file` **(Optional)**
The default entry file is index.js, but you can specify a different file:
```bash
--entry-file="index.debug.js"
```
## Logout
To switch accounts, you can log out of the CLI at any time.
```bash
npx stallion logout
```
---
# MCP Server Overview
The Stallion MCP server brings OTA release analytics into Claude, Cursor, ChatGPT, and any MCP client. Ask 'is my rollout healthy?' and get adoption, rollback risk, and a recommendation — read-only and OAuth-secured.
**🚧 Beta**
The Stallion MCP server is currently in **Beta**. It's live and safe to use — it's
strictly read-only and scoped to your own account — but tools, responses, and the hosted
endpoint may change as we refine it. We'd love your feedback: reach out via the
[contact page](https://stalliontech.io/contact) or [join our Discord](https://discord.gg/HzqsrKF5wv).
**What is MCP?**
The [Model Context Protocol](https://modelcontextprotocol.io) is an open standard that
lets AI assistants securely connect to external tools and data. The **Stallion MCP
server** exposes your OTA release analytics to any MCP-compatible assistant.
# Stallion MCP Server
The Stallion MCP server puts your release analytics inside **Claude, Cursor, ChatGPT, and
any MCP client**. Instead of clicking through dashboards, you ask a question in natural
language and get a real answer:
- _"Is the 2.4.0 rollout on Checkout healthy?"_ → adoption, rollback rate, and an
**advance / hold / rollback** recommendation with the reason.
- _"Why did this release roll back?"_ → the top crash clusters behind it.
- _"How small was the last patch?"_ → delta-patch size vs the full download.
It is **read-only**. It observes your releases; it never changes them. Every answer is
scoped to exactly what your own Stallion account can see.
## Why use it
- **Not a dashboard, an answer.** The `get_rollout_health` tool joins adoption, error, and
rollout state into a single verdict — the judgment call a release manager makes on every
rollout.
- **Natural language.** Resolve projects, buckets, and releases by name. No IDs to look up.
- **One endpoint, every org.** Reach all your organizations from a single URL.
- **Client-agnostic.** Works with Claude, Cursor, ChatGPT, and any MCP client.
## The endpoint
```bash
https://mcp.stalliontech.io/mcp
```
Point any MCP client at this URL and sign in with your Stallion account. There are no
tokens to paste — see [Connecting Clients](/docs/mcp/connect).
## What you can ask
| Capability | Tool | What it answers |
| --- | --- | --- |
| Rollout health | `get_rollout_health` | Advance, hold, or roll back — with the reason |
| Adoption trends | `get_adoption_trend` | Download → install → rollback over time, with drop-off |
| Rollback diagnosis | `diagnose_rollback` | The top crash clusters driving a rollback |
| Delta patches | `get_patch_info` | How small the update really shipped |
| Releases & versions | `list_releases`, `list_app_versions` | What's live where |
| Bundles | `list_bundles`, `list_buckets` | Bundle history and sizes |
See the full [Tools Reference](/docs/mcp/tools) for every tool and its inputs.
## Next steps
### Connect your assistant
Add the server to Claude, Cursor, ChatGPT, or Claude Code. See
[Connecting Clients](/docs/mcp/connect).
### Explore the tools
Browse the [Tools Reference](/docs/mcp/tools) to see everything the assistant can call.
### Understand the security model
Read how [OAuth 2.1 and read-only scoping](/docs/mcp/security) keep your data safe.
---
# Connecting Clients
Connect the Stallion MCP server to Claude, Cursor, ChatGPT, and Claude Code. One URL, OAuth login, no tokens to paste.
# Connecting Clients
The Stallion MCP server is hosted at one URL and works with any MCP client:
```bash
https://mcp.stalliontech.io/mcp
```
When you connect, the client opens a browser and you sign in with your Stallion account
(email OTP, SSO, or passkey) — or it's **silent** if you're already signed into the
[console](https://console.stalliontech.io). There are no tokens to copy or paste.
**How auth works**
Sign-in uses **OAuth 2.1** in your browser — nothing to paste. Each request runs with
your own Stallion access. See [Security](/docs/mcp/security) for details.
## Choose your client
#### Cursor
#### Claude
#### ChatGPT
#### Claude Code
**One-click install.** Open the install link:
```bash
https://cursor.com/install-mcp?name=stallion&config=eyJ1cmwiOiJodHRwczovL21jcC5zdGFsbGlvbnRlY2guaW8vbWNwIn0=
```
Or add it manually to `~/.cursor/mcp.json` (OAuth is auto-discovered):
```json
{
"mcpServers": {
"stallion": {
"url": "https://mcp.stalliontech.io/mcp"
}
}
}
```
Open the **Add custom connector** screen on claude.ai:
```bash
claude.ai → Settings → Connectors → Add custom connector
```
Paste the server URL:
```bash
https://mcp.stalliontech.io/mcp
```
**Paid plan required**
Custom connectors on claude.ai require a paid Claude plan.
ChatGPT supports custom MCP connectors through **Developer Mode**:
### Enable Developer Mode
Go to **Settings → Connectors → Advanced** and turn on **Developer Mode**.
### Add the connector
Add a new connector and paste `https://mcp.stalliontech.io/mcp`.
### Sign in
Sign in with your Stallion account when prompted.
Add the server with one command:
```bash
claude mcp add --transport http stallion https://mcp.stalliontech.io/mcp
```
On first use, Claude Code opens a browser for you to sign in.
## Verify the connection
Ask your assistant to run `auth_status`, or simply ask _"list my Stallion orgs"_. If it
returns your organizations, you're connected.
---
# Tools Reference
Every tool exposed by the Stallion MCP server — navigation and analytics — with inputs and what each returns. All read-only.
# Tools Reference
The Stallion MCP server exposes a small set of consolidated, **read-only** tools. Your
assistant picks the right ones automatically — you rarely call them by name. Project-scoped
tools accept **names or ids**; pass `org` to disambiguate a project name that exists in
more than one organization.
**Read-only**
Every tool observes; none of them change a release, bundle, or setting. You only ever see
what your own Stallion account can access.
## Navigation
These tools let the assistant find its way around your account by name.
| Tool | Inputs | Returns |
| --- | --- | --- |
| `list_orgs` | — | Your organizations (id, name, region) |
| `list_projects` | `org` | Projects in an org, with platform flags |
| `get_project_detail` | `project`, `org?` | Project config: platforms, patch/backup-CDN, archive state (**no secrets**) |
| `list_buckets` | `project`, `org?` | Buckets in a project, with latest bundle versions |
| `list_bundles` | `bucket`, `project`, `org?` | Bundles in a bucket: version, size, author, promoted, checksum |
| `list_app_versions` | `project`, `platform`, `org?` | App versions that have releases, with counts — a good place to start |
| `list_releases` | `project`, `platform`, `appVersion`, `org?` | Production releases and their rollout state |
## Analytics
These tools answer release-health questions.
| Tool | Inputs | Returns |
| --- | --- | --- |
| `get_rollout_health` _(headline)_ | `project`, `platform`, `appVersion`, `org?` | Adoption + rollback metrics and a **recommendation** (advance / hold / rollback / investigate) with the reason |
| `get_adoption_trend` | `project`, `platform`, `appVersion`, `range` | Download → install → rollback time series (`1D` / `7D` / `15D` / `1M`) with drop-off at each step |
| `diagnose_rollback` | `project`, `platform`, `appVersion`, `range` | The top crash clusters behind auto-rollbacks |
| `get_patch_info` | `project`, `platform`, `appVersion`, `org?` | Delta-patch sizes for a release vs the full-bundle download |
## Utility
| Tool | Inputs | Returns |
| --- | --- | --- |
| `auth_status` | — | Confirms your token works and reports the signed-in user |
## The headline tool
`get_rollout_health` is the one to reach for on every rollout. It joins **adoption rate**,
**rollback rate**, and **live rollout state** into a single verdict:
- **advance** — metrics are healthy; safe to increase the rollout percentage.
- **hold** — not enough exposure yet, or early warning signs; wait and watch.
- **rollback** — rollback rate is over threshold; pull the release.
- **investigate** — the release is paused or already rolled back; look closer.
Every response includes the raw numbers alongside the recommendation, so you can see
exactly why the verdict was reached.
**Tip**
Not sure where to start? Ask _"which app versions have releases for my project?"_ —
that runs `list_app_versions` and gives you the versions to drill into.
---
# Security Overview
How the Stallion MCP server keeps your data safe — OAuth 2.1, read-only access, and scoping to exactly what your account can see.
# Security
**Read-only by design**
The server observes; it never mutates. There is no tool that changes a release, bundle,
rollout, or setting.
## OAuth 2.1
The hosted endpoint is secured with **OAuth 2.1**. In practice this means:
- **No tokens to paste.** Your client opens a browser and you sign in through the Stallion
console — or it's silent if you're already logged in.
- **Your login methods.** Sign in with email OTP, SSO, or passkey — whatever your
organization uses.
## Scoped to your account
Authentication inherits **exactly your user's access scope**. The assistant can only see
the organizations, projects, and releases that you can see in the console. There is no
elevated or shared access.
## No secrets exposed
Configuration responses are deliberately filtered. For example, `get_project_detail`
returns platform and patch settings — but **never** secrets like CI tokens, app tokens, or
signing material.
**Questions?**
For enterprise security reviews or questions about the MCP server, reach out via the
[contact page](https://stalliontech.io/contact).
---
# Benefits of Patch Updates
Discover the key benefits of React Native Stallion's Patch Updates - up to 98% size reduction, faster downloads, better user experience, and file-level intelligence for React Native OTA updates.
# Benefits of Patch Updates
Patch Updates provides significant advantages over traditional full-bundle OTA updates.
## Up to 98% Size Reduction
Patch Updates can reduce update sizes by up to 98% compared to traditional full-bundle updates. If your full bundle was 20 MB, updates now go out in just a few KB.
**Benefits:**
- **Faster Downloads**: Updates complete in seconds instead of minutes
- **Bandwidth Savings**: Massive reduction in data transfer
- **Cost Efficiency**: Significant reduction in infrastructure costs
### Real-World Impact
For a million-user app with a 20 MB update:
- **Traditional OTA/CodePush**: 20 TB of bandwidth
- **Patch Updates**: 400 GB of bandwidth
- **Savings**: 19.6 TB (98% reduction)
## Increased Release Adoption
When updates are lightweight and instant, adoption rates increase dramatically. Users are more likely to apply updates when they're fast and seamless, leading to:
- Faster bug fix deployments
- Quicker feature rollouts
- Better overall release velocity
## File-Level Differential Updates
Patch Updates intelligently analyzes your changes at the file level, ensuring you only ship the assets you added or removed. If you updated a single component, only that component ships. Added a new image? Only that image ships.
This file-level diff approach is far superior to traditional Codepush-style updates that require full bundle downloads.
## Integrated Security
Every patch is cryptographically signed and verified, ensuring that your users only receive authentic, tamper-proof updates. The same robust security model that protects your full bundles now protects every patch.
## Universal Impact
Whether you have a thousand users or millions, Patch Updates benefits everyone. Updates are so small that everyone gets the update instantly. The download time that used to take minutes now takes seconds.
## Comparison with Traditional OTA
| Aspect | Traditional OTA | Patch Updates |
|--------|----------------|---------------|
| **Update Size** | Full bundle (20 MB) | Patch (400 KB) |
| **Download Time** | 30-60 seconds | 1-2 seconds |
| **Bandwidth** | High | 98% reduction |
| **User Experience** | Slow, noticeable | Instant, seamless |
| **Adoption Rate** | Lower | Higher |
## Conclusion
Patch Updates provides clear benefits across multiple dimensions: size reduction, speed, user experience, security, and cost efficiency.
[Get started with Patch Updates](/docs/patch-updates/getting-started) to experience these benefits.
---
# How Patch Updates Works
Learn how React Native Stallion's Patch Updates generates differential updates, on-demand patches between any Stallion versions, version targeting, and delivery.
# How Patch Updates Works
Patch Updates works automatically in the background, requiring no changes to your existing React Native OTA workflow.
## Automatic Patch Generation
### Step 1: Upload Releases as Usual
Build your React Native bundle and upload it to React Native Stallion using the CLI. No special configuration needed for differential updates.
### Step 2: Automatic Patch Creation
When you promote a release, a patch is automatically generated with the previous version:
- **Advanced Binary Diff Algorithms**: The system intelligently compares your new release with the previous one
- **Optimized Differential Update**: Creates a patch containing only the changes
- **File-Level Analysis**: Analyzes changes at the file level for optimal patch sizes
### Step 3: Version Targeting
For example, if you release version 4:
- A patch is automatically generated between version 3 and version 4
- All users on version 3 automatically receive the patch update
### On-demand patch generation
Patches are generated **on demand** between **any two Stallion bundle versions**, not only consecutive releases. That lets users update across version gaps (for example from **Vx** to **Vy**) without you publishing every step in between.
When the **first** user on **Vx** requests **Vy**:
1. They receive the **full Vy bundle**.
2. A **patch generation workflow** runs for **Vx → Vy**.
From then on, every other user moving from **Vx** to **Vy** gets the **patch** instead of the full bundle.
## First Release Behavior
**Important**: The first release on an app version (V1) is not patched, as the default bundle was shipped with the app build itself.
All incremental versions after V1 will be delivered as patches:
- **Default** (shipped with app): Included in app build
- **V1** (first release): Users download the full bundle
- **V2**: Users on V1 receive a patch update
- **V3**: Users on V2 receive a patch update
- **And so on** for all subsequent releases
**First Release on App Version**
The first release on an app version is not patched, as it was shipped with the
app build itself. All incremental versions after the V1 release will be
delivered as patches.
## User Experience
From the user's perspective, nothing changes. They still receive updates automatically, but now those updates are dramatically smaller and faster. The only difference users notice is that updates are dramatically faster.
## Example Workflow
1. **Initial Release (V1)**:
- Upload and promote version 1
- Users download the full 20 MB bundle
2. **Second Release (V2)**:
- Make a small bug fix and upload version 2
- System automatically generates a patch between V1 and V2
- Patch size: ~400 KB (98% smaller)
- Users on V1 receive the 400 KB patch
- Users on older versions receive full V2 bundle
3. **Third Release (V3)**:
- Add a new feature and upload version 3
- System generates a patch between V2 and V3
- Users on V2 receive the patch
## Conclusion
Patch Updates works automatically in the background, requiring no changes to your workflow. The system intelligently generates optimal patches, ensuring users get the fastest possible updates with minimal bandwidth usage.
[Learn how to get started](/docs/patch-updates/getting-started).
---
# Getting Started with Patch Updates
Step-by-step guide to use React Native Stallion's Patch Updates on Pro or Enterprise. Learn enabling Patch Updates under Patch Settings in the Console, SDK requirements, and on-demand patches for releases after activation.
# Getting Started with Patch Updates
Getting started with Patch Updates is straightforward. This guide covers SDK requirements and how Patch Updates fits into your existing Stallion workflow.
## Requirements
- **Plan**: Pro or Enterprise (Patch Updates is not included on free plans)
- **Activation**: In the [Stallion Console](https://console.stalliontech.io/), open **Project settings** for your project, go to **Patch Settings**, and enable Patch Updates. Releases published after activation generate patches on demand.
- **SDK Version**: The latest stable React Native Stallion SDK supporting Patch Updates is 2.4.0 or above
- **No Code Changes**: Your existing codebase requires no modifications
- **Same Workflow**: Continue using React Native Stallion exactly as you always have
**Pro & Enterprise**
Patch Updates is available only on **Pro** and **Enterprise** plans. In the
[Stallion Console](https://console.stalliontech.io/), open **Project
settings**, go to **Patch Settings**, and enable Patch Updates. All releases
published after you enable this setting generate patches on demand.
**SDK Requirement**
The latest stable React Native Stallion SDK supporting Patch Updates is 2.4.0
or above. Check the [SDK Installation guide](/docs/sdk/installation) if you
need to update.
## Using Patch Updates
With Patch Updates enabled under **Project settings** → **Patch Settings**, eligible releases generate patches on demand when you promote—no further app configuration is required.
### Step 1: Upload Your Bundle
Upload your bundle as usual using the Stallion CLI:
```bash
npx stallion publish-bundle \
--upload-path=// \
--platform= \
--release-note="Your release notes"
```
### Step 2: Promote the Release
Promote the release through the [Stallion Console](https://console.stalliontech.io/):
1. Navigate to your bucket
2. Select the bundle you want to promote
3. Click "Promote Bundle"
4. Fill in the target app version and release notes
5. Save the promotion
### Step 3: On-demand patch generation
When you promote a release that was **published after** you enabled Patch Updates, the system **generates a patch on demand**:
- Detects the previous version
- Generates an optimized patch containing only changes
- Signs the patch for security
- Distributes the patch to eligible users
Releases published before you enabled the feature are not eligible for patch generation.
### Step 4: Users Receive Patches
- Users on the previous version receive the patch update
- Users on older versions or new installations receive full bundles
- Patches download automatically in the background
## Verifying Patch Updates
After users request updates, open the release in the [Stallion Console](https://console.stalliontech.io/) and check the **Patch details** section at the top of the release details page. It lists generated patches by source Stallion version. See [Verify patch updates are generated](#verify-patch-updates-are-generated) under Troubleshooting for a screenshot and what to look for.
## Troubleshooting
### Verify patch updates are generated
Once Patch Updates is enabled and users are requesting updates, confirm patches are being created in the Console:
1. Open the [Stallion Console](https://console.stalliontech.io/) and go to **Releases**.
2. Select a promoted release and open its **release details** page.
3. At the top, look for the **Patch details** section (Patch Details Section).

In **Patch details**, you can see which **from** versions have patches generated for this release, along with patch size metrics (for example bundle diff size and total patch size per source version).
**If this section appears** for your releases after users start requesting updates, Patch Updates is working successfully.
**If it does not appear**, work through the steps below.
### Patch Not Generated
- Confirm Patch Updates is enabled under **Project settings** → **Patch Settings** (Pro or Enterprise only)
- Ensure the bundle or release was published **after** Patch Updates was enabled
- Ensure there's a previous release for the same app version
- Confirm you're running React Native Stallion SDK 2.4.0 or above
### Users Not Receiving Patches
- Users must be on a source version that has a generated patch to the target release (see **Patch details** on the release)
- Users must have React Native Stallion SDK 2.4.0 or above
- Confirm the **Patch details** section lists the source version you expect; if not, wait for the first on-demand patch workflow to complete or check the steps above
## Next Steps
- **[Learn More](/docs/patch-updates/benefits)**: Understand all the benefits
## Conclusion
Getting started with Patch Updates is simple: use a Pro or Enterprise plan, enable Patch Updates under **Project settings** → **Patch Settings**, use React Native Stallion SDK 2.4.0 or above, then publish and promote releases as usual. Only releases published after activation generate patches on demand.
---
# Phased Rollout
React Native Stallion Phased Rollout - Learn how to control the percentage of users who receive your releases. Gradual deployment for safer OTA updates.
# Phased Rollout
Phased rollout is a powerful feature that allows you to control how many users receive your latest release. When you promote a release to production, you can specify the exact percentage of your user base that should receive the update, enabling you to deploy changes gradually and safely.
## How Phased Rollout Works
When a user opens your app, the Stallion SDK automatically checks for available releases. If your latest release is configured for phased rollout (less than 100%), the system uses a random selection algorithm to determine whether that specific user should receive the update.
**Important**
The system only checks the latest non-rolled back, non-paused release before
the current release. It does not keep checking back through multiple previous
releases.
### Release Selection Logic
The SDK follows this decision process:
1. **Check Latest Release**: If the user is eligible for the latest release (based on the rollout percentage), they will receive it
2. **Check Previous Release**: If the user doesn't qualify for the latest release, the system checks the most recent non-rolled back, non-paused release before the current one
3. **Release Decision**:
- If the previous release is at 100% rollout, the user receives that release
- If the previous release is not at 100% rollout, the user receives no release
**Important**
The rollout percentage is calculated based on unique user IDs (UIDs) generated
by the Stallion SDK during app initialization. Each user is assigned a unique
UID that determines their eligibility for phased releases.
## Examples
### Example 1: Gradual Feature Rollout
**Scenario**: You've released a new feature and want to test it with a small percentage of users before full deployment.
**Setup**:
- Release A (previous): 100% rollout
- Release B (latest): 25% rollout
**User Experience**:
- 25% of users will receive Release B with the new feature
- 75% of users will continue using Release A (the stable version)
- You can monitor adoption metrics and gradually increase the percentage
### Example 2: Critical Bug Fix
**Scenario**: You need to deploy a critical bug fix immediately but want to ensure stability.
**Setup**:
- Release A (with bug): 0% rollout (paused)
- Release B (bug fix): 50% rollout
**User Experience**:
- 50% of users will receive Release B with the bug fix
- 50% of users will receive no release (since Release A is paused and there is no other release before release A)
- You can monitor for any issues and increase to 100% once confirmed stable
### Example 3: Previous Release Not at 100%
**Scenario**: You have multiple releases where the previous release is also not fully rolled out.
**Setup**:
- Release A (old): 30% rollout
- Release B (latest): 25% rollout
**User Experience**:
- 25% of users will receive Release B (latest)
- 75% of users will receive no release (since Release A is only at 30%, not 100%)
- This demonstrates why it's important to ensure previous releases reach 100% before deploying new ones
**Beta Testing**
Want to test releases before rolling them out to users? Learn how to use [Beta
Testing](/docs/beta-testing) to safely test releases at 0% rollout with your
internal team.
## Managing Phased Rollouts
### Setting Rollout Percentage
1. Navigate to **Releases** in your Stallion dashboard
2. Select your target app version
3. Click **Manage Release**
4. Adjust the rollout slider to your desired percentage
5. Click **Update Release**
**Important**
Rollout percentage cannot be decreased once increased. You can only increase
the percentage or pause/rollback the release. Plan your rollout strategy
carefully before increasing the percentage.
### Monitoring Rollout
Use the **Adoption Dashboard** to monitor:
- Download statistics
- Installation success rates
- User adoption patterns
- Rollback incidents
### Best Practices
**Best Practice**
Start with a small percentage (5-10%) for new features and gradually increase
based on monitoring results.
- **Start Small**: Begin with 5-10% rollout for new features
- **Monitor Closely**: Watch adoption metrics and user feedback
- **Gradual Increase**: Increase rollout percentage in stages (25%, 50%, 75%, 100%)
- **Have a Rollback Plan**: Always be prepared to pause or rollback if issues arise
- **Test Thoroughly**: Use internal testing with 0% rollout before public release
## Rollout States
### Active Rollout
- Release is being distributed to users
- Rollout percentage can be adjusted
- Users are receiving updates based on the percentage
### Paused Rollout
- Release is paused and not distributed to new users
- Existing users who already have the release keep it
- Can be resumed later
### Rolled Back
- Release is completely removed
- Users fall back to the previous stable release
- Can be un-rolled back to resume distribution
---
# Codepush Mandatory Updates - React Native OTA Update Flow
Learn how to implement mandatory Codepush-style updates in React Native with React Native Stallion. Handle non-dismissable update popups, download progress tracking, and automatic restarts for critical updates. Perfect for migrating from Codepush.
# CodePush Mandatory Updates - React Native OTA Update Flow
Mandatory updates are critical releases that require immediate installation. Unlike optional updates, mandatory releases cannot be dismissed by users and must be applied before the app can continue functioning normally. This is especially important for security patches, critical bug fixes, or breaking changes that require immediate deployment.
Stallion provides a robust API to handle mandatory updates in React Native applications, giving you full control over the update experience similar to Codepush. This guide will show you how to implement a custom mandatory update flow with progress tracking and non-dismissable UI.
**Important**
The code examples in this guide are dummy implementations provided for
demonstration purposes. You must implement your own styling and design for the
update modal based on your app's design language and brand guidelines. The
examples focus on the functional implementation and API usage rather than
production-ready UI components.
**Prerequisite**
Before continuing, ensure that the Stallion SDK is installed and configured in
your React Native app. If not, refer to our [Installation
Guide](/docs/sdk/installation/).
### Detecting Mandatory Updates
The `useStallionUpdate` hook provides access to update metadata, including the `isMandatory` flag. This flag indicates whether a release requires immediate installation and cannot be skipped, similar to Codepush's mandatory update mechanism.
```tsx
import { useStallionUpdate } from "react-native-stallion";
const UpdateHandler = () => {
const { newReleaseBundle, isRestartRequired } = useStallionUpdate();
// Check if the new release is mandatory
if (newReleaseBundle?.isMandatory) {
// Handle mandatory update flow
}
return null;
};
```
The `newReleaseBundle` object contains all metadata about the downloaded update, including:
- `isMandatory`: Boolean indicating if the update is mandatory
- `releaseNote`: Release notes for the update
- `version`: Version number of the bundle
- Other metadata fields
### Creating a Non-Dismissable Update Popup
For mandatory updates, you should create a modal or popup that cannot be dismissed by users. This ensures that critical updates are applied before users can continue using the app, just like Codepush mandatory updates.
```tsx
import React, { useState, useEffect } from "react";
import { Modal, View, Text, StyleSheet } from "react-native";
import { useStallionUpdate } from "react-native-stallion";
const MandatoryUpdateModal = () => {
const { newReleaseBundle, isRestartRequired } = useStallionUpdate();
const [isVisible, setIsVisible] = useState(false);
useEffect(() => {
if (newReleaseBundle?.isMandatory) {
setIsVisible(true);
}
}, [newReleaseBundle]);
// Prevent dismissal for mandatory updates
const handleBackdropPress = () => {
// Do nothing - modal cannot be dismissed
};
return (
Update Required
{newReleaseBundle?.releaseNote ||
"A critical update is available. Please wait while we download and install it."}
);
};
const styles = StyleSheet.create({
overlay: {
flex: 1,
backgroundColor: "rgba(0, 0, 0, 0.7)",
justifyContent: "center",
alignItems: "center",
},
modalContainer: {
backgroundColor: "#fff",
borderRadius: 12,
padding: 24,
width: "80%",
maxWidth: 400,
},
title: {
fontSize: 20,
fontWeight: "bold",
marginBottom: 12,
},
message: {
fontSize: 14,
color: "#666",
marginBottom: 16,
},
});
```
### Tracking Download Progress
Stallion emits `DOWNLOAD_PROGRESS_PROD` events during the download process. You can listen to these events using `addEventListener` to track download progress and update your UI accordingly.
The event payload contains a `progress` property that represents the download progress as a fraction between 0 and 1 (0 = 0%, 1 = 100%).
```tsx
import React, { useState, useEffect } from "react";
import { Modal, View, Text, StyleSheet, TouchableOpacity } from "react-native";
import {
useStallionUpdate,
addEventListener,
removeEventListener,
restart,
} from "react-native-stallion";
const MandatoryUpdateModal = () => {
const { newReleaseBundle, isRestartRequired } = useStallionUpdate();
const [isVisible, setIsVisible] = useState(false);
const [downloadProgress, setDownloadProgress] = useState(0);
useEffect(() => {
if (newReleaseBundle?.isMandatory) {
setIsVisible(true);
}
}, [newReleaseBundle]);
useEffect(() => {
// Define the event listener function
const eventListener = (event) => {
if (event.type === "DOWNLOAD_PROGRESS_PROD") {
// Progress is a fraction between 0 and 1
const progress = event?.progress || 0;
setDownloadProgress(progress);
}
};
// Add the event listener
addEventListener(eventListener);
// Cleanup: remove the event listener
return () => {
removeEventListener(eventListener);
};
}, []);
const handleRestart = () => {
restart();
};
return (
{}} // Non-dismissable
>
Update Required
{newReleaseBundle?.releaseNote ||
"A critical update is available. Please wait while we download and install it."}
{Math.round(downloadProgress * 100)}%
{isRestartRequired && (
Restart App
)}
);
};
const styles = StyleSheet.create({
overlay: {
flex: 1,
backgroundColor: "rgba(0, 0, 0, 0.7)",
justifyContent: "center",
alignItems: "center",
},
modalContainer: {
backgroundColor: "#fff",
borderRadius: 12,
padding: 24,
width: "80%",
maxWidth: 400,
},
title: {
fontSize: 20,
fontWeight: "bold",
marginBottom: 12,
},
message: {
fontSize: 14,
color: "#666",
marginBottom: 16,
},
progressContainer: {
marginVertical: 16,
},
progressBar: {
height: 8,
backgroundColor: "#e0e0e0",
borderRadius: 4,
overflow: "hidden",
marginBottom: 8,
},
progressFill: {
height: "100%",
backgroundColor: "#007AFF",
borderRadius: 4,
},
progressText: {
fontSize: 12,
color: "#666",
textAlign: "center",
},
restartButton: {
backgroundColor: "#007AFF",
padding: 12,
borderRadius: 8,
marginTop: 16,
},
restartButtonText: {
color: "#fff",
textAlign: "center",
fontSize: 16,
fontWeight: "600",
},
});
```
### Complete Implementation Example
Here's a complete example that combines all the concepts:
```tsx
import React, { useState, useEffect } from "react";
import { Modal, View, Text, StyleSheet, TouchableOpacity } from "react-native";
import {
useStallionUpdate,
addEventListener,
removeEventListener,
restart,
} from "react-native-stallion";
const MandatoryUpdateHandler = () => {
const { newReleaseBundle, isRestartRequired } = useStallionUpdate();
const [isVisible, setIsVisible] = useState(false);
const [downloadProgress, setDownloadProgress] = useState(0);
// Show modal when mandatory update is detected
useEffect(() => {
if (newReleaseBundle?.isMandatory) {
setIsVisible(true);
}
}, [newReleaseBundle]);
// Listen to download progress events
useEffect(() => {
// Define the event listener function
const eventListener = (event) => {
if (event.type === "DOWNLOAD_PROGRESS_PROD") {
const progress = event?.progress || 0;
setDownloadProgress(progress);
}
};
// Add the event listener
addEventListener(eventListener);
// Cleanup: remove the event listener by passing the same function
return () => {
removeEventListener(eventListener);
};
}, []);
const handleRestart = () => {
restart();
};
if (!newReleaseBundle?.isMandatory) {
return null;
}
return (
{}} // Non-dismissable for mandatory updates
>
Update Required
{newReleaseBundle.releaseNote ||
"A critical update is available and must be installed to continue using the app."}
Downloading... {Math.round(downloadProgress * 100)}%
{isRestartRequired && (
Restart App
)}
);
};
const styles = StyleSheet.create({
overlay: {
flex: 1,
backgroundColor: "rgba(0, 0, 0, 0.75)",
justifyContent: "center",
alignItems: "center",
},
modalContainer: {
backgroundColor: "#fff",
borderRadius: 16,
padding: 24,
width: "85%",
maxWidth: 400,
shadowColor: "#000",
shadowOffset: { width: 0, height: 4 },
shadowOpacity: 0.3,
shadowRadius: 8,
elevation: 8,
},
title: {
fontSize: 22,
fontWeight: "bold",
marginBottom: 12,
color: "#000",
},
message: {
fontSize: 14,
color: "#666",
marginBottom: 20,
lineHeight: 20,
},
progressSection: {
marginVertical: 16,
},
progressBar: {
height: 8,
backgroundColor: "#e0e0e0",
borderRadius: 4,
overflow: "hidden",
marginBottom: 8,
},
progressFill: {
height: "100%",
backgroundColor: "#007AFF",
borderRadius: 4,
transition: "width 0.3s ease",
},
progressText: {
fontSize: 12,
color: "#666",
textAlign: "center",
},
restartButton: {
backgroundColor: "#007AFF",
paddingVertical: 14,
paddingHorizontal: 24,
borderRadius: 8,
marginTop: 8,
},
restartButtonText: {
color: "#fff",
fontSize: 16,
fontWeight: "600",
textAlign: "center",
},
});
export default MandatoryUpdateHandler;
```
### Key Implementation Points
1. **Non-Dismissable Modal**: Set `onRequestClose` to an empty function to prevent users from dismissing mandatory update modals, similar to Codepush mandatory updates.
2. **Progress Tracking**: Use `addEventListener` to listen for `DOWNLOAD_PROGRESS_PROD` events and update your UI with the `progress` value (0 to 1).
3. **Event Listener Cleanup**: Always use `removeEventListener` and pass the same listener function that was used with `addEventListener` to properly unsubscribe from events.
4. **Conditional Restart Button**: Only show the restart button when `isRestartRequired` is `true`, indicating that the download is complete and the app is ready to restart.
5. **Restart Method**: Import and call the `restart` function from `react-native-stallion` to trigger the app restart.
### Best Practices for Mandatory Updates
- **Use Sparingly**: Reserve mandatory updates for critical security patches or breaking changes that require immediate deployment.
- **Clear Communication**: Provide clear release notes explaining why the update is mandatory and what changes users can expect.
- **Progress Feedback**: Always show download progress to keep users informed during the update process.
- **Error Handling**: Consider adding error handling for failed downloads or network issues.
- **Testing**: Thoroughly test mandatory update flows in staging environments before deploying to production.
**Tip**
For more information on handling optional updates and custom UI flows, check
out our guide on [Custom Update UX with
Stallion](/blogs/react-native-over-the-air-updates-with-custom-ui).
**Migration from Codepush**
If you're migrating from Codepush, Stallion's mandatory update flow provides
similar functionality with enhanced progress tracking and better React Native
integration. The `isMandatory` flag works similarly to Codepush's mandatory
update mechanism, making the migration process straightforward.
---
# Automating Releases with Stallion CLI
React Native Stallion Release Automation - Learn how to use Stallion CLI to publish, release, and manage app bundles. CI/CD integration for OTA updates.
import Tabs from '@theme/Tabs';
import TabItem from '@theme/TabItem';
# Release Automation with Stallion CLI
The **Stallion CLI** simplifies the process of publishing, promoting, and managing application bundles for both Android and iOS platforms. This guide outlines the core commands and usage patterns.
---
## Publishing a Bundle
To publish a bundle, run the following command:
```bash
stallion publish-bundle \
--upload-path=orgname/project-name/bucket-name \
--platform=android/ios \
--release-note="Your release note here"
```
### Example
```bash
stallion publish-bundle \
--upload-path=my-org/my-project/my-bucket \
--platform=android \
--release-note="Initial release"
```
After a successful upload, you will receive a **bundle hash**. This hash is required for promoting the bundle.
---
## Promoting a Bundle
To promote the published bundle, use the bundle hash from the previous step:
```bash
stallion release-bundle \
--project-id= \
--hash= \
--app-version= \
--release-note="Your release note" \
--ci-token=
```
### Example
```bash
stallion release-bundle \
--project-id=64f5f341a43eb5ccf93548e4 \
--hash=6c8a45dcf5a3e983e389afada81449b2b326b2540758a55ca2227902a55f7e2a \
--app-version=1.0.1 \
--release-note="First test CI release" \
--ci-token=stl_zKNKb6JvW80DemZNomJF8EgxHo-KNcVo_u
```
---
## Updating a Release
By default, a newly promoted bundle is rolled out to 0% of users. You can update the release to control rollout percentage, mark it as mandatory, pause, or even rollback.
```bash
stallion update-release \
--project-id= \
--hash= \
--release-note="Updated release note" \
--rollout-percent= \
--is-mandatory= \
--ci-token=
```
### Example
```bash
stallion update-release \
--project-id=64f5f341a43eb5ccf93548e4 \
--hash=6c8a45dcf5a3e983e389afada81449b2b326b2540758a55ca2227902a55f7e2a \
--release-note="First test CI release" \
--rollout-percent=27 \
--is-mandatory=true \
--ci-token=stl_zKNKb6JvW80DemZNomJF8EgxHo
```
---
## GitHub Actions Workflow
Here is a sample GitHub Actions workflow to automate publishing, promoting, and updating a Stallion bundle using the CLI:
```yaml
name: Stallion Release Automation
on:
push:
branches:
- main # or your deployment branch
jobs:
release-bundle:
runs-on: ubuntu-latest
env:
PROJECT_ID: 64f5f341a43eb5ccf93548e4 #Save in env
APP_VERSION: 1.0.1
RELEASE_NOTE: "Automated CI Release"
CI_TOKEN: ${{ secrets.STALLION_CI_TOKEN }}
UPLOAD_PATH: my-org/my-project/my-bucket
PLATFORM: android
steps:
- name: Checkout code
uses: actions/checkout@v3
- name: Set up Node.js (if needed)
uses: actions/setup-node@v4
with:
node-version: 20
- name: Install Stallion CLI
run: npm install -g stallion-cli
- name: Publish Bundle and Extract Hash
id: publish
run: |
echo "Publishing bundle..."
OUTPUT=$(stallion publish-bundle \
--upload-path=$UPLOAD_PATH \
--platform=$PLATFORM \
--release-note="$RELEASE_NOTE")
echo "$OUTPUT"
HASH=$(echo "$OUTPUT" | grep -oE '[a-f0-9]{64}')
echo "Bundle hash: $HASH"
echo "BUNDLE_HASH=$HASH" >> $GITHUB_ENV
- name: Release Bundle
run: |
stallion release-bundle \
--project-id=$PROJECT_ID \
--hash=$BUNDLE_HASH \
--app-version=$APP_VERSION \
--release-note="$RELEASE_NOTE" \
--ci-token=$CI_TOKEN
- name: Update Release (optional rollout config)
run: |
stallion update-release \
--project-id=$PROJECT_ID \
--hash=$BUNDLE_HASH \
--release-note="$RELEASE_NOTE" \
--rollout-percent=100 \
--is-mandatory=true \
--ci-token=$CI_TOKEN
```
> Make sure to set the `STALLION_CI_TOKEN` as a GitHub Secret for secure access.
---
# Beta Testing
React Native Stallion Beta Testing - Learn how to test releases at 0% rollout with your internal team. Internal testing workflow for OTA updates.
# Beta Testing
Beta testing allows your internal team to test releases even when they're set to 0% rollout. This is particularly useful for testing new features or bug fixes before making them available to your entire user base.
## How Beta Testing Works
When a release is promoted to production at 0% rollout, it's not distributed to regular users. However, internal team members can still receive these releases by logging into the Stallion testing interface.
### Internal User Status
Once you log into the Stallion modal using the SDK access pin, your device is considered an "internal user." This special status allows you to receive releases that are set to 0% rollout, which are normally not distributed to regular users.
## Accessing Beta Releases
### Prerequisites
**Prerequisite**
You need to have the Stallion SDK integrated and access to the SDK access pin.
For detailed setup instructions, refer to [Stallion
Testing](/docs/sdk/stallion-testing).
### Step-by-Step Process
1. **Login to Stallion**: Use the Stallion modal in your app with the SDK access pin
2. **Internal User Status**: Once logged in, your device is considered an internal user
3. **Receive 0% Releases**: Even releases set to 0% rollout will be downloaded to your device
4. **Test Thoroughly**: You can test the release in a production-like environment before rolling out to users
## Beta Testing Workflow
### Complete Development and Deployment Process
The complete workflow for developing, testing, and deploying releases follows this sequence:
1. **Feature Development**: Work on different features in your development environment
2. **Testing Framework**: Use the [Testing Framework](/docs/sdk/stallion-testing) to test individual features and components
3. **Release Preparation**: Once features are ready, prepare a release for production
4. **Beta Testing**: Test the complete release using beta testing at 0% rollout
5. **Phased Rollout**: Use [Phased Rollout](/docs/phased-rollout) to gradually deploy to your users
### Beta Testing Process
1. **Promote Release**: Promote your release to production with 0% rollout
2. **Internal Testing**: Your team logs into the Stallion interface and tests the release
3. **Validate Changes**: Ensure the release works correctly in the production environment
4. **Ready for Rollout**: Once validated, the release is ready for phased rollout to users
### Testing Best Practices
- **Test in Production Environment**: Use the same environment your users will experience
- **Test All Features**: Ensure all new functionality works as expected
- **Performance Testing**: Check for any performance regressions
- **Edge Cases**: Test various scenarios and edge cases
- **Device Compatibility**: Test on different devices and screen sizes
## Testing Strategy Overview
### Three-Phase Testing Approach
**Complete Testing Strategy**
For optimal release quality, follow this three-phase approach: Testing
Framework → Beta Testing → Phased Rollout
#### Phase 1: Testing Framework
- **Purpose**: Test individual features and components during development
- **Environment**: Development and staging environments
- **Scope**: Feature-specific testing and component validation
- **Documentation**: [Testing Framework](/docs/sdk/stallion-testing)
#### Phase 2: Beta Testing
- **Purpose**: Test complete releases in production environment with internal team
- **Environment**: Production environment with 0% rollout
- **Scope**: End-to-end testing of the complete release
- **Access**: Internal team members only
#### Phase 3: Phased Rollout
- **Purpose**: Gradually deploy to users with controlled rollout percentages
- **Environment**: Production environment with increasing rollout percentages
- **Scope**: User-facing deployment with monitoring
- **Documentation**: [Phased Rollout](/docs/phased-rollout)
## Benefits of Beta Testing
### Quality Assurance
- **Production Environment Testing**: Test releases in the actual production environment without affecting users
- **Complete Release Validation**: Validate the entire release as a cohesive unit after individual feature testing
- **Real-World Testing**: Test with real data and production conditions
- **Quality Gate**: Final quality checkpoint before user deployment
### Risk Mitigation
- **Controlled Testing**: Test with a small, controlled internal team before wider release
- **Issue Detection**: Identify integration issues that may not appear in individual feature testing
- **Production Readiness**: Ensure the release is truly ready for production deployment
- **User Experience**: Validate the complete user experience before public rollout
### Workflow Integration
- **Bridge Between Testing and Deployment**: Serves as the critical step between Testing Framework and Phased Rollout
- **Production Confidence**: Provides confidence that the release works in production before user deployment
- **Team Alignment**: Ensures your entire team has tested and approved the release
- **Deployment Readiness**: Confirms the release is ready for gradual user rollout
---
# Handling Multiple Environments
Separate Dev, QA, and Production app flavours in Stallion using one project per flavour and per-flavour ProjectId / AppToken.
# Handling Multiple Environments
Most React Native apps ship more than one flavour — for example Dev, QA, and Production — each with its own APIs and config. To keep those flavours separated in Stallion, use a **separate project per flavour**, each with its own Project ID and App Token wired into the matching native build. For how Organization, Project, Bucket, and Release relate, see [Stallion Hierarchy](/docs/stallion-hierarchy).
## One Project Per Flavour
Create a Stallion project for each flavour (for example `myapp-dev`, `myapp-qa`, `myapp-prod`). Each project has its own Project ID and App Token. Publish and promote releases into the project that matches the flavour you are targeting.
The Stallion SDK reads **`StallionProjectId`** and **`StallionAppToken`** from the native build (`strings.xml` on Android, `Info.plist` on iOS). Those credentials determine which project the installed app talks to, and which promoted releases it can receive.
## Wire ProjectId and AppToken Per Flavour
Follow the [Installation guide](/docs/sdk/installation) for the base setup, then override the values per flavour so each native build gets the correct credentials.
### Android — product flavours
First declare the flavours in `android/app/build.gradle`. Without this, flavour resource folders are ignored:
```gradle
android {
flavorDimensions "env"
productFlavors {
dev {
dimension "env"
}
qa {
dimension "env"
}
prod {
dimension "env"
}
}
}
```
Then put each flavour's Stallion values in its own source set:
```
android/app/src/
main/res/values/strings.xml
dev/res/values/strings.xml
qa/res/values/strings.xml
prod/res/values/strings.xml
```
Example flavour `strings.xml`:
```xml
YOUR_PROJECT_IDspb_YOUR_APP_TOKEN
```
Once the flavours are declared, Gradle automatically merges only the active flavour's resources at build time. No Stallion SDK code changes are required.
You can also inject values with `resValue` inside `productFlavors` if tokens come from CI secrets.
### iOS — build configurations + `.xcconfig`
You do not need multiple `Info.plist` files.
1. Create configurations for each flavour (for example `Release-Dev`, `Release-QA`, `Release-Prod`).
2. Add one `.xcconfig` per flavour with the Stallion values.
3. Reference them from a single `Info.plist`:
```xml
StallionProjectId$(STALLION_PROJECT_ID)StallionAppToken$(STALLION_APP_TOKEN)
```
4. Point each scheme at the matching configuration.
Xcode substitutes the values at build time.
## Publishing Bundles for a Flavour
Upload each OTA bundle to the Stallion project that matches the flavour, then promote it for that flavour's app version.
### Your app's other environment variables
Apart from the Stallion credentials above, your app likely reads its own environment values — API base URLs, feature flags, keys. Whether an OTA bundle picks these up correctly depends on which library you use:
- **[`react-native-config`](https://github.com/react-native-config/react-native-config)** — values are packed at the native layer and exposed to JS through NativeModules. Any JS bundle, OTA or not, reads whatever the installed flavour's native build already contains, so nothing extra is needed at publish time.
- **[`react-native-dotenv`](https://github.com/goatandsheep/react-native-dotenv)** — Babel inlines the values into the JS bundle itself, so the OTA bundle carries whichever `.env` file was active when it was built. Set `APP_ENV` / `NODE_ENV` on the publish command so the correct file is packed:
```bash
APP_ENV=staging npx stallion publish-bundle \
--upload-path=// \
--platform=android \
--release-note="staging build"
```
```bash
NODE_ENV=production npx stallion publish-bundle \
--upload-path=// \
--platform=android \
--release-note="production build"
```
Clear the Metro cache before switching environments, or a stale transform can bake the wrong values into the bundle:
```bash
# macOS / Linux
rm -rf "$TMPDIR/metro-"* node_modules/.cache/metro
```
For full `publish-bundle` flags, see the [Publish Bundle API Reference](/docs/cli/usage-api-reference).
## Checklist
1. Create one Stallion project per flavour.
2. Put each project's `StallionProjectId` and `StallionAppToken` into that flavour's native config.
3. Build and ship each flavour with its matching credentials.
4. Publish and promote OTA releases into the matching project.
5. If you use dotenv-style env files, set the env on publish and clear the Metro cache between environments.
---
# Bundle Signing
React Native Stallion Bundle Signing - Secure, tamper-proof OTA updates with cryptographic verification. Learn how to implement bundle signing for production React Native apps.
**Note**
Bundle signing requires minimum **Stallion CLI version 2.1.0** and minimum
**React Native Stallion SDK version 2.3.0**.
# Bundle Signing
Bundle signing is a security feature in React Native Stallion that ensures your Over-the-Air (OTA) updates are authentic, tamper-proof, and origin-verified before being applied in production environments.
**🧭 Why Bundle Signing Matters**
In high-stakes environments—like fintech, healthcare, or enterprise apps—code integrity is critical.
Without signing, OTA updates are vulnerable to:
- **Tampering in transit**
- **Unauthorized deployment**
- **Rollback to older, compromised builds**
Bundle signing mitigates these risks by cryptographically verifying each update before it's applied.
### 🔑 How It Works
Now that you understand the core concept of bundle signing, let's walk through the process step by step — from generating your signing keys, to signing your bundle, and finally verifying the signature at runtime.
#### Step 1: First, you need to generate a key pair using the Stallion CLI:
```bash
stallion generate-key-pair
```
This will create two files in the `stallion/secrets/` directory:
```
stallion/secrets/ ├── private-key.pem 🔒 Keep this secret. Used to sign
bundles. └── public-key.pem 🔓 Safe to distribute. Used to verify signatures.
```
#### Step 2: Add the public key to your native configuration files
You need to add the public key to your Android `strings.xml` and iOS `Info.plist` files. The public key should be added as a string resource named `StallionPublicSigningKey`. Here's how to do it:
- Copy the contents of your `stallion/secrets/public-key.pem` file
- Add it to your native configuration files as shown below:
For Android (`strings.xml`):
```xml
StallionExample680cd3b922e4392b4291eec9spb_rqEcK-p8u4i8rnEcQYutlcdS7c0IGAQf2P1pSjJV1yYOUR_PUBLIC_KEY_HERE
```
For iOS (`Info.plist`):
```xml
StallionPublicSigningKeyYOUR_PUBLIC_KEY_HERE
```
The public key should be a long string that looks something like this:
```
-----BEGIN PUBLIC KEY-----
MIIBIjANBgkqhkiG9w0BAQEFAAOCAQ8AMIIBCgKCAQEAh9Exmq0slWAXty4RBrGH
AKSJDHasdaSADSadW2D/U3IulUD5SbrC8y/bdRcYV6Lrtyh/MsAemdtcAWPSjtM9
R9NME6RZdHqSC8iNPqnx0Fg0Q1nvasdasYJG1HQ/fpeLJplEtgArGNisWX2HAEB1
+NB8djwNhdnr9fPTcuDzni8asKv7aFwcJfMW8EJpXELMxI+wNAQnoa3PMx9NOdeQ
zgMcm/GnVwpDtsIsoh9+phh4fS9w7hQzNz9IIP1kJqvev3vFGBB1HEQuWv2w0t5P
PBi233rTQBAQRGCZCUu1zTfJRVXcEvylbrcZ+m3LnvKQ4GDHLeZIGtUUbxRANip4 iwIDAQAB
-----END PUBLIC KEY-----
```
**Important**
When adding the public key to your native configuration files, only copy the
base64-encoded key content (the long string between BEGIN and END lines). Do
not include the "-----BEGIN PUBLIC KEY-----" and "-----END PUBLIC KEY-----"
lines.
#### Step 3: Sign the Bundle During Publish
When publishing your bundle, you need to include the `--private-key` parameter to sign it. This ensures that your bundle is cryptographically signed before being distributed to users.
```bash
stallion publish-bundle --upload-path=orgname/project-name/bucket-name --platform=android/ios --release-note="notes" --private-key="Path to your private key"
```
Example for Android:
```bash
stallion publish-bundle --upload-path=my-org/my-project/my-bucket --platform=android --release-note="my release notes" --private-key=./stallion/secrets/private-key.pem
```
Example for iOS:
```bash
stallion publish-bundle --upload-path=my-org/my-project/my-bucket --platform=ios --release-note="my release notes" --private-key=./stallion/secrets/private-key.pem
```
**Important**
Make sure to use the same private key that corresponds to the public key you
added in your native configuration files. Using different key pairs will cause
signature verification to fail.
The signing process:
1. The CLI reads your private key
2. Generates a cryptographic signature of your bundle
3. Attaches the signature to the bundle metadata
4. Uploads both the bundle and its signature to Stallion servers
This signature will be used by the Stallion SDK to verify the authenticity of the update before installing it on users' devices.
#### Step 4: Verify Signature on the Device
In the Stallion SDK, before an update is installed, the runtime:
- Extracts the bundle's signature
- Validates it using the embedded public key
- Rejects the update if validation fails
This ensures only trusted updates are applied.
### 🛡️ Security Best Practices
- Never expose your private.key — store it securely in CI/CD secrets or a vault
- Distribute the public.key inside your app or via a secure fetch mechanism
- Rotate key pairs periodically
---
# SSO Overview
Single Sign-On (SSO) integration for React Native Stallion - Secure authentication with enterprise identity providers using OIDC.
**Free for All Plans**
We believe SSO is a fundamental security feature that shouldn't be monetized.
That's why **SSO is available for free across all React Native Stallion plans** — because
secure authentication shouldn't come at a premium.
# Single Sign-On (SSO)
Single Sign-On (SSO) allows your team members to authenticate with Stallion using your organization's existing identity provider. This provides a seamless and secure login experience while giving administrators centralized control over access.
## Benefits of SSO
- **Centralized Access Control** - Manage user access through your existing identity provider
- **Enhanced Security** - Leverage your organization's authentication policies, MFA, and session management
- **Simplified Onboarding** - New team members can access Stallion immediately using their existing credentials
- **Audit & Compliance** - Track authentication events through your identity provider's logging
## Supported Protocols
**SAML 2.0 Coming Soon**
Currently, only **OIDC (OpenID Connect)** is supported. **SAML 2.0** support
is coming in **February 2026**.
Stallion currently supports authentication via **OpenID Connect (OIDC)**, an industry-standard protocol built on top of OAuth 2.0. OIDC provides secure, token-based authentication with support for modern security features.
## Supported Identity Providers
Stallion supports SSO integration with the following identity providers:
| Provider | OIDC | SAML 2.0 |
|----------|------|----------|
| [Okta](/docs/sso/oidc/okta) | ✅ | Coming Soon |
| [Microsoft Entra ID](/docs/sso/oidc/microsoft-entra-id) | ✅ | Coming Soon |
| [Keycloak](/docs/sso/oidc/keycloak) | ✅ | Coming Soon |
| [Google](/docs/sso/oidc/google) | ✅ | Coming Soon |
| [General Integration](/docs/sso/oidc/general-oidc) | ✅ | Coming Soon |
**Other Providers**
Don't see your identity provider listed? Any OIDC-compliant provider can be
configured using our [General OIDC](/docs/sso/oidc/general-oidc) guide.
## How It Works
1. **Admin configures SSO** - An organization admin sets up the connection between Stallion and your identity provider
2. **User initiates login** - Team members click "Sign in with SSO" on the Stallion login page
3. **Redirect to IdP** - Users are redirected to your identity provider's login page
4. **Authentication** - Users authenticate using their existing credentials (including MFA if configured)
5. **Token exchange** - Upon successful authentication, Stallion receives an ID token containing user information
6. **Session created** - Stallion creates a session and grants access based on the user's organization membership
## SSO Admins
Once SSO is enforced, everyone in your organization signs in through your
identity provider. **SSO admins** are the exception: when they enter their
email, they can choose **password or SSO**. This ensures you can still get in if
SSO is misconfigured or your identity provider is unavailable.
**SSO Admin Access**
The admin who configures SSO becomes the first SSO admin. **Only an existing
SSO admin can promote or demote another** — organization admins and owners
cannot, unless they are SSO admins themselves. Your organization must always
have at least one SSO admin, so the last one cannot be removed.
You can designate additional SSO admins, or hand the role over entirely, from
**Organization → Members**. This means the person who sets up SSO does not have
to be the one who holds password access afterwards — a common requirement when
IT configures SSO but a security team owns the fallback account.
### Passkeys
SSO admins sign in with a password plus a one-time code sent to their email. A
**passkey is also required by default**, exactly as it is for every other
Stallion account.
An SSO admin can turn on *Allow SSO admins to sign in without a passkey* under
**Organization → Members**, and then waive the passkey requirement for
individual SSO admins. The waiver only applies while all of the following hold,
so turning the org-wide setting off restores the passkey requirement
immediately:
- the account is an SSO admin,
- the organization has the setting enabled, and
- that specific admin has had the requirement waived.
## Getting Started
To configure SSO for your organization, select your identity provider from the list below:
- [Okta OIDC](/docs/sso/oidc/okta) - Configure SSO with Okta
- [Microsoft Entra ID OIDC](/docs/sso/oidc/microsoft-entra-id) - Configure SSO with Azure AD / Microsoft Entra ID
- [Keycloak OIDC](/docs/sso/oidc/keycloak) - Configure SSO with Keycloak
- [Google OIDC](/docs/sso/oidc/google) - Configure SSO with Google Workspace
- [General OIDC](/docs/sso/oidc/general-oidc) - Configure SSO with any OIDC-compliant provider
## Requirements
Before setting up SSO, ensure you have:
- A Stallion account (SSO is free on all plans)
- Admin access to your organization in Stallion Console
- Admin access to your identity provider
- The ability to create OIDC applications in your identity provider
---
# Okta OIDC
Configure Single Sign-On (SSO) with Okta for React Native Stallion using OpenID Connect.
**Free for All Plans**
SSO is available for free on all React Native Stallion plans.
# Okta OIDC Setup
This guide walks you through configuring SSO with Okta as your identity provider.
## Prerequisites
- Admin access to your Okta organization
- Admin access to your Stallion organization
## Step 1: Create an OIDC Application in Okta
1. Log in to your Okta Admin Console
2. Navigate to **Applications** → **Applications**
3. Click **Create App Integration**
4. Select **OIDC - OpenID Connect** as the sign-in method
5. Select **Web Application** as the application type
6. Click **Next**
## Step 2: Configure Application Settings
Configure the following settings:
| Setting | Value |
|---------|-------|
| App integration name | `Stallion SSO` |
| Sign-in redirect URIs | `https://api.stalliontech.io/api/v1/sso/auth/login/callback` |
| Sign-in redirect URIs | `https://api.stalliontech.io/api/v1/sso/auth/finalize/callback` |
| Sign-out redirect URIs | `https://console.stalliontech.io` |
## Step 3: Gather OIDC Configuration
After creating the application, note down the following values:
- **Client ID** - Found in the application's General tab
- **Client Secret** - Found in the application's General tab
- **Issuer URL** - Format: `https://{your-okta-domain}`
## Step 4: Configure SSO in Stallion Console
1. Log in to [Stallion Console](https://console.stalliontech.io)
2. Navigate to your **Organization** → **SSO Settings**
3. Click **Configure SSO**
### Step 4.1: Enter Configuration
Enter the following details:
| Field | Description |
|-------|-------------|
| Domain | Your organization's email domain (e.g., `yourcompany.com`) |
| Org Slug | A unique identifier for your organization |
| Issuer URL | From Step 3 (e.g., `https://{your-okta-domain}`) |
| Client ID | From Step 3 |
| Client Secret | From Step 3 |
Click **Next** to proceed.
### Step 4.2: Verify Domain
1. Copy the provided **TXT record**
2. Add it to your domain's DNS settings
3. Wait for DNS propagation (this may take a few minutes)
4. Click **Verify** to confirm domain ownership
### Step 4.3: Finalize SSO
1. Click **Finalize SSO**
2. You will be redirected to Okta to log in
3. Complete authentication with your Okta credentials
4. Once successful, SSO is fully configured
## Step 5: Assign Users
In Okta, assign the Stallion application to users or groups who should have access.
## Troubleshooting
**Need Help?**
If you encounter issues during setup, contact our support team at
[stalliontech.io/contact](https://stalliontech.io/contact).
---
# Microsoft Entra ID OIDC
Configure Single Sign-On (SSO) with Microsoft Entra ID (Azure AD) for React Native Stallion using OpenID Connect.
**Free for All Plans**
SSO is available for free on all React Native Stallion plans.
# Microsoft Entra ID OIDC Setup
This guide walks you through configuring SSO with Microsoft Entra ID (formerly Azure Active Directory) as your identity provider.
## Prerequisites
- Admin access to your Microsoft Entra ID tenant
- Admin access to your Stallion organization
## Step 1: Register an Application in Entra ID
1. Log in to the [Microsoft Entra admin center](https://entra.microsoft.com)
2. Navigate to **Identity** → **Applications** → **App registrations**
3. Click **New registration**
4. Configure the registration:
- **Name**: `Stallion SSO`
- **Supported account types**: Select based on your requirements
- **Redirect URI**: Select **Web** and enter `https://api.stalliontech.io/api/v1/sso/auth/login/callback`
5. Click **Register**
6. After registration, go to **Authentication** and add another redirect URI: `https://api.stalliontech.io/api/v1/sso/auth/finalize/callback`
## Step 2: Configure Client Secret
1. In your app registration, go to **Certificates & secrets**
2. Click **New client secret**
3. Add a description and select an expiration period
4. Click **Add**
5. **Copy the secret value immediately** - it won't be shown again
## Step 3: Gather OIDC Configuration
Note down the following values from your app registration:
| Value | Location |
|-------|----------|
| Client ID | Overview → Application (client) ID |
| Client Secret | Certificates & secrets (from Step 2) |
| Tenant ID | Overview → Directory (tenant) ID |
| Issuer URL | `https://login.microsoftonline.com/{tenant-id}/v2.0` |
**Use your own tenant ID, not /common**
The Issuer URL must name your directory. A shared endpoint such as
`https://login.microsoftonline.com/common/v2.0` would let accounts from *any*
Microsoft directory reach your organization's sign-in, so Stallion rejects
tokens that do not come from the directory the connection is configured for —
sign-in fails with **issuer_mismatch**.
## Step 4: Configure API Permissions
1. Go to **API permissions**
2. Click **Add a permission**
3. Select **Microsoft Graph** → **Delegated permissions**
4. Add the following permissions:
- `openid`
- `email`
- `profile`
5. Click **Grant admin consent for [your organization]**
## Step 5: Configure SSO in Stallion Console
1. Log in to [Stallion Console](https://console.stalliontech.io)
2. Navigate to your **Organization** → **SSO Settings**
3. Click **Configure SSO**
### Step 5.1: Enter Configuration
Enter the following details:
| Field | Description |
|-------|-------------|
| Domain | Your organization's email domain (e.g., `yourcompany.com`) |
| Org Slug | A unique identifier for your organization |
| Issuer URL | `https://login.microsoftonline.com/{tenant-id}/v2.0` |
| Client ID | From Step 3 |
| Client Secret | From Step 2 |
Click **Next** to proceed.
### Step 5.2: Verify Domain
1. Copy the provided **TXT record**
2. Add it to your domain's DNS settings
3. Wait for DNS propagation (this may take a few minutes)
4. Click **Verify** to confirm domain ownership
### Step 5.3: Finalize SSO
1. Click **Finalize SSO**
2. You will be redirected to Microsoft Entra ID to log in
3. Complete authentication with your Microsoft credentials
4. Once successful, SSO is fully configured
## Troubleshooting
**Need Help?**
If you encounter issues during setup, contact our support team at
[stalliontech.io/contact](https://stalliontech.io/contact).
---
# Google OIDC
Configure Single Sign-On (SSO) with Google Workspace for React Native Stallion using OpenID Connect.
**Free for All Plans**
SSO is available for free on all React Native Stallion plans.
# Google OIDC Setup
This guide walks you through configuring SSO with Google Workspace as your identity provider.
## Prerequisites
- Admin access to your Google Cloud Console
- A Google Workspace organization (for domain-restricted access)
- Admin access to your Stallion organization
## Step 1: Create OAuth Credentials in Google Cloud
1. Go to the [Google Cloud Console](https://console.cloud.google.com)
2. Select or create a project
3. Navigate to **APIs & Services** → **Credentials**
4. Click **Create Credentials** → **OAuth client ID**
5. If prompted, configure the OAuth consent screen first
## Step 2: Configure OAuth Consent Screen
1. Go to **APIs & Services** → **OAuth consent screen**
2. Select **Internal** (for Google Workspace) or **External**
3. Fill in the required information:
- **App name**: `Stallion SSO`
- **User support email**: Your support email
- **Developer contact**: Your email
4. Add scopes: `email`, `profile`, `openid`
5. Save and continue
## Step 3: Create OAuth Client ID
1. Go back to **Credentials** → **Create Credentials** → **OAuth client ID**
2. Select **Web application**
3. Configure:
| Setting | Value |
|---------|-------|
| Name | `Stallion SSO` |
| Authorized redirect URIs | `https://api.stalliontech.io/api/v1/sso/auth/login/callback` |
| Authorized redirect URIs | `https://api.stalliontech.io/api/v1/sso/auth/finalize/callback` |
4. Click **Create**
## Step 4: Gather OIDC Configuration
After creating the OAuth client, note down:
| Value | Description |
|-------|-------------|
| Client ID | Shown after creation |
| Client Secret | Shown after creation |
| Issuer URL | `https://accounts.google.com` |
## Step 5: Configure SSO in Stallion Console
1. Log in to [Stallion Console](https://console.stalliontech.io)
2. Navigate to your **Organization** → **SSO Settings**
3. Click **Configure SSO**
### Step 5.1: Enter Configuration
Enter the following details:
| Field | Description |
|-------|-------------|
| Domain | Your organization's email domain (e.g., `yourcompany.com`) |
| Org Slug | A unique identifier for your organization |
| Issuer URL | `https://accounts.google.com` |
| Client ID | From Step 4 |
| Client Secret | From Step 4 |
Click **Next** to proceed.
### Step 5.2: Verify Domain
1. Copy the provided **TXT record**
2. Add it to your domain's DNS settings
3. Wait for DNS propagation (this may take a few minutes)
4. Click **Verify** to confirm domain ownership
### Step 5.3: Finalize SSO
1. Click **Finalize SSO**
2. You will be redirected to Google to log in
3. Complete authentication with your Google Workspace credentials
4. Once successful, SSO is fully configured
## Restricting Access to Your Domain
To ensure only users from your Google Workspace domain can access Stallion:
1. Use an **Internal** OAuth consent screen, or
2. Configure domain restrictions in Stallion Console after SSO setup
## Troubleshooting
**Need Help?**
If you encounter issues during setup, contact our support team at
[stalliontech.io/contact](https://stalliontech.io/contact).
---
# Keycloak OIDC
Configure Single Sign-On (SSO) with Keycloak for React Native Stallion using OpenID Connect.
**Free for All Plans**
SSO is available for free on all React Native Stallion plans.
# Keycloak OIDC Setup
This guide walks you through configuring SSO with Keycloak as your identity provider.
## Prerequisites
- Admin access to your Keycloak instance
- Admin access to your Stallion organization
## Step 1: Create a New Client in Keycloak
1. Log in to your Keycloak Admin Console
2. Select your realm (or create a new one)
3. Navigate to **Clients** → **Create client**
4. Configure the client:
- **Client type**: OpenID Connect
- **Client ID**: `stallion-sso`
5. Click **Next**
## Step 2: Configure Client Settings
Configure the following settings:
| Setting | Value |
|---------|-------|
| Client authentication | ON |
| Valid redirect URIs | `https://api.stalliontech.io/api/v1/sso/auth/login/callback` |
| Valid redirect URIs | `https://api.stalliontech.io/api/v1/sso/auth/finalize/callback` |
| Web origins | `https://api.stalliontech.io` |
Click **Save**.
## Step 3: Gather OIDC Configuration
1. Go to **Clients** → **stallion-sso** → **Credentials** tab
2. Copy the **Client secret**
3. Note down the following values:
| Value | Description |
|-------|-------------|
| Client ID | `stallion-sso` (or your chosen ID) |
| Client Secret | From Credentials tab |
| Issuer URL | `https://{your-keycloak-domain}/realms/{realm-name}` |
## Step 4: Configure SSO in Stallion Console
1. Log in to [Stallion Console](https://console.stalliontech.io)
2. Navigate to your **Organization** → **SSO Settings**
3. Click **Configure SSO**
### Step 4.1: Enter Configuration
Enter the following details:
| Field | Description |
|-------|-------------|
| Domain | Your organization's email domain (e.g., `yourcompany.com`) |
| Org Slug | A unique identifier for your organization |
| Issuer URL | `https://{your-keycloak-domain}/realms/{realm-name}` |
| Client ID | From Step 3 |
| Client Secret | From Step 3 |
Click **Next** to proceed.
### Step 4.2: Verify Domain
1. Copy the provided **TXT record**
2. Add it to your domain's DNS settings
3. Wait for DNS propagation (this may take a few minutes)
4. Click **Verify** to confirm domain ownership
### Step 4.3: Finalize SSO
1. Click **Finalize SSO**
2. You will be redirected to Keycloak to log in
3. Complete authentication with your Keycloak credentials
4. Once successful, SSO is fully configured
## Step 5: Configure User Attributes (Optional)
To pass additional user information, configure mappers in Keycloak:
1. Go to **Clients** → **stallion-sso** → **Client scopes** tab
2. Click on the dedicated scope
3. Add mappers for email, name, and other required attributes
## Troubleshooting
**Need Help?**
If you encounter issues during setup, contact our support team at
[stalliontech.io/contact](https://stalliontech.io/contact).
---
# General OIDC
Configure Single Sign-On (SSO) with any OIDC-compliant identity provider for React Native Stallion.
**Free for All Plans**
SSO is available for free on all React Native Stallion plans.
# General OIDC Setup
This guide walks you through configuring SSO with any OpenID Connect (OIDC) compliant identity provider.
## Prerequisites
- An OIDC-compliant identity provider
- Admin access to your identity provider
- Admin access to your Stallion organization
## OIDC Requirements
Your identity provider must support:
- OpenID Connect Core 1.0
- Authorization Code Flow
- Standard OIDC claims (`sub`, `email`, `name`)
## Step 1: Create an OIDC Application
In your identity provider, create a new OIDC/OAuth application with the following configuration:
| Setting | Value |
|---------|-------|
| Application Name | `Stallion SSO` |
| Application Type | Web Application |
| Grant Type | Authorization Code |
| Redirect URI (Login) | `https://api.stalliontech.io/api/v1/sso/auth/login/callback` |
| Redirect URI (Finalize) | `https://api.stalliontech.io/api/v1/sso/auth/finalize/callback` |
| Post-Logout Redirect URI | `https://console.stalliontech.io` |
## Step 2: Configure Scopes
Ensure the following scopes are enabled:
- `openid` (required)
- `email` (required)
- `profile` (required)
## Step 3: Gather Configuration Values
Collect the following values from your identity provider:
| Value | Description |
|-------|-------------|
| Client ID | The unique identifier for your application |
| Client Secret | The secret key for your application |
| Issuer URL | The OIDC issuer URL (used for discovery) |
| Authorization URL | The authorization endpoint (if discovery not supported) |
| Token URL | The token endpoint (if discovery not supported) |
| UserInfo URL | The userinfo endpoint (if discovery not supported) |
**OIDC Discovery**
If your identity provider supports OIDC Discovery, you only need the **Issuer
URL**. Stallion will automatically fetch other endpoints from
`{issuer}/.well-known/openid-configuration`.
## Step 4: Configure SSO in Stallion Console
1. Log in to [Stallion Console](https://console.stalliontech.io)
2. Navigate to your **Organization** → **SSO Settings**
3. Click **Configure SSO**
### Step 4.1: Enter Configuration
Enter the following details:
| Field | Description |
|-------|-------------|
| Domain | Your organization's email domain (e.g., `yourcompany.com`) |
| Org Slug | A unique identifier for your organization |
| Issuer URL | Your identity provider's issuer URL |
| Client ID | From Step 3 |
| Client Secret | From Step 3 |
Click **Next** to proceed.
### Step 4.2: Verify Domain
1. Copy the provided **TXT record**
2. Add it to your domain's DNS settings
3. Wait for DNS propagation (this may take a few minutes)
4. Click **Verify** to confirm domain ownership
### Step 4.3: Finalize SSO
1. Click **Finalize SSO**
2. You will be redirected to your identity provider to log in
3. Complete authentication with your IdP credentials
4. Once successful, SSO is fully configured
## Claim Mapping
Stallion expects the following claims in the ID token:
| Stallion Field | OIDC Claim | Required |
|----------------|------------|----------|
| User ID | `sub` | Yes |
| Email | `email` | Yes |
| Name | `name` or `preferred_username` | No |
| Profile Picture | `picture` | No |
If your identity provider uses different claim names, contact Stallion support for custom claim mapping.
## Testing Your Configuration
After saving, click **Test Connection** to verify:
1. Redirect to your identity provider works
2. Authentication completes successfully
3. User information is retrieved correctly
## Troubleshooting
### Common Issues
**Invalid redirect URI**
- Ensure both redirect URIs are configured in your IdP:
- `https://api.stalliontech.io/api/v1/sso/auth/login/callback`
- `https://api.stalliontech.io/api/v1/sso/auth/finalize/callback`
**Missing claims**
- Verify that `email` and `profile` scopes are enabled
- Check that your IdP is configured to include email in the ID token
**Discovery failed**
- If your IdP doesn't support OIDC discovery, manually enter all endpoint URLs
**Need Help?**
If you encounter issues during setup, contact our support team at
[stalliontech.io/contact](https://stalliontech.io/contact).
---
# SCIM Provisioning
Automatically create, update and remove Stallion members from your identity provider using SCIM 2.0, and map IdP groups onto Stallion roles.
# User Provisioning (SCIM)
SSO decides **who can sign in**. SCIM decides **who is a member**.
Without SCIM, signing in through your identity provider is not enough on its own —
someone still has to invite each person into the organization by hand, and remove
them by hand when they leave. SCIM closes that gap: assign the Stallion app to a
user in your identity provider and they appear as a member; unassign them and
their access is gone, along with every active session.
**Requires SSO**
SCIM provisions members into the organization your identity provider already
authenticates for, so you need an **active SSO connection with a verified
domain** before you can configure it.
## What SCIM controls
| Action in your identity provider | What happens in Stallion |
| --- | --- |
| Assign the app to a user | The member is created and added to your organization |
| Add the user to a mapped group | Their organization role changes to that group's role |
| Remove the user from a mapped group | Their role falls back to your default role |
| Rename a group | Nothing — mappings survive renames |
| Unassign the app / deactivate the user | Organization access, project access and all active sessions are removed |
## Roles
SCIM can set one thing: the member's **organization role**.
| Stallion role | What it grants |
| --- | --- |
| **Admin** | Full control — projects, members, billing, promoting and rolling back releases. Seeded with Developer access on every project. |
| **Member** | No organization-wide permissions. Seeded with Viewer access on every project. |
Per-project roles stay in the console. If you grant someone **Release Manager**
on a specific project, that grant survives every SCIM role change — it is
deliberately treated as outranking anything derived from the organization role.
### SSO Admin is not provisionable
**SSO Admin cannot be assigned over SCIM, by design.** It is the break-glass role
that lets a named person sign in with a password if your identity provider goes
down, and it governs who may change your SSO configuration.
If your identity provider could grant it, a compromised provider could mint
itself a password bypass around the very SSO it controls. And because Stallion
requires every organization to keep at least one SSO Admin, a routine
deprovisioning sweep could otherwise remove the last one and lock you out of
your own account.
SSO Admins are managed by SSO Admins, in **Members**. A SCIM request that would
remove your last SSO Admin is refused with a `409`, and the member keeps their
access — you will see the rejection in the activity log on the SCIM settings
page.
## Setting it up
1. Go to **Settings → Federation → User provisioning (SCIM)**.
2. Select the **Default role** — what a provisioned user gets when none of their
groups is mapped. Most organizations leave this as **Member**.
3. Click **Generate token**. Copy both the **SCIM Base URL** and the **bearer
token**.
**The token is shown once**
Stallion stores only a salted hash of your SCIM token, so it cannot be shown
again. If you lose it, rotate to issue a new one — rotating invalidates the
previous token immediately, so update your identity provider straight after.
4. Paste both into your identity provider's provisioning settings and run a
sync. See the [Microsoft Entra ID guide](/docs/sso/scim/microsoft-entra-id)
for the exact fields.
5. Once your groups have synced, map them to roles in the **Group role mapping**
table.
### The base URL is region-specific
Your organization lives in a region, and the SCIM URL shown on the settings page
is the one for *your* region. A request sent to the wrong regional host is
refused with an error naming the correct one — it is never silently accepted, so
a misconfiguration fails loudly rather than half-applying changes.
## Group role mapping
Groups carry no permissions on their own. A group becomes a Stallion role only
when you map it, so the dozens of unrelated groups your identity provider pushes
are simply ignored.
- Only groups your identity provider has actually synced appear in the table —
you map a group that exists rather than typing a name that may never match.
- A user in several mapped groups gets the **highest** role among them.
- A user in no mapped group gets the **default role**.
- Mappings are keyed on the group's stable identifier, so renaming a group in
your identity provider does not break it.
Changing a mapping applies immediately to everyone currently in that group — you
do not have to wait for the next sync.
## Turning SCIM on and off
**Pause** stops your identity provider changing anything while leaving every
existing member exactly as they are. Pausing is not a mass deprovision.
**Revoke** destroys the token and disables provisioning. The correlation records
between Stallion accounts and identity-provider users are kept, so re-enabling
later resumes where it left off instead of re-creating everyone as new.
## Enabling SCIM on an existing organization
Members you invited by hand before turning SCIM on are **adopted**, not
duplicated — your provider's first sync claims them rather than failing on them.
**Adoption does not change anyone's role.** Turning SCIM on is not a re-grading
of your organization: until your identity provider actually says something about
someone, they keep exactly the access they had. In particular the admin who set
the organization up does not get demoted by their own first sync.
A member becomes *Managed by SCIM* — the badge in **Members**, and a disabled
role picker — only once a group mapping actually assigns their role. Before
that, their role is still yours to edit in the console, because SCIM has not
decided it.
While your organization has **no group mappings at all**, SCIM does not touch
roles for anyone. It still creates and removes members; it simply has no opinion
about what they should be. The activity log says so explicitly:
> roles unchanged — no group role mappings configured yet
## Keeping an account outside SCIM
Sometimes you want an account your identity provider cannot touch — most often
the person who set the organization up and configured SSO. There are two levels,
and they transfer at different moments.
**Do not assign them to the SCIM application.** This is the one that matters.
Assignment is what creates their SCIM record, and from that point your identity
provider owns their lifecycle: unassigning them later removes them from the
organization, along with every active session. Left off the SCIM application
entirely, they are invisible to provisioning — nothing syncs them, nothing can
deprovision them.
They can still sign in. Sign-in is governed by your OIDC application, which is a
separate assignment; see
[the two applications](/docs/sso/scim/microsoft-entra-id#step-2--create-a-non-gallery-application-for-provisioning).
**Do not put them in a mapped group.** If they are assigned to the SCIM
application but you still want to control their role by hand, keep them out of
every group you have mapped to a Stallion role. A mapped group is what transfers
role ownership and locks the console picker.
**Keep one admin out of SCIM**
Worth doing deliberately: leave at least one org admin off the SCIM
application. A misconfigured group mapping cannot then reach them, and you
keep someone who can repair the organization from the console. It is the same
reasoning as the SSO Admin break-glass role, applied to provisioning.
Stallion also refuses to remove or demote your **last** org admin — a SCIM
request that would is rejected with a `409` and recorded in the activity log —
but that is a backstop, not a substitute for keeping one person out of scope.
## Troubleshooting
The SCIM settings page shows the last request received, the last error, and a
log of recent provisioning activity, including anything Stallion refused.
| Symptom | Cause |
| --- | --- |
| Every request returns `401` | Token revoked or rotated, SSO connection disabled, or SCIM paused |
| Request rejected naming another host | Your provider is pointed at the wrong region's base URL |
| `'user@example.com' is not in a verified domain` | The address is outside the domains verified on your SSO connection |
| A deprovision was refused with `409` | That member is your only SSO Admin |
| Users are created but all get the same role | Their groups are not mapped yet, so they fall to the default role |
---
# SCIM with Microsoft Entra ID
Configure automatic user provisioning from Microsoft Entra ID to Stallion using SCIM 2.0, including group-to-role mapping.
# SCIM with Microsoft Entra ID
This guide configures Entra ID to create, update and remove Stallion members
automatically. Read the [SCIM overview](/docs/sso/scim/overview) first for what
SCIM controls and what it deliberately does not.
## Before you start
- An **active** Stallion SSO connection with a **verified domain**
- You are an **SSO Admin** on the Stallion organization
- In Entra, you can create and edit enterprise applications (Application
Administrator or higher)
- **Microsoft Entra ID P1 or P2.** Automatic provisioning to an application that
is not in the Entra gallery is a paid feature; on the free tier the
Provisioning blade stays unavailable.
## Step 1 — Get your endpoint and token
In Stallion, go to **Settings → Federation → User provisioning (SCIM)**.
1. Set the **Default role** — what a provisioned user gets when none of their
groups is mapped. Leave it as **Member** unless you have a reason not to.
2. Click **Generate token**.
3. Copy the **SCIM Base URL** and the **bearer token**.
**Copy the token now**
Only a salted hash is stored, so the token cannot be shown again. If you lose
it, rotate to issue a new one — the previous token stops working immediately.
## Step 2 — Create a non-gallery application for provisioning
Provisioning needs its **own** Entra application, separate from the one you use
for OIDC sign-in.
1. In the Azure portal, go to **Enterprise applications → New application**.
2. Choose **Create your own application**.
3. Name it something like `Stallion SCIM`.
4. Select **Integrate any other application you don't find in the gallery
(Non-gallery)**, then **Create**.
**Why a second application?**
Entra only offers automatic provisioning on gallery apps and on non-gallery
apps created this way. An application you registered under **App
registrations** — which is how OIDC sign-in is set up — uses a template with no
provisioning capability, so its Provisioning blade is disabled and shows
*"Out of the box automatic provisioning to … is not supported today."* That
message is about how the app was created in Entra, not about Stallion.
Stallion does not mind the split: SCIM requests are authenticated by the bearer
token alone, which already identifies your organization. The provisioning app
never needs to know about your sign-in app.
You will end up with two applications, which is expected:
| Entra application | Purpose |
| --- | --- |
| Your OIDC app (App registration) | Who can **sign in** |
| `Stallion SCIM` (non-gallery) | Who gets **provisioned** |
## Step 3 — Configure provisioning
1. Open the `Stallion SCIM` application you just created.
2. Go to **Provisioning → Get started**, and set **Provisioning Mode** to
**Automatic**.
3. Under **Admin Credentials**:
| Field | Value |
| --- | --- |
| Tenant URL | The **SCIM Base URL** from Stallion |
| Secret Token | The **bearer token** from Stallion |
4. Click **Test Connection**. Entra fetches the service configuration and
verifies the token. If it succeeds, click **Save**.
**Use the URL Stallion gave you**
The base URL is specific to your organization's region. Typing a different
Stallion hostname will fail with an error naming the correct one.
## Step 4 — Attribute mappings
Entra's defaults work. The attributes Stallion honours are:
| Entra attribute | Stallion use |
| --- | --- |
| `userName` | The member's email address — must be in a verified domain |
| `active` | `false` removes the member from the organization |
| `externalId` | Correlation, so the link survives an email change in Entra |
| `displayName`, `name.givenName`, `name.familyName` | Display name |
You can safely delete mappings for attributes Stallion does not use (phone
numbers, addresses, job title). Leave `userName`, `active` and `externalId` in
place.
**Email changes are not applied**
Stallion deliberately ignores a `userName` change pushed over SCIM. A Stallion
account's address identifies it across every organization it belongs to, so one
tenant's identity provider must not be able to rename it. `externalId` is what
keeps the correlation stable if the address changes in Entra.
## Step 5 — Assign users and groups
Under **Provisioning → Settings**, set **Scope** to *Sync only assigned users and
groups*, then:
1. Go to **Users and groups** on the `Stallion SCIM` application.
2. Assign the users, and the groups you intend to map to roles.
3. Return to **Provisioning** and set **Provisioning Status** to **On**.
**Leave your break-glass admin off this list**
Anyone you assign here gets a SCIM record, and from then on unassigning them
removes them from the organization. If you want an account Entra cannot touch
— typically whoever set the organization up — assign them to the **sign-in**
application only and leave them off this one. See
[keeping an account outside SCIM](/docs/sso/scim/overview#keeping-an-account-outside-scim).
**Assign people on both applications**
Assignment on your OIDC app decides who can **sign in**; assignment on
`Stallion SCIM` decides who gets **provisioned**. Someone assigned only to the
provisioning app becomes a member but cannot sign in, and someone assigned only
to the sign-in app can authenticate but will never be given access to the
organization.
To test a single user immediately instead of waiting for a cycle, use
**Provision on demand** on the Provisioning blade. It runs one named user right
away and shows each step — import, match, determine action, export — with the
exact request and response.
Entra's initial cycle can take up to 40 minutes. Subsequent cycles run roughly
every 40 minutes.
## Step 6 — Map groups to roles
Once Entra has synced your groups, they appear in Stallion under **Group role
mapping** on the SCIM settings page. Choose **Admin** or **Member** for each
group you want to grant a role.
A typical setup is two groups:
| Entra group | Stallion role |
| --- | --- |
| `Stallion Admins` | Admin |
| `Stallion Users` | Member |
Anyone assigned the app but in neither group still gets the default role.
Changing a mapping takes effect immediately for everyone currently in the group
— you do not have to wait for the next Entra cycle.
## What deprovisioning does
When you unassign a user from the application, Entra sends a request setting
`active` to `false`. Stallion then removes:
- Organization access
- Project access
- SSO tenant membership
- **Every active session** — access tokens live 30 days, so revoking them is the
point of deprovisioning rather than an extra
The one exception is your last SSO Admin, which Stallion refuses to remove. See
[SSO Admin is not provisionable](/docs/sso/scim/overview#sso-admin-is-not-provisionable).
## Troubleshooting
Entra's **Provisioning logs** (on the enterprise application) show every request
and Stallion's response. The SCIM settings page in Stallion shows the same events
from the other side, including anything refused.
| Entra symptom | Cause |
| --- | --- |
| *"Out of the box automatic provisioning … is not supported today"* | The app was created under **App registrations**. Create a non-gallery application instead — see [Step 2](#step-2--create-a-non-gallery-application-for-provisioning) |
| Provisioning blade unavailable on a non-gallery app | The tenant is on free Entra ID; automatic provisioning needs P1 or P2 |
| Test Connection fails with 401 | Token was rotated or revoked, SCIM is paused, or the SSO connection is not active |
| Test Connection fails naming another host | Wrong region in the Tenant URL — use the URL shown in Stallion |
| User skipped: "not in a verified domain" | The address is outside the domains verified on your SSO connection |
| Deprovision fails with 409 | That member is your only SSO Admin |
| Provisioning quarantined | Entra quarantines a job after repeated failures. Fix the cause, then **Restart provisioning** |
| Users provisioned but all at the same role | Their groups are not mapped yet |
---
# SCIM with Google Workspace
Why automated SCIM provisioning from Google Workspace to Stallion is not possible, and what to use for membership and offboarding instead.
# SCIM with Google Workspace
**Google Workspace cannot provision to Stallion over SCIM.** This is a limit of
Google Workspace, not of Stallion's SCIM endpoint, which is standard SCIM 2.0
with no provider-specific configuration.
**Google sign-in is unaffected**
This page is only about **provisioning**. Signing in to Stallion with Google
is fully supported — see [Google OIDC](/docs/sso/oidc/google).
## Why not
Google's automated user provisioning targets **pre-integrated catalog apps
only** — roughly 80 named applications, each with its own configuration page in
the Admin console and its endpoint and attribute mapping already built in. There
is no screen anywhere in Google Workspace for entering your own SCIM base URL
and bearer token.
The path Google offers for an app that is not in its catalog is
[Set up your own custom SAML app](https://knowledge.workspace.google.com/admin/apps/set-up-your-own-custom-saml-app),
and that flow is SSO and nothing else: ACS URL, Entity ID, attribute mapping,
group mapping into the SAML assertion. No provisioning step exists in it.
So unlike Microsoft Entra — where a *non-gallery application* exists precisely so
an admin can point at an arbitrary SCIM endpoint — there is nowhere to put
Stallion's URL, however compliant the endpoint is.
Stallion is not in Google's catalog.
## What to use instead
### Google sign-in, manual membership
Keep [Google OIDC](/docs/sso/oidc/google) for authentication, so password policy,
MFA and session control stay with Google. Manage membership in **Members** in
the Stallion console: invite people, set roles, remove them when they leave.
**Offboarding is not automatic**
Suspending someone in Google Workspace stops them signing in, but their
Stallion membership and any **active session** survive until a human removes
them in the console. Sessions last 30 days. If automatic offboarding is what
you need from SCIM, this option does not give it to you.
### A different provider for provisioning
Stallion's SCIM endpoint is generic, so any provider that can push to a custom
SCIM URL will work — and it does **not** have to be the provider you use to sign
in. SCIM authenticates on its own bearer token and has no relationship to your
OIDC connection.
Plenty of organizations run Google Workspace for mail and calendar while identity
lives elsewhere. If that is you:
- [Microsoft Entra ID](/docs/sso/scim/microsoft-entra-id) — documented and tested
- Okta, JumpCloud, OneLogin, Ping — standard SCIM 2.0 against the same endpoint;
not documented here yet, so [get in touch](mailto:support@stalliontech.io) and
we will walk you through it
## If this changes
Getting listed in Google's catalog is an onboarding process with Google, not a
change to our code — the endpoint already exists and already speaks the protocol
Google's connectors use. If Google Workspace provisioning matters to your
rollout, tell us before you commit to a plan; demand is what decides whether we
pursue the listing.
---
# Uploading Source Maps to Sentry | Stallion OTA Updates
Learn how to upload React Native source maps from Stallion OTA updates to Sentry for accurate error tracking. Step-by-step guide for Hermes and JavaScript Core builds, including source map composition and sentry-cli configuration. Integrate Stallion with Sentry for production stack trace resolution.
**CLI Requirement**
Source map upload to Sentry requires Stallion CLI version 2.4.0 or above. Make sure you're running the latest version. Check the [CLI Installation guide](/docs/cli/installation) if you need to update.
## Publish Bundle
When publishing with `--keep-artifacts=true` and `--sourcemap=true`, Stallion performs the standard OTA publish flow and additionally persists all bundle and sourcemap outputs on disk for Sentry integration.
Example command:
```bash
stallion publish-bundle --upload-path=orgname/project-name/bucket-name --platform=android/ios --release-note="notes" --keep-artifacts=true --sourcemap=true
```
This enables deterministic Sentry integration without re-running any React Native bundling step.
- **Normal OTA publish is executed**
Stallion generates the platform bundles, applies Hermes compilation when enabled, uploads the OTA payload to the Stallion backend, and completes the rollout exactly as in a standard publish.
- **Source maps are generated**
With `--sourcemap=true`, Stallion ensures both standard JS sourcemaps and Hermes sourcemaps are produced for the publish.
Instead of treating the bundle and sourcemap as temporary files, Stallion keeps the final outputs in a stable directory structure so you can reliably pick them up in CI and upload to Sentry.
- **Artifacts are persisted on disk**
With `--keep-artifacts=true`, Stallion does not delete any intermediate build outputs and writes the final bundle + sourcemap pairs into a stable, CI-friendly directory.
The resulting structure is:
```
stallion-artifacts/
├── android/
│ ├── normal/
│ │ ├── index.android.bundle
│ │ └── index.android.bundle.map
│ └── hermes/
│ ├── index.android.bundle
│ └── index.android.bundle.hbc.map
└── ios/
├── normal/
| ├── main.jsbundle
| └── main.jsbundle.map
└── hermes/
├── main.jsbundle
└── main.jsbundle.hbc.map
```
## Prepare sourcemaps for Sentry
**Javascript Core**
You can upload normal JS sourcemap directly to Sentry. No additional steps are required.
**Hermes**
Use the following commands to merge the packager + Hermes sourcemaps and preserve the Debug ID metadata (required by Sentry to correctly associate artifacts).
#### Android
#### iOS
```bash
mv stallion-artifacts/android/normal/index.android.bundle.map stallion-artifacts/android/normal/index.android.bundle.packager.map
node \
node_modules/react-native/scripts/compose-source-maps.js \
stallion-artifacts/android/normal/index.android.bundle.packager.map \
stallion-artifacts/android/hermes/index.android.bundle.hbc.map \
-o stallion-artifacts/android/normal/index.android.bundle.map
node \
node_modules/@sentry/react-native/scripts/copy-debugid.js \
stallion-artifacts/android/normal/index.android.bundle.packager.map stallion-artifacts/android/normal/index.android.bundle.map
rm -f stallion-artifacts/android/normal/index.android.bundle.packager.map
```
```bash
mv stallion-artifacts/ios/normal/main.jsbundle.map stallion-artifacts/ios/normal/main.jsbundle.packager.map
node \
node_modules/react-native/scripts/compose-source-maps.js \
stallion-artifacts/ios/normal/main.jsbundle.packager.map \
stallion-artifacts/ios/hermes/main.jsbundle.hbc.map \
-o stallion-artifacts/ios/normal/main.jsbundle.map
node \
node_modules/@sentry/react-native/scripts/copy-debugid.js \
stallion-artifacts/ios/normal/main.jsbundle.packager.map stallion-artifacts/ios/normal/main.jsbundle.map
rm -f stallion-artifacts/ios/normal/main.jsbundle.packager.map
```
## Upload to Sentry
Make sure sentry-cli is configured for your project and set up your environment variables:
```bash
SENTRY_AUTH_TOKEN=your_sentry_auth_token
SENTRY_ORG=your_sentry_org
SENTRY_PROJECT=your_sentry_project
```
Upload the bundle and source map to Sentry:
**Javascript Core**
Upload source maps for React Native JavaScript Core application.
#### Android
#### iOS
```bash
node_modules/@sentry/cli/bin/sentry-cli sourcemaps upload \
--debug-id-reference \
--strip-prefix /path/to/project/root \
stallion-artifacts/android/normal/index.android.bundle stallion-artifacts/android/normal/index.android.bundle.map
```
```bash
node_modules/@sentry/cli/bin/sentry-cli sourcemaps upload \
--debug-id-reference \
--strip-prefix /path/to/project/root \
stallion-artifacts/ios/normal/main.jsbundle stallion-artifacts/ios/normal/main.jsbundle.map
```
**Hermes**
Upload source maps for React Native Hermes applications.
#### Android
#### iOS
```bash
node_modules/@sentry/cli/bin/sentry-cli sourcemaps upload \
--strip-prefix /path/to/project/root \
stallion-artifacts/android/hermes/index.android.bundle stallion-artifacts/android/normal/index.android.bundle.map
```
```bash
node_modules/@sentry/cli/bin/sentry-cli sourcemaps upload \
--debug-id-reference \
--strip-prefix /path/to/project/root \
stallion-artifacts/ios/hermes/main.jsbundle stallion-artifacts/ios/normal/main.jsbundle.map
```
## Wrap Your App
Ensure `withStallion` is the outermost function because it needs access to the root component in order to swap out the bundle.
```javascript
export default withStallion(Sentry.wrap(App));
```
This ensures that both Stallion and Sentry are properly configured to work together, with Stallion handling OTA updates and Sentry handling error tracking.
## Reference
- [Sentry: Uploading Source Maps](https://docs.sentry.io/platforms/react-native/sourcemaps/uploading/)
---
# Uploading Source Maps to Bugsnag | Stallion OTA Updates
Learn how to upload React Native source maps from Stallion OTA updates to Bugsnag for accurate error monitoring. Complete guide for Hermes and JavaScript Core builds, including source map composition, code bundle ID configuration, and Bugsnag integration with Stallion for production debugging.
**CLI Requirement**
Source map upload to Bugsnag requires Stallion CLI version 2.4.0 or above. Make sure you're running the latest version. Check the [CLI Installation guide](/docs/cli/installation) if you need to update.
## Publish Bundle
When publishing with `--keep-artifacts=true` and `--sourcemap=true`, Stallion performs the standard OTA publish flow and additionally persists all bundle and sourcemap outputs on disk for Bugsnag integration.
Example command:
```bash
stallion publish-bundle --upload-path=orgname/project-name/bucket-name --platform=android/ios --release-note="notes" --keep-artifacts=true --sourcemap=true
```
This enables deterministic Bugsnag integration without re-running any React Native bundling step.
- **Normal OTA publish is executed**
Stallion generates the platform bundles, applies Hermes compilation when enabled, uploads the OTA payload to the Stallion backend, and completes the rollout exactly as in a standard publish.
- **Source maps are generated**
With `--sourcemap=true`, Stallion ensures both standard JS sourcemaps and Hermes sourcemaps are produced for the publish.
Instead of treating the bundle and sourcemap as temporary files, Stallion keeps the final outputs in a stable directory structure so you can reliably pick them up in CI and upload to Bugsnag.
- **Artifacts are persisted on disk**
With `--keep-artifacts=true`, Stallion does not delete any intermediate build outputs and writes the final bundle + sourcemap pairs into a stable, CI-friendly directory.
The resulting structure is:
```
stallion-artifacts/
├── android/
│ ├── normal/
│ │ ├── index.android.bundle
│ │ └── index.android.bundle.map
│ └── hermes/
│ ├── index.android.bundle
│ └── index.android.bundle.hbc.map
└── ios/
| ├── normal/
| | ├── main.jsbundle
| | └── main.jsbundle.map
| └── hermes/
| ├── main.jsbundle
| └── main.jsbundle.hbc.map
```
## Prepare sourcemaps for Bugsnag
**Javascript Core**
You can upload normal JS sourcemap directly to Bugsnag. No additional steps are required.
**Hermes**
For Hermes builds, you need to compose the packager and Hermes sourcemaps. Use the following commands:
#### Android
#### iOS
```bash
mv stallion-artifacts/android/normal/index.android.bundle.map stallion-artifacts/android/normal/index.android.bundle.packager.map
node \
node_modules/react-native/scripts/compose-source-maps.js \
stallion-artifacts/android/normal/index.android.bundle.packager.map \
stallion-artifacts/android/hermes/index.android.bundle.hbc.map \
-o stallion-artifacts/android/normal/index.android.bundle.map
rm -f stallion-artifacts/android/normal/index.android.bundle.packager.map
```
```bash
mv stallion-artifacts/ios/normal/main.jsbundle.map stallion-artifacts/ios/normal/main.jsbundle.packager.map
node \
node_modules/react-native/scripts/compose-source-maps.js \
stallion-artifacts/ios/normal/main.jsbundle.packager.map \
stallion-artifacts/ios/hermes/main.jsbundle.hbc.map \
-o stallion-artifacts/ios/normal/main.jsbundle.map
rm -f stallion-artifacts/ios/normal/main.jsbundle.packager.map
```
## Upload to Bugsnag
### Installation
Install the Bugsnag source maps uploader:
```bash
npm install --save-dev @bugsnag/source-maps
# or
yarn add --dev @bugsnag/source-maps
```
### Extract Bundle Hash
When publishing a bundle, extract the bundle hash from the output. In your CI pipeline:
```bash
OUTPUT=$(stallion publish-bundle \
--upload-path=$UPLOAD_PATH \
--platform=$PLATFORM \
--release-note="$RELEASE_NOTE" \
--keep-artifacts=true \
--sourcemap=true)
BUNDLE_HASH=$(echo "$OUTPUT" | grep -oE '[a-f0-9]{64}')
CODE_BUNDLE_ID=${BUNDLE_HASH:0:32} # First 32 characters
```
The `CODE_BUNDLE_ID` (first 32 characters of the bundle hash) is used to associate source maps with the running bundle, similar to how CodePush uses bundle identifiers.
### Upload Source Maps
Upload the bundle and source map to Bugsnag using the code bundle ID:
**Javascript Core**
Upload source maps for React Native JavaScript Core application.
#### Android
#### iOS
```bash
npx bugsnag-source-maps upload-react-native \
--api-key YOUR_API_KEY_HERE \
--code-bundle-id $CODE_BUNDLE_ID \
--platform android \
--source-map stallion-artifacts/android/normal/index.android.bundle.map \
--bundle stallion-artifacts/android/normal/index.android.bundle
```
```bash
npx bugsnag-source-maps upload-react-native \
--api-key YOUR_API_KEY_HERE \
--code-bundle-id $CODE_BUNDLE_ID \
--platform ios \
--source-map stallion-artifacts/ios/normal/main.jsbundle.map \
--bundle stallion-artifacts/ios/normal/main.jsbundle
```
**Hermes**
Upload source maps for React Native Hermes applications.
#### Android
#### iOS
```bash
npx bugsnag-source-maps upload-react-native \
--api-key YOUR_API_KEY_HERE \
--code-bundle-id $CODE_BUNDLE_ID \
--platform android \
--source-map stallion-artifacts/android/normal/index.android.bundle.map \
--bundle stallion-artifacts/android/hermes/index.android.bundle
```
```bash
npx bugsnag-source-maps upload-react-native \
--api-key YOUR_API_KEY_HERE \
--code-bundle-id $CODE_BUNDLE_ID \
--platform ios \
--source-map stallion-artifacts/ios/normal/main.jsbundle.map \
--bundle stallion-artifacts/ios/hermes/main.jsbundle
```
## Configure Bugsnag in Your App
In your React Native app, import `ACTIVE_RELEASE_HASH` from `react-native-stallion` and use it as Bugsnag’s `codeBundleId` for the currently running Stallion bundle:
**ACTIVE_RELEASE_HASH requirement**
`ACTIVE_RELEASE_HASH` is available in **react-native-stallion 2.4.0-alpha.5** and above. On older SDK versions it may be missing/undefined.
```tsx
import { AppRegistry } from 'react-native';
import App from './App';
import { name as appName } from './app.json';
import Bugsnag from '@bugsnag/react-native';
import { ACTIVE_RELEASE_HASH } from 'react-native-stallion';
Bugsnag.start({
codeBundleId: ACTIVE_RELEASE_HASH ?? '',
});
AppRegistry.registerComponent(appName, () => App);
```
`ACTIVE_RELEASE_HASH` from the Stallion SDK matches the first 32 characters of the bundle hash, which is the same `CODE_BUNDLE_ID` used when uploading source maps. This ensures Bugsnag can correctly associate stack traces with the uploaded source maps.
## Complete CI Example
Here's a complete GitHub Actions example that publishes, extracts the hash, and uploads to Bugsnag:
```yaml
- name: Publish Bundle and Extract Hash
id: publish
run: |
echo "Publishing bundle..."
OUTPUT=$(stallion publish-bundle \
--upload-path=$UPLOAD_PATH \
--platform=$PLATFORM \
--release-note="$RELEASE_NOTE" \
--keep-artifacts=true \
--sourcemap=true)
echo "$OUTPUT"
BUNDLE_HASH=$(echo "$OUTPUT" | grep -oE '[a-f0-9]{64}')
CODE_BUNDLE_ID=${BUNDLE_HASH:0:32}
echo "Bundle hash: $BUNDLE_HASH"
echo "Code bundle ID: $CODE_BUNDLE_ID"
echo "BUNDLE_HASH=$BUNDLE_HASH" >> $GITHUB_ENV
echo "CODE_BUNDLE_ID=$CODE_BUNDLE_ID" >> $GITHUB_ENV
- name: Prepare Hermes Source Maps (if using Hermes)
run: |
if [ "$PLATFORM" = "android" ]; then
mv stallion-artifacts/android/normal/index.android.bundle.map stallion-artifacts/android/normal/index.android.bundle.packager.map
node node_modules/react-native/scripts/compose-source-maps.js \
stallion-artifacts/android/normal/index.android.bundle.packager.map \
stallion-artifacts/android/hermes/index.android.bundle.hbc.map \
-o stallion-artifacts/android/normal/index.android.bundle.map
rm -f stallion-artifacts/android/normal/index.android.bundle.packager.map
else
mv stallion-artifacts/ios/normal/main.jsbundle.map stallion-artifacts/ios/normal/main.jsbundle.packager.map
node node_modules/react-native/scripts/compose-source-maps.js \
stallion-artifacts/ios/normal/main.jsbundle.packager.map \
stallion-artifacts/ios/hermes/main.jsbundle.hbc.map \
-o stallion-artifacts/ios/normal/main.jsbundle.map
rm -f stallion-artifacts/ios/normal/main.jsbundle.packager.map
fi
- name: Upload Source Maps to Bugsnag
run: |
if [ "$PLATFORM" = "android" ]; then
npx bugsnag-source-maps upload-react-native \
--api-key $BUGSNAG_API_KEY \
--code-bundle-id $CODE_BUNDLE_ID \
--platform android \
--source-map stallion-artifacts/android/normal/index.android.bundle.map \
--bundle stallion-artifacts/android/hermes/index.android.bundle
else
npx bugsnag-source-maps upload-react-native \
--api-key $BUGSNAG_API_KEY \
--code-bundle-id $CODE_BUNDLE_ID \
--platform ios \
--source-map stallion-artifacts/ios/normal/main.jsbundle.map \
--bundle stallion-artifacts/ios/hermes/main.jsbundle
fi
- name: Release Bundle
run: |
stallion release-bundle \
--project-id=$PROJECT_ID \
--hash=$BUNDLE_HASH \
--app-version=$APP_VERSION \
--release-note="$RELEASE_NOTE" \
--ci-token=$CI_TOKEN
```
## Script example (publish + compose + upload)
If you prefer a single, reusable script (instead of wiring the steps directly into your CI YAML), you can use the following.
Save as `stallion_publish_and_upload_bugsnag.sh`, then:
```bash
chmod +x ./stallion_publish_and_upload_bugsnag.sh
./stallion_publish_and_upload_bugsnag.sh \
--upload-path "orgname/project-name/bucket-name" \
--platform "android" \
--release-note "notes" \
--hermes-disabled false \
--bugsnag-api-key "YOUR_API_KEY_HERE"
```
```bash
#!/usr/bin/env bash
set -euo pipefail
# -----------------------------------------------------------------------------
# stallion_publish_and_upload_bugsnag.sh
#
# What it does:
# 1) Runs: stallion publish-bundle ... --sourcemap=true
# 2) Composes RN packager sourcemap + Hermes sourcemap into one .map
# 3) Uploads bundle + composed sourcemap to Bugsnag using CODE_BUNDLE_ID = hash
#
# Requirements:
# - stallion CLI installed and authenticated
# - react-native dependency present (compose-source-maps.js exists)
# - Bugsnag CLI package installed (npx bugsnag-source-maps ...)
#
# Usage:
# ./stallion_publish_and_upload_bugsnag.sh \
# --upload-path "orgname/project-name/bucket-name" \
# --platform "android" \
# --release-note "notes" \
# --hermes-disabled false \
# --bugsnag-api-key "YOUR_API_KEY_HERE"
#
# Options (these are always passed to Stallion; defaults shown):
# --keep-artifacts true|false (default: true)
# --sourcemap true|false (default: true)
# --hermes-disabled true|false (default: false)
# --stallion-cmd "stallion" (default: stallion)
# --artifacts-dir "stallion-artifacts" (default: stallion-artifacts)
# -----------------------------------------------------------------------------
log() { printf "\n[%s] %s\n" "$(date '+%Y-%m-%d %H:%M:%S')" "$*"; }
die() { printf "\n[ERROR] %s\n" "$*" >&2; exit 1; }
UPLOAD_PATH=""
PLATFORM=""
RELEASE_NOTE=""
KEEP_ARTIFACTS="true"
SOURCEMAP="true"
HERMES_DISABLED="false"
BUGSNAG_API_KEY=""
STALLION_CMD="stallion"
ARTIFACTS_DIR="stallion-artifacts"
while [[ $# -gt 0 ]]; do
case "$1" in
--upload-path) UPLOAD_PATH="${2:-}"; shift 2 ;;
--platform) PLATFORM="${2:-}"; shift 2 ;;
--release-note) RELEASE_NOTE="${2:-}"; shift 2 ;;
--keep-artifacts) KEEP_ARTIFACTS="${2:-}"; shift 2 ;;
--sourcemap) SOURCEMAP="${2:-}"; shift 2 ;;
--hermes-disabled) HERMES_DISABLED="${2:-}"; shift 2 ;;
--bugsnag-api-key) BUGSNAG_API_KEY="${2:-}"; shift 2 ;;
--stallion-cmd) STALLION_CMD="${2:-}"; shift 2 ;;
--artifacts-dir) ARTIFACTS_DIR="${2:-}"; shift 2 ;;
-h|--help)
cat <<'HELP'
Usage:
./stallion_publish_and_upload_bugsnag.sh --upload-path "org/project/bucket" --platform "android|ios" --release-note "notes" --hermes-disabled true|false --bugsnag-api-key "KEY"
Options (these are always passed to Stallion; defaults shown):
--keep-artifacts true|false (default: true)
--sourcemap true|false (default: true)
--hermes-disabled true|false (default: false)
--stallion-cmd "stallion" (default: stallion)
--artifacts-dir "stallion-artifacts" (default: stallion-artifacts)
HELP
exit 0
;;
*)
die "Unknown argument: $1"
;;
esac
done
[[ -n "$UPLOAD_PATH" ]] || die "--upload-path is required"
[[ -n "$PLATFORM" ]] || die "--platform is required (android|ios)"
[[ -n "$RELEASE_NOTE" ]] || die "--release-note is required"
[[ -n "$BUGSNAG_API_KEY" ]] || die "--bugsnag-api-key is required"
if [[ "$PLATFORM" != "android" && "$PLATFORM" != "ios" ]]; then
die "--platform must be 'android' or 'ios'"
fi
if [[ "$HERMES_DISABLED" != "true" && "$HERMES_DISABLED" != "false" ]]; then
die "--hermes-disabled must be 'true' or 'false'"
fi
command -v "$STALLION_CMD" >/dev/null 2>&1 || die "Cannot find '$STALLION_CMD' in PATH"
command -v node >/dev/null 2>&1 || die "node is required"
command -v npx >/dev/null 2>&1 || die "npx is required"
# --- 1) Publish bundle and capture output ------------------------------------
log "Running Stallion publish-bundle..."
PUBLISH_OUTPUT="$(
"$STALLION_CMD" publish-bundle \
--upload-path="$UPLOAD_PATH" \
--platform="$PLATFORM" \
--release-note="$RELEASE_NOTE" \
--keep-artifacts="$KEEP_ARTIFACTS" \
--sourcemap="$SOURCEMAP" \
2>&1 | tee /dev/stderr
)"
# Extract a likely hash from the output.
# This is intentionally flexible because different CLI versions print differently.
CODE_BUNDLE_ID="$(
printf "%s\n" "$PUBLISH_OUTPUT" \
| grep -Eo '([a-f0-9]{32,64})' \
| head -n 1 \
|| true
)"
[[ -n "$CODE_BUNDLE_ID" ]] || die "Could not auto-detect bundle hash from publish output. Please ensure publish prints the hash."
#
# Bugsnag `--code-bundle-id` should be 32 chars in our setup.
# If Stallion prints 64-char hashes, trim them consistently.
#
CODE_BUNDLE_ID="${CODE_BUNDLE_ID:0:32}"
log "Detected CODE_BUNDLE_ID: $CODE_BUNDLE_ID"
# --- 2) Compose source maps (RN packager + Hermes) ----------------------------
# Stallion artifacts follow these patterns:
# - Android: stallion-artifacts/android/{normal,hermes}/index.android.bundle(.map|.hbc.map)
# - iOS: stallion-artifacts/ios/{normal,hermes}/main.jsbundle(.map|.hbc.map)
NORMAL_DIR=""
HERMES_DIR=""
BUNDLE_BASENAME=""
if [[ "$PLATFORM" == "android" ]]; then
NORMAL_DIR="$ARTIFACTS_DIR/android/normal"
HERMES_DIR="$ARTIFACTS_DIR/android/hermes"
BUNDLE_BASENAME="index.android.bundle"
elif [[ "$PLATFORM" == "ios" ]]; then
NORMAL_DIR="$ARTIFACTS_DIR/ios/normal"
HERMES_DIR="$ARTIFACTS_DIR/ios/hermes"
BUNDLE_BASENAME="main.jsbundle"
else
die "--platform must be 'android' or 'ios'"
fi
PACKAGER_MAP="$NORMAL_DIR/$BUNDLE_BASENAME.packager.map"
NORMAL_MAP="$NORMAL_DIR/$BUNDLE_BASENAME.map"
BUNDLE_FILE_NORMAL="$NORMAL_DIR/$BUNDLE_BASENAME"
BUNDLE_FILE_HERMES="$HERMES_DIR/$BUNDLE_BASENAME"
HERMES_MAP="$HERMES_DIR/$BUNDLE_BASENAME.hbc.map"
[[ -f "$NORMAL_MAP" ]] || die "Expected sourcemap not found: $NORMAL_MAP"
[[ -f "$BUNDLE_FILE_NORMAL" ]] || die "Expected bundle not found: $BUNDLE_FILE_NORMAL"
SOURCE_MAP_TO_UPLOAD="$NORMAL_MAP"
BUNDLE_FILE_TO_UPLOAD="$BUNDLE_FILE_NORMAL"
if [[ "$HERMES_DISABLED" == "false" ]]; then
[[ -f "$HERMES_MAP" ]] || die "Expected Hermes sourcemap not found: $HERMES_MAP"
log "Hermes enabled: composing source maps (packager + Hermes) for $PLATFORM..."
mv "$NORMAL_MAP" "$PACKAGER_MAP"
COMPOSE_SCRIPT="./node_modules/react-native/scripts/compose-source-maps.js"
[[ -f "$COMPOSE_SCRIPT" ]] || die "compose-source-maps.js not found at: $COMPOSE_SCRIPT (is react-native installed?)"
node "$COMPOSE_SCRIPT" \
"$PACKAGER_MAP" \
"$HERMES_MAP" \
-o "$NORMAL_MAP"
rm -f "$PACKAGER_MAP"
log "Composed map written to: $NORMAL_MAP"
SOURCE_MAP_TO_UPLOAD="$NORMAL_MAP"
# Prefer the Hermes bundle artifact when present (Android), otherwise fall back
# to the normal bundle path (iOS artifacts may not include a separate Hermes bundle).
if [[ -f "$BUNDLE_FILE_HERMES" ]]; then
BUNDLE_FILE_TO_UPLOAD="$BUNDLE_FILE_HERMES"
else
BUNDLE_FILE_TO_UPLOAD="$BUNDLE_FILE_NORMAL"
fi
else
log "Hermes disabled: uploading normal bundle + packager sourcemap for $PLATFORM..."
SOURCE_MAP_TO_UPLOAD="$NORMAL_MAP"
BUNDLE_FILE_TO_UPLOAD="$BUNDLE_FILE_NORMAL"
fi
[[ -f "$SOURCE_MAP_TO_UPLOAD" ]] || die "Expected sourcemap not found: $SOURCE_MAP_TO_UPLOAD"
[[ -f "$BUNDLE_FILE_TO_UPLOAD" ]] || die "Expected bundle not found: $BUNDLE_FILE_TO_UPLOAD"
log "Using bundle for upload: $BUNDLE_FILE_TO_UPLOAD"
log "Using sourcemap for upload: $SOURCE_MAP_TO_UPLOAD"
# --- 3) Upload to Bugsnag ----------------------------------------------------
log "Uploading bundle + sourcemap to Bugsnag..."
npx bugsnag-source-maps upload-react-native \
--api-key "$BUGSNAG_API_KEY" \
--code-bundle-id "$CODE_BUNDLE_ID" \
--platform "$PLATFORM" \
--source-map "$SOURCE_MAP_TO_UPLOAD" \
--bundle "$BUNDLE_FILE_TO_UPLOAD"
log "Done. Bugsnag upload completed for CODE_BUNDLE_ID=$CODE_BUNDLE_ID"
```
## Reference
- [Bugsnag: React Native and Expo source maps](https://docs.bugsnag.com/build-integrations/js/source-maps-react-native/)
- [Bugsnag: App Center CodePush](https://docs.bugsnag.com/platforms/react-native/react-native/codepush/)
---
# Integration Checklist
React Native Stallion Integration Checklist - Debug guide to help resolve installation issues. Step-by-step troubleshooting for OTA update setup.
### Step 1: Get your app running without Stallion
Get your React Native app running. Make sure the build compiles and runs correctly without Stallion installed.
### Step 2: Install the Stallion SDK and CLI
- Make sure the [Stallion SDK is installed](/docs/sdk/installation#sdk-installation).
Make sure you have completed all steps mentioned in the installation section including
iOS and Android native code changes.
- Also complete the [Stallion CLI Installation](/docs/cli/installation#installation).
- Create a custom entry point for Stallion Modal inside your app somewhere. Read more [here](/docs/sdk/stallion-testing).
### Step 3: Create an app build (APK / Testflight)
Now with Stallion SDK installation completed, compile and build your React Native app.
Make sure the app builds correctly. Create an app build (APK / Testflight) on a **non-production App Version**
where you can test Stallion integration without impacting prodcution users.
### Step 4: Send your first release through Stallion CLI
- Make some code changes in your React Native app. Make sure these are changes that can be validated easily.
- Build and push updated bundle to Stallion. Check [Publishing Bundle To Stallion](/docs/cli/usage-api-reference).
- Set release rollout to 100% to start receiving the OTA update.
### Step 5: Test the OTA release inside your React Native app
- Open your React Native app built on the target app version.
- Stallion will check for a new update by default everytime app enters background to foreground state.
Wait for the build to download.
- To make sure that the build was downloaded properly you can verify the adoption numbers in the Stallion Console against your release.
- You can also open the Stallion Modal from the custom entry point configured in Step 2.
Under the `Production` tab, you should be able to see the newly downloaded build along with other meta details.
- Restart the app, changes should be reflected now.
### Step 6: Use Stallion testing framework
Now that we verified that a build can be sent to production users,
lets test Stallion's testing framework for your internal app testing and distribution.
- Publish some more Stallion releases by making some code changes. Mentioned in Step 4.
- Open Stallion Modal from the custom entry point.
- Under the `Testing` tab, go inside your bucket and download the build.
- Restart the app to validate the code changes.
- To reset to production version of your app, switch to the `Production` tab and simply restart the app.
### Step 7: Add a custom UI for Stallion OTA installation (Optional)
Check [this blog](/blogs/react-native-over-the-air-updates-with-custom-ui) to add custom modals and popups for React Native OTA updates using Stallion.
- [This blog](/blogs/react-native-over-the-air-updates-with-custom-ui) walks through how to **build custom UI prompts**—like modals or banners—when a new Stallion OTA update is available.
- These UI flows can prompt users to restart their app, improving visibility and adoption of your latest releases.
### Step 8: Track adoption of your OTA releases on Stallion Console
Stallion dashboard provides powerful metrics of app adoption that gives you valuable insights about your release.
Make informed decisions with this data
Still facing issues ? Dont worry, we got you covered. Email us at support@stalliontech.io.
---
# React Native OTA Bundle Signing: Secure & Verify Updates Before Installation
How React Native Stallion's customer-managed bundle signing works — sign OTA bundles before publishing, verify signatures on-device before installation, and where signing fits alongside TLS, CI/CD security, and patch updates.
## Why OTA Updates Need a Security Layer
Over-the-air (OTA) updates let React Native teams ship JavaScript and supported assets without publishing a new native app build for every change. That flexibility also means the update-delivery path becomes part of the application's software supply chain.
The important question is not only **"Can users download the update?"** but also:
> **Can the app verify that the update came from a trusted source and has not been modified before it is installed?**
That's where bundle signing comes in.
React Native Stallion supports customer-managed bundle signing so teams can sign OTA bundles before publishing and have the Stallion SDK verify the signature before installation.
## What Bundle Signing Actually Protects
Bundle signing uses public-key cryptography to let a device verify the authenticity and integrity of an OTA artifact.
A signing flow typically has two related keys:
- **Private key** — used to sign the release. This should remain under the team's control and should never be committed to source control.
- **Public key** — used by the application to verify the signature.
If the downloaded artifact does not pass signature verification, the update should not be installed.
Bundle signing helps protect against scenarios such as:
- An OTA artifact being modified after it was signed.
- An unauthorized party attempting to publish an artifact that the application will not accept because it is not signed by the trusted key.
- A corrupted or altered update being accepted as a valid release.
Signing is one security control in an OTA system. It does not replace HTTPS, access control, CI/CD security, monitoring, or release governance.
## TLS vs. Bundle Signing
HTTPS/TLS and bundle signing solve different problems.
**TLS protects the connection.** It encrypts data in transit and helps establish a secure connection between the device and the update service.
**Bundle signing protects the artifact.** The device can verify the cryptographic signature of the update before installation.
Using both gives you defense in depth:
**CI / developer → signed bundle → HTTPS/CDN delivery → device verification → installation**
This distinction matters because transport security alone is not the same thing as application-level verification of the artifact.
It's also worth distinguishing signing from encryption. **Encryption** protects confidentiality — it makes data difficult for unauthorized parties to read. **Signing** provides authenticity and integrity — it lets the receiver verify that the artifact was signed by a trusted key and has not been modified since signing. For OTA systems, both can be useful: TLS protects the network connection, encryption can protect sensitive data where applicable, and signing verifies the OTA artifact itself. These complement — rather than replace — access controls that restrict who can publish releases, CI/CD security, staged rollout controls, and rollback mechanisms that limit the impact of a bad release. A secure OTA architecture uses these controls together rather than treating any one control as a complete security solution.
## How Stallion Bundle Signing Works
When bundle signing is enabled, the signing process can happen as part of your local or CI release workflow.
### 1. Generate a Key Pair
Use the Stallion CLI to generate a key pair:
```bash
stallion generate-key-pair
```
This produces a private key and a public key.
```text
stallion/secrets/
├── private-key.pem
└── public-key.pem
```
The private key is used for signing. The public key is used for verification.
### 2. Add the Public Key to the Native App
The public key needs to be available to the native application so the Stallion SDK can verify signed OTA updates.
For Android, add the base64-encoded public key to `strings.xml`:
```xml
YOUR_PUBLIC_KEY_HERE
```
For iOS, add it to `Info.plist`:
```xml
StallionPublicSigningKeyYOUR_PUBLIC_KEY_HERE
```
Only the public key belongs in the application. Never include the private signing key in the app.
For the exact configuration and key format, see the [Bundle Signing documentation](/docs/bundle-signing).
### 3. Protect the Private Key
The private signing key is the most sensitive part of the workflow.
Store it in a secure secret manager or CI/CD secret store. Do not commit it to Git, place it in a public repository, or expose it in build logs.
For production pipelines, access to the signing key should be limited to the people and automation that are actually allowed to publish production OTA releases.
### 4. Sign the Bundle Before Publishing
Publish the bundle using the private key:
```bash
stallion publish-bundle \
--upload-path=my-org/my-project/my-bucket \
--platform=android \
--release-note="Secure OTA release" \
--private-key=./stallion/secrets/private-key.pem
```
Stallion attaches the cryptographic signature to the bundle metadata as part of the publishing workflow.
### 5. Verify the Signature on the Device
When the update is received, the React Native Stallion SDK verifies the signature using the corresponding public key.
The signed update is accepted for installation only when signature verification succeeds.
This creates a trust boundary between **the party authorized to sign releases** and **the device that is about to execute the update.**
## Customer-Managed Signing Keys
One important advantage of customer-managed signing is that your team controls the private signing key.
The key can remain in your own development environment, CI system, or secret-management infrastructure rather than becoming another credential managed by the OTA provider.
This can be useful for teams with:
- Strict software supply-chain requirements
- Enterprise security reviews
- Separation of deployment responsibilities
- Internal key-management policies
- Regulated or security-sensitive applications
Stallion's bundle-signing workflow is designed around this model: sign the artifact before it is uploaded, keep the private key under your control, and verify the update on the device.
For enterprise teams, customer-managed signing can fit into broader software-supply-chain governance alongside SSO, audit logging, role-based access control, CI/CD controls, regional data hosting, and deployment policies.
## Bundle Signing in CI/CD
Bundle signing fits naturally into an automated release pipeline.
A production workflow can look like:
```text
Code merge
↓
CI build
↓
Retrieve signing key from secret manager
↓
Generate OTA bundle
↓
Sign bundle
↓
Publish to Stallion
↓
Release / rollout controls
↓
Device downloads update
↓
Signature verification
↓
Install verified update
```
This keeps signing close to the release artifact rather than making it a separate manual security step.
A CI system should also ensure that:
- Production signing credentials are stored as secrets.
- Pull requests and untrusted workflows cannot access production signing keys.
- Signing keys are rotated according to your organization's security policy.
- CI logs never print private key material.
- Production publishing permissions are restricted to the appropriate workflow.
## What Happens if Verification Fails?
If the downloaded update does not pass signature verification, it should not be treated as a trusted update.
That protects the application from accepting an artifact that does not match the expected cryptographic identity.
A failed verification can happen because:
- The artifact was modified.
- The signature does not match the artifact.
- The wrong signing key was used.
- The update was produced by an unauthorized release workflow.
- The downloaded data is corrupted.
The important behavior is simple:
**Unverified update → reject the update → continue using the existing trusted version.**
## Bundle Signing and Patch Updates
Differential or patch-based OTA delivery does not remove the need for update verification.
Whether an OTA platform delivers a full bundle or a differential patch, the resulting update should be verified before installation.
Stallion supports both [on-demand differential patch delivery](/blogs/react-native-patch-updates-codepush-alternative) and bundle signing, and the two capabilities are designed to work together: differential delivery can reduce transfer size while signing provides a cryptographic verification layer for the update workflow.
The exact patch size depends on the changes between releases. Stallion's documented benchmark scenarios have reached up to 98% smaller payloads than corresponding full bundles. Actual patch size depends on the versions being compared and what changed.
## Why Bundle Signing Matters for Production OTA
OTA updates are part of your production software supply chain.
A secure release process should therefore answer:
- Who is allowed to publish an update?
- How is the release artifact protected?
- How does the device know the artifact is trusted?
- What happens when verification fails?
- Where are signing credentials stored?
- Can the release be rolled back if something goes wrong?
Bundle signing addresses one of those questions directly: **how the device verifies the authenticity and integrity of the OTA artifact.**
For enterprise teams, that can complement broader controls such as access management, audit logging, CI/CD governance, staged rollouts, rollback mechanisms, and security monitoring.
## Bundle Signing With React Native Stallion
Stallion combines bundle signing with the release controls needed to operate OTA updates in production.
Depending on your plan and configuration, the platform provides capabilities such as:
- Customer-managed bundle signing
- OTA release and rollout controls
- Release analytics
- Rollback controls
- CI/CD integration
- On-demand differential patch delivery
- Enterprise deployment options
The goal is not simply to make OTA updates smaller or faster. It is to give teams more control over **what gets published, who can publish it, how it reaches users, and whether the device accepts it.**
## Supported Versions
Check the current Stallion documentation for supported CLI and React Native SDK versions before implementation, as version requirements can change.
## Getting Started
### Generate your signing keys
```bash
stallion generate-key-pair
```
### Add the public key to your native app
Add the public key as `StallionPublicSigningKey` in Android's `strings.xml` and iOS's `Info.plist` before publishing a signed release. See the [Bundle Signing documentation](/docs/bundle-signing) for the exact format.
### Publish a signed bundle
```bash
stallion publish-bundle \
--upload-path=my-org/my-project/my-bucket \
--platform=android \
--release-note="Production release" \
--private-key=./stallion/secrets/private-key.pem
```
For the complete setup, see the [**Bundle Signing documentation**](/docs/bundle-signing).
If you're integrating Stallion with Expo, the [**Expo integration documentation**](/docs/expo-integration-with-stallion) also covers configuring the public signing key in the native app.
**Pro Tip**
Already using Stallion? Start signing your bundles today with `stallion
generate-key-pair`.
## Bundle Signing Security Checklist
Before enabling production OTA releases, verify that your team:
- [ ] Generates a dedicated signing key pair.
- [ ] Stores the private key in a secure secret manager.
- [ ] Never commits the private key to source control.
- [ ] Restricts production signing access.
- [ ] Keeps signing credentials out of CI logs.
- [ ] Embeds or securely provisions the corresponding public key.
- [ ] Verifies updates before installation.
- [ ] Has a rollback procedure for failed releases.
- [ ] Monitors OTA releases and adoption.
- [ ] Reviews key rotation procedures periodically.
## Frequently Asked Questions
### What is bundle signing for React Native OTA updates?
Bundle signing uses cryptographic signatures to allow a React Native application to verify an OTA update before installing it. The device uses a trusted public key to verify an update that was signed with the corresponding private key.
### Does bundle signing replace HTTPS?
No. HTTPS/TLS and bundle signing provide different protections. TLS protects data in transit, while signing provides artifact authenticity and integrity verification. Using both provides defense in depth.
### Should the OTA provider hold my private signing key?
That depends on the provider's security model and your organization's requirements. Customer-managed signing lets your team retain control of the private key and use it from your own environment or CI/CD secret store.
### How do I protect my OTA signing key?
Keep the private key in a secure secret manager, restrict access to authorized release workflows, never commit it to source control, and avoid exposing it in logs. Follow your organization's key rotation and incident-response procedures.
### Does bundle signing protect against every OTA attack?
No. Bundle signing addresses artifact authenticity and integrity, but OTA security is broader. Teams should also use secure transport, strong access controls, protected CI/CD credentials, release governance, monitoring, and rollback mechanisms.
### Is bundle signing useful with patch updates?
Yes. Differential delivery reduces the amount of data transferred, while signing provides a way to verify the update artifact before installation. The two controls address different parts of the OTA delivery problem.
## Secure Your React Native OTA Release Pipeline
OTA updates give React Native teams a faster way to ship supported application changes. Bundle signing adds another layer of control by letting your team manage the signing key and verify updates before installation.
With React Native Stallion, you can combine customer-managed bundle signing with OTA release controls, CI/CD integration, rollback capabilities, and on-demand differential patch delivery.
[**Read the Bundle Signing Documentation →**](/docs/bundle-signing)
[**Get Started Free →**](https://console.stalliontech.io/auth/signup)
[**Explore React Native Stallion →**](https://stalliontech.io/)
---
# Best CodePush Alternative in 2026 — React Native OTA Updates with Stallion
CodePush is unmaintained in 2026. Discover why React Native Stallion (Stallion Software) is the best CodePush alternative with patch updates, migration guide, advanced JS API, hosted service, and active development. Perfect CodePush replacement for modern React Native apps.
## Introduction
CodePush was historically the default OTA solution for React Native apps. For years, it was the go-to choice for teams looking to deliver over-the-air updates without going through app store reviews.
But times have changed.
In 2024–25, CodePush is effectively unmaintained and the hosted service has been shut down. Teams can only self-host CodePush on Azure, which can be complex and expensive, and it still carries many long-standing issues that have never been resolved.
Developers and enterprises are now actively searching for a modern CodePush alternative that can meet the demands of today's React Native applications. They need a CodePush replacement with hosted service, [patch updates](/docs/patch-updates), advanced JavaScript API, and active development—everything CodePush no longer provides.
**React Native Stallion introduces a significantly more advanced OTA system designed for production apps in 2026**—with hosted service, [patch updates](/docs/patch-updates), advanced controls, and active development that CodePush simply cannot match.
[Get started with React Native Stallion today](https://stalliontech.io/contact)
## Why Teams Are Moving Away From CodePush
The writing has been on the wall for CodePush for some time. Here's why teams are actively seeking alternatives:
### No Hosted Service; Self-Hosting Required
CodePush's hosted service has been shut down. Teams must now self-host on Azure, which means:
- Complex infrastructure setup and maintenance
- Ongoing operational overhead
- Additional costs for Azure resources
- No "out of the box" solution
### Azure Setup Can Be Complex, Slow, and Expensive
Self-hosting CodePush on Azure is far from straightforward:
- Requires significant Azure expertise
- Complex configuration and setup process
- Ongoing maintenance and monitoring
- Higher costs than managed solutions
### Many Long-Standing Bugs Remain Unresolved
CodePush has accumulated technical debt over the years:
- Known bugs that have persisted for years
- No active development to fix issues
- Limited community support
- Workarounds become permanent solutions
### No Active Development or New Features
CodePush is effectively in maintenance mode:
- No new features being added
- No improvements to existing functionality
- No adaptation to modern React Native patterns
- Stagnant technology in a rapidly evolving ecosystem
### Very Limited JS API
CodePush's JavaScript API is basic and restrictive:
- Limited control over update flow
- Few customization options
- Difficult to implement advanced update strategies
- Not designed for modern React Native patterns
### Limited Install Strategies
CodePush supports mostly immediate or next restart strategies:
- Limited flexibility in how updates are applied
- Difficult to implement user-controlled updates
- No background download options
- Poor support for staged rollouts
### Only Full Bundle Updates
CodePush requires full bundle downloads for every update:
- Large download sizes even for tiny changes
- Slower update delivery
- Higher bandwidth usage
- Poor user experience on slower connections
## What a Modern CodePush Alternative Must Provide
If you're evaluating CodePush alternatives, here's what you should expect from a modern OTA solution in 2026:
### Hosted Service That Works Out of the Box
You shouldn't have to set up and maintain infrastructure. A modern solution should offer a fully managed hosted service that works immediately with zero setup.
### 🐝 [Patch Updates](/docs/patch-updates) (Small, Fast, Incremental Updates)
The ability to ship only changed files, not entire bundles. This means:
- Updates that are 90–95% smaller than full bundles
- Faster delivery and installation
- Lower bandwidth usage
- Dramatically better user experience
### A More Powerful JS API for Update Customization
Fine-grained control from JavaScript to:
- Trigger downloads and installs manually
- Decide when updates apply
- Control how the app restarts
- Customize user notifications
- Implement advanced update flows
### Flexible Install Strategies
Support for multiple install strategies:
- Background downloads
- Install on next app start
- Install immediately with optional UI
- Fully customizable per release
- User-driven update flows
### Internal Testing Channels for Staging and QA
Dedicated workflows for:
- Internal testing channels
- QA and staging environments
- Safe promotion from internal → beta → production
- Team-based testing workflows
### Better Reliability, Observability, and Automation
Modern OTA solutions should provide:
- Comprehensive analytics and metrics
- Automatic rollback capabilities
- Phased rollout controls
- Detailed release insights
- Automation-friendly APIs
### Optional On-Prem/Self-Hosted Solution for Enterprise Teams
For enterprises with specific requirements:
- Flexible self-hosting options
- Not limited to a single cloud provider
- Full control over infrastructure
- Compliance and security support
### Clear Documentation and Active, Ongoing Development
A solution that's actively maintained with:
- Regular updates and new features
- Clear, comprehensive documentation
- Active community support
- Long-term commitment to the platform
## Introducing React Native Stallion
React Native Stallion is a modern OTA update platform built to replace CodePush for today's React Native ecosystem. It's the best CodePush alternative for teams looking for a CodePush replacement with modern features.
**Offers full + [patch updates](/docs/patch-updates), advanced controls, and a powerful developer workflow.**
- **Hosted service available immediately** with zero infrastructure setup—no Azure self-hosting required
- **Designed to be fast, reliable, secure, and future-proof** for production React Native apps
- **Actively developed** with regular updates and new features, unlike CodePush
- **Enterprise-ready** with both hosted and on-premise options for all team sizes
React Native Stallion fills the gap left by CodePush's decline, providing everything modern React Native teams need for production-grade over-the-air updates, hot updates, and incremental deployments.
[Explore React Native Stallion's features](https://stalliontech.io/contact)
## Key Features That Make Stallion the Best CodePush Alternative
### 🐝 [Patch Updates](/docs/patch-updates) (Prime Feature)
React Native Stallion's [Patch Updates](/docs/patch-updates) is a game-changing feature that CodePush simply doesn't offer:
- **Automatically generates and ships only the changed files**
- **Updates are often 90–95% smaller than full bundles**
- **Faster delivery, lower bandwidth usage, and dramatically better user experience**
Instead of downloading a 20 MB bundle for a tiny bug fix, users get a 400 KB patch that downloads in seconds. This is revolutionary for React Native OTA updates and something CodePush does not support.
**Learn More**
Read our comprehensive guide on [Patch Updates](/docs/patch-updates) to
understand how differential updates work and why they matter.
### Advanced JavaScript API
React Native Stallion provides fine-grained control from JavaScript that far exceeds CodePush's limited API:
- **Trigger downloads and installs manually**
- **Decide when updates apply, how the app restarts, and how users are notified**
- **Access to update metadata** (version, release notes, mandatory flags)
- **Event listeners** for download progress and completion
- **Custom update flows** tailored to your app's needs
This level of control enables sophisticated update strategies that CodePush simply cannot support.
### Flexible Install Strategies
React Native Stallion supports multiple install strategies that you can customize per release:
- **Install in background**: Download updates silently without user interruption
- **Install on next app start**: Apply updates when users restart the app
- **Install immediately with optional UI**: Show custom update prompts and controls
- **Fully customizable per release**: Different strategies for different release types
CodePush supports only limited strategies, making it difficult to implement modern update flows.
### Internal Testing + Promotion Flow
React Native Stallion provides dedicated workflows for internal testing:
- **Create internal testing channels** for your team
- **Test updates with employees/QA before production release**
- **Promote builds safely** from internal → beta → production
- **Zero rollout testing** for internal validation
CodePush does not provide a dedicated internal testing workflow, making it difficult to safely test updates before production.
### Hosted + On-Prem Options
React Native Stallion offers flexibility that CodePush cannot match:
- **Fully hosted cloud version** requires zero setup and works immediately
- **On-Prem/self-host available** for enterprise needs with flexible deployment options
- **Not limited to a single cloud provider**—deploy on AWS, Azure, GCP, or your own infrastructure
CodePush's on-prem hosting is limited to Azure and requires heavy manual setup, making it complex and expensive.
### Actively Maintained
React Native Stallion is actively developed with:
- **Frequent updates** and new features
- **Long-term support** and commitment
- **Clear documentation**, examples, and real-world guidance
- **Responsive support** for issues and questions
CodePush, by contrast, is effectively unmaintained with no active development.
## CodePush vs React Native Stallion (Comparison Table)
| Feature | CodePush (2026) | React Native Stallion |
| ----------------------------- | ------------------- | ------------------------ |
| **Maintained** | ❌ Not actively | ✔ Actively maintained |
| **Hosted Service** | ❌ No | ✔ Yes |
| **Self-Hosting** | Azure only, complex | Flexible on-prem hosting |
| **Patch Updates** | ❌ No | ✔ Yes |
| **JS API** | Limited | Advanced |
| **Install Strategies** | Limited | Flexible & customizable |
| **Phased Rollouts** | ✔ Basic rollouts | ✔ Full support |
| **Internal Testing Channels** | ❌ No | ✔ Yes |
| **Release Insights** | Limited | Detailed analytics |
| **On-Prem Support** | Limited to Azure | Full on-prem option |
| **Update Size** | Full bundle only | Full + Patch |
| **Documentation** | Outdated | Comprehensive & current |
| **Community Support** | Limited | Active & responsive |
## Migrating From CodePush to Stallion
Migrating from CodePush to React Native Stallion is straightforward:
### Straightforward Integration
- **Familiar API patterns** make the transition smooth
- **Works without any Azure setup**—just use the hosted service
- **Similar concepts** with enhanced capabilities
- **No breaking changes** to your existing React Native codebase
### Clear Migration Documentation
React Native Stallion provides comprehensive migration guides:
- **Step-by-step instructions** for migrating from CodePush to React Native Stallion
- **Code examples** showing side-by-side comparisons between CodePush and Stallion APIs
- **Best practices** for modern update strategies and OTA workflows
- **Support** during the migration process from our technical team
**Migration Guide**
Check out our detailed [CodePush migration
guide](/docs/migrating-from-codepush) for step-by-step instructions on moving
from CodePush to React Native Stallion. Learn how to implement [mandatory
updates](/docs/codepush-mandatory-updates) and explore [Patch
Updates](/docs/patch-updates) for differential updates.
### Benefits You'll Gain Immediately
Once migrated, you'll immediately benefit from:
- **[Patch Updates](/docs/patch-updates)**: Dramatically smaller update sizes
- **Better Analytics**: Comprehensive release insights
- **Advanced Controls**: More flexible update strategies
- **Active Support**: Responsive team and community
- **Future-Proof**: Ongoing development and improvements
## Conclusion
CodePush's shutdown and lack of active development have left a significant gap in the React Native OTA ecosystem. Teams need a modern, reliable, and actively maintained solution that can meet the demands of today's production applications.
**React Native Stallion fills that gap** with a modern, hosted, [patch-enabled](/docs/patch-updates), highly customizable OTA platform designed specifically for 2026 and beyond.
For developers looking to move beyond CodePush in 2026, React Native Stallion is the clear and future-proof choice. With hosted service, revolutionary [Patch Updates](/docs/patch-updates), advanced JavaScript API, flexible install strategies, internal testing workflows, and active development, React Native Stallion provides everything CodePush offered—and much more.
Don't let CodePush's limitations hold your React Native app back. [Get started with React Native Stallion today](https://stalliontech.io/contact) and experience the future of OTA updates.
The best CodePush alternative is here, and it's built for modern React Native teams.
## Frequently Asked Questions
### What is the best CodePush alternative in 2026?
React Native Stallion is the best CodePush alternative in 2026, offering hosted service, [Patch Updates](/docs/patch-updates), advanced JS API, flexible install strategies, and active development—all features that CodePush no longer provides.
### Is CodePush still maintained in 2026?
No, CodePush is effectively unmaintained in 2026. The hosted service has been shut down, and teams must self-host on Azure. There's no active development or new features being added.
### How do I migrate from CodePush to React Native Stallion?
Migrating from CodePush to React Native Stallion is straightforward. Check out our comprehensive [migration guide](/docs/migrating-from-codepush) for step-by-step instructions. The API patterns are familiar, making the transition smooth.
### Does React Native Stallion support patch updates?
Yes! React Native Stallion's Patch Updates feature provides differential updates that are 90-98% smaller than full bundles. This is a revolutionary feature that CodePush does not support. Learn more in our [Patch Updates documentation](/docs/patch-updates).
### Can I use React Native Stallion as a CodePush replacement?
Absolutely. React Native Stallion is designed as a complete CodePush replacement with all the features CodePush offered, plus modern enhancements like Patch Updates, advanced JS API, and active development.
### Does React Native Stallion offer hosted service?
Yes, React Native Stallion offers a fully managed hosted service that works immediately with zero setup. Unlike CodePush which requires Azure self-hosting, React Native Stallion provides both hosted and on-premise options.
### What makes React Native Stallion better than CodePush?
React Native Stallion offers [Patch Updates](/docs/patch-updates) (98% size reduction), hosted service, advanced JS API, flexible install strategies, internal testing channels, comprehensive analytics, active development, and both hosted and on-premise options—all features CodePush lacks or no longer provides.
---
# CodePush On-Premise Alternative — Enterprise Self-Hosted OTA Updates with React Native Stallion
Looking for a CodePush on-premise alternative? React Native Stallion offers enterprise self-hosted OTA updates with full data control, Azure alternative, compliance support, and seamless deployment. Best CodePush replacement for enterprises requiring on-premise solutions.
## The CodePush On-Premise Reality
If you're using CodePush or evaluating OTA update solutions for React Native, you might have discovered that CodePush does offer on-premise deployment. But here's the catch: **it's built on outdated technology that hasn't kept pace with modern React Native development**.
CodePush's on-premise solution reflects an older era of mobile development. It lacks the modern features, performance optimizations, and developer experience that today's React Native teams need. For enterprises with strict compliance requirements, data residency regulations, or security policies that mandate internal hosting, you need more than just on-premise—you need a modern, powerful CodePush alternative that offers self-hosted OTA updates with enterprise-grade features.
**Enter React Native Stallion's Self-Hosted solution**—the enterprise-grade CodePush on-premise alternative built with modern architecture, cutting-edge features, and the performance your teams deserve.
[Get your custom quote for self-hosted React Native Stallion](https://stalliontech.io/contact)
## Why Choose Self-Hosted React Native Stallion Over CodePush On-Premise?
### Modern Architecture vs. Legacy Technology
CodePush's on-premise solution is built on older technology that hasn't evolved with modern React Native development. React Native Stallion is built from the ground up with modern best practices:
- **Modern Stack**: Built with contemporary technologies and architectural patterns
- **Active Development**: Regular updates and feature releases, not maintenance mode
- **Performance Optimized**: Designed for today's React Native applications and performance requirements
- **Developer Experience**: Modern APIs and tooling that your team will actually enjoy using
### Revolutionary [Patch Updates](/docs/patch-updates)
CodePush requires full bundle downloads for every update, even tiny changes. React Native Stallion's [Patch Updates](/docs/patch-updates) change everything:
- **Up to 98% Size Reduction**: Updates that are 98% smaller than CodePush
- **File-Level Diffs**: Intelligent differential updates at the file level, not just bundle level
- **Instant Updates**: Downloads that complete in seconds, not minutes
- **Better User Experience**: Users get updates instantly, even on slower connections
CodePush's on-premise solution simply doesn't offer this level of efficiency.
### Complete Data Control & Security
While CodePush on-premise does offer data control, React Native Stallion takes it further:
- **Full Data Residency**: Host your infrastructure in any geography based on your compliance and policy requirements
- **Data Control**: Complete control over where your data is stored and how it's secured
- **Your Infrastructure, Your Rules**: Deploy on AWS, Azure, GCP, or your own data centers
- **Enterprise Security**: Private registries, network isolation, and custom security policies
### CodePush On-Premise vs. React Native Stallion Self-Hosted
| Feature | CodePush On-Premise | React Native Stallion Self-Hosted |
| ----------------------- | ----------------------------- | --------------------------------- |
| **Technology Stack** | Legacy architecture | Modern, actively developed |
| **Patch Updates** | Full bundle downloads only | Up to 98% size reduction |
| **Update Speed** | Minutes for large bundles | Seconds with differential updates |
| **Analytics** | Basic metrics | Comprehensive adoption tracking |
| **Rollback** | Manual or basic auto-rollback | Intelligent automatic rollback |
| **Deployment** | Complex setup | Seamless, automated deployment |
| **Support** | Limited | Enterprise-grade with SLAs |
| **Active Development** | Maintenance mode | Regular feature releases |
| **Modern React Native** | Limited support | Built for modern RN apps |
## Seamless On-Premise Deployment
One of the biggest concerns with self-hosted solutions is complexity. React Native Stallion eliminates that worry with a deployment process designed to be as seamless as possible.
- **Automated Setup**: Deploy your entire infrastructure with minimal configuration
- **Infrastructure as Code**: Ready-to-use deployment templates for consistent environments
- **Container-Based**: Modern containerized architecture for easy deployment and scaling
- **Your Infrastructure**: Integrates with your existing databases, analytics, and cloud providers
- **Complete Support**: Our technical team supports you through the entire setup process
## What You Get with Self-Hosted React Native Stallion
Self-hosted React Native Stallion includes all the features of our cloud offering:
- **[Patch Updates](/docs/patch-updates)**: Revolutionary differential updates with up to 98% size reduction
- **Phased Rollouts**: Control rollout percentages with granular precision
- **Automatic Rollbacks**: Protect your users from unstable releases
- **Comprehensive Analytics**: Track adoption, downloads, and performance metrics
- **Bundle Signing**: Enterprise-grade security for all updates
- **Beta Testing Framework**: Test releases before production deployment
- **Custom Update Flows**: Full control over update UI and user experience
### Enterprise Support
- **Business Hours Support**: Complete support during business hours (Mon–Fri, 10 AM to 6 PM IST)
- **Weekly Updates**: Regular patches, bug fixes, and feature updates
- **SDK Updates**: Regular SDK releases with migration guides and compatibility notes
**Get Your Custom Quote**
Pricing for self-hosted React Native Stallion starts at competitive enterprise
rates. [Contact us for a custom quote](https://stalliontech.io/contact)
tailored to your organization's needs, user base, and requirements.
## The CodePush Migration Path
If you're currently using CodePush (cloud or on-premise), migrating to self-hosted React Native Stallion is straightforward:
- **Similar API Surface**: Familiar patterns make migration smooth
- **Comprehensive Migration Guide**: Step-by-step documentation for migrating from CodePush
- **SDK Compatibility**: Works seamlessly with existing React Native codebases
Beyond CodePush on-premise, React Native Stallion offers significant advantages:
- **Patch Updates**: Revolutionary differential updates that CodePush simply doesn't support—learn more in our [Patch Updates guide](/docs/patch-updates)
- **Better Analytics**: More comprehensive adoption and performance metrics than CodePush
- **Superior Rollback**: More intelligent automatic rollback mechanisms
- **Modern Architecture**: Built for modern React Native applications, not legacy code
- **Active Development**: Regular feature updates and improvements, unlike CodePush's maintenance mode
For teams migrating from CodePush, check out our [migration guide](/docs/migrating-from-codepush) and learn about [mandatory update flows](/docs/codepush-mandatory-updates).
## Why Enterprises Choose Self-Hosted React Native Stallion
### Financial Services
Banks and fintech companies require complete control over their update infrastructure. Self-hosted React Native Stallion ensures data residency, complete audit trails, and full control over security policies.
### Healthcare
Healthcare organizations need solutions with full data control, ensuring patient data protection and the ability to implement healthcare-specific security requirements.
### Government and Defense
Government and defense contractors require on-premise solutions for classified data, security clearances, and custom deployments in air-gapped networks.
### Large Enterprises
Organizations with complex compliance and security requirements benefit from multi-region deployments, custom integrations, and enterprise-grade support.
[Request a custom quote for your organization](https://stalliontech.io/contact)
## Getting Started
Ready to explore self-hosted React Native Stallion as your CodePush on-premise alternative?
1. **Contact Us**: [Request a custom quote](https://stalliontech.io/contact) and schedule a technical discussion
2. **Technical Consultation**: Our team will understand your requirements and provide detailed specifications
3. **Deployment**: Our technical team supports you through the entire setup and deployment process
## Conclusion
If you're considering CodePush on-premise, you have a choice: stick with outdated technology that works but doesn't excel, or choose a modern solution built for today's React Native development.
React Native Stallion's self-hosted solution is the modern CodePush on-premise alternative that doesn't compromise on features, performance, or ease of use. With complete data control, seamless deployment, enterprise-grade support, revolutionary [Patch Updates](/docs/patch-updates), and all the features you need for modern React Native OTA updates, self-hosted React Native Stallion gives you the best of both worlds: the power of a cutting-edge OTA platform and the control of on-premise infrastructure.
Don't let CodePush's legacy technology hold you back. [Contact us today](https://stalliontech.io/contact) to get your custom quote and discover how self-hosted React Native Stallion can transform your React Native update infrastructure.
The future of enterprise OTA updates is here, and it's built for modern React Native teams.
## Frequently Asked Questions
### What is the best CodePush on-premise alternative?
React Native Stallion is the best CodePush on-premise alternative, offering modern architecture, [Patch Updates](/docs/patch-updates) support, flexible deployment options, and enterprise-grade features that CodePush on-premise cannot match.
### Can I migrate from CodePush on-premise to React Native Stallion?
Yes! Migrating from CodePush on-premise to React Native Stallion is straightforward. The API patterns are familiar, and our team provides comprehensive migration support. Check out our [migration guide](/docs/migrating-from-codepush) for details.
### Does React Native Stallion support Azure deployment?
Yes, React Native Stallion's self-hosted solution supports deployment on AWS, Azure, GCP, or your own infrastructure. Unlike CodePush which is limited to Azure, React Native Stallion offers flexible cloud provider options.
### What makes React Native Stallion better than CodePush on-premise?
React Native Stallion offers [Patch Updates](/docs/patch-updates) (98% size reduction), modern architecture, active development, flexible deployment options, comprehensive analytics, and enterprise support—all features that CodePush on-premise lacks.
### Is React Native Stallion suitable for enterprise compliance requirements?
Absolutely. React Native Stallion's self-hosted solution provides full data control, supports data residency requirements, and offers enterprise-grade security features that allow you to implement your own compliance policies and security standards.
---
# Expo Updates Alternative for React Native — Differential OTA & Advanced Release Controls
Compare Expo EAS Update and React Native Stallion for React Native OTA delivery. Differential updates, release and recovery controls, enterprise security, internal testing, and how Stallion works alongside Expo.
## The Problem
Expo EAS Update is one option for delivering over-the-air updates to React Native applications. Recent Expo SDK releases also support bundle diffing, which can reduce the amount of data downloaded for compatible updates.
That changes the comparison.
The question is no longer simply whether an OTA platform can deliver a smaller update. The more useful question is what your team needs from the OTA layer: patch efficiency, release controls, recovery workflows, security, testing, deployment flexibility, and enterprise requirements.
React Native Stallion provides the same core OTA capabilities while adding more operational control around differential delivery, release management, testing, security, and deployment infrastructure.
If you already use Expo, you do not need to replace your Expo development or native build workflow. Stallion can be used as the OTA delivery layer while you continue using Expo for development and native builds.
## What Has Changed With Expo EAS Update
Recent Expo SDK releases introduced bundle diffing for EAS Update.
Expo EAS Update supports bundle diffing for compatible updates. Its current implementation precomputes patches for selected update relationships and can generate additional patches on demand when a device requests a different base version. Patch delivery remains conditional and can fall back to the full bundle.
However, the patch is not guaranteed for every update request. Expo documents that a patch is served when it is meaningfully smaller than the full bundle and can be generated efficiently. Fresh-install patching is also experimental and opt-in, and Expo notes that patches can take a few minutes to become available after an update is published.
Expo's bundle-diffing documentation also describes a specific generation strategy: EAS precomputes a patch against the second-newest update on a channel. If a device is running a different published update, Expo initially serves the full bundle for that request, then generates a patch for that specific base update on demand — which becomes available for subsequent requests from devices on the same base version. Patches are therefore not guaranteed for every possible update pair immediately.
**Bundle diffing in Expo EAS Update**
Expo EAS Update supports bundle diffing for compatible update pairs. Patch
delivery remains conditional and can fall back to the full bundle when an
appropriate patch is unavailable or does not provide a meaningful efficiency
benefit.
The more useful distinction is now **how each platform approaches differential delivery and what capabilities surround the OTA release lifecycle**.
## Where Stallion Fits
Stallion supports binary-safe differential delivery with on-demand patch generation between compatible versions.
Instead of positioning differential updates as a capability that only applies to a fixed update path, Stallion gives teams flexibility to generate patches between any compatible versions when needed, even when intermediate releases exist between them.
In Stallion's verified benchmark scenario:
- Full bundle: **20 MB**
- Patch: **400 KB**
- Reduction: **98%**
The 98% figure is a verified benchmark scenario, not a guarantee for every update. Actual patch size depends on the changes between releases.
This matters most when teams ship frequent updates, operate at larger user counts, or want to minimize the amount of data transferred for small JavaScript changes.
## Why Patch Size Matters
A smaller OTA artifact can reduce:
- **Bandwidth consumption** — less data needs to be transferred to affected devices.
- **Download time** — smaller artifacts generally transfer faster than larger ones under the same network conditions.
- **Cellular usage** — users on metered or slower connections have less data to download.
- **Release overhead at scale** — small changes do not necessarily need to move a large artifact to every affected device.
For example, using Stallion's verified 20 MB → 400 KB benchmark:
- 1,000 users × 20 MB = **20 GB**
- 1,000 users × 400 KB ≈ **400 MB**
At 1 million users:
- Full bundle = approximately **20 TB**
- 400 KB patch = approximately **400 GB**
That represents approximately **19.6 TB less data transferred** in this illustrative scenario. These calculations use the benchmark patch size for illustration — real traffic depends on the actual patch generated for each release and the number of devices receiving it.
## How Differential OTA Delivery Works
The basic idea is straightforward.
A native app contains a compatible runtime and an initial application bundle. Later OTA releases can replace the update layer without replacing the native binary, as long as the new update is compatible with that runtime.
With differential delivery, the platform can compare compatible versions and generate a smaller representation of the changes.
The important distinction is that **patches are conditional**. If a patch is unavailable, unsuitable, or not meaningfully smaller than the full bundle, a full update may still be delivered. Stallion's patch-first model is designed around minimizing that transfer for compatible incremental releases.
## First Native Build vs OTA Releases
OTA systems do not replace the native application build.
The native application must first contain the OTA client and the required native configuration. Once that build is installed, compatible JavaScript and other supported non-native changes can be delivered through the OTA layer.
The same principle applies when using Stallion with Expo:
1. Build the native application with the Stallion integration.
2. Distribute that native build through the appropriate app store or testing channel.
3. Publish compatible OTA releases through Stallion.
4. Deliver subsequent updates without rebuilding the native application when the changes remain compatible with the installed runtime.
**App store review still applies**
Stallion does not bypass the App Store or Google Play requirement for the
initial native application build. It provides the OTA delivery layer for
subsequent compatible updates.
## Stallion With Expo
You do not need to abandon Expo to use Stallion.
Expo can continue to handle React Native application development, Expo SDK management, native project generation, native builds, and app-store submission. Stallion can handle the OTA delivery layer.
The Stallion-enabled native build needs to be installed before that application can receive Stallion OTA updates. This gives teams using Expo another choice for the OTA portion of their architecture without requiring them to replace the broader Expo development workflow.
## Where Stallion Can Be a Better Fit
Expo EAS Update provides differential delivery, channels, runtime-version targeting, rollouts, previews, and other release-management capabilities. We do not position Stallion by pretending those capabilities do not exist.
Instead, Stallion is a strong fit when teams want additional control around the OTA layer itself.
### On-demand differential patch generation
Stallion supports any-to-any patch generation: teams can generate a differential patch between any two compatible Stallion versions on demand, even when intermediate releases exist. This is useful when multiple versions remain active in the field and users may be upgrading across version gaps.
EAS Update also supports on-demand patch generation, but its current bundle-diffing architecture precomputes a patch against the second-newest update on a channel. When a device requests a newer update from another base version, EAS Update can generate that specific patch on demand for subsequent requests. Expo's approach is not limited to consecutive versions, but its patch-generation strategy prioritizes the second-newest update, while Stallion treats any-to-any generation as an explicit, on-demand capability rather than a fallback path.
### Verified patch-size benchmarks
In Stallion's documented benchmark scenarios, Patch Updates have reached **up to 98% smaller payloads** than corresponding full bundles. The benchmark provides a concrete reference point rather than suggesting that every release will have the same reduction.
### Release and recovery controls
Stallion combines OTA delivery with release-management and recovery capabilities such as staged rollouts, release rollback, automatic recovery, JavaScript and native crash detection, release analytics, and in-app testing. These let you manage an OTA release as a production deployment rather than simply uploading a bundle.
### Enterprise security
For organizations with stricter security requirements, Stallion provides [customer-managed bundle signing](/blogs/bundle-signing-security-in-ota-updates-with-react-native-stallion), SSO, regional data hosting, enterprise access controls, and on-premise deployment options. These capabilities are especially relevant when OTA infrastructure is part of a larger enterprise security or compliance review.
**Enterprise Solution**
Learn more about [self-hosted React Native
Stallion](/blogs/codepush-on-premise-alternative) for enterprise teams
requiring on-premise deployment.
### Expo and non-Expo React Native
Keep Expo. Change the OTA Layer
Teams already invested in Expo do not need to replace their development or native build workflow to evaluate Stallion. Stallion can sit underneath the existing application workflow as the OTA delivery layer, allowing teams to keep Expo while choosing a different approach to OTA delivery.
## Expo EAS Update vs Stallion
| Capability | Expo EAS Update | React Native Stallion |
| -------------------------- | ----------------------------------------------------------------------------------------- | ------------------------------------------------------------------------------------------------- |
| OTA delivery | Production-ready OTA updates through expo-updates | Production-ready OTA updates for React Native |
| Differential / patch updates | Bundle diffing with on-demand patches for update pairs | Binary-safe patches with on-demand generation between any two Stallion versions |
| Rollouts | Percentage-based and branch-based rollouts | Gradual percentage-based rollouts |
| Rollback / recovery | Rollback and automatic recovery for qualifying launch-time failures | Automatic and manual recovery with JS and native crash detection |
| Release adoption analytics | Update launches, users, crash rate and payload insights | Detailed release, download, adoption and rollback insights |
| Code signing | Customer-managed keys, local signing and on-device verification — Production & Enterprise | **Customer-managed keys, local signing and on-device verification — all plans** |
| Internal testing | Preview builds, staging channels and production-build testing | **Dedicated UI to switch to any version in one click — PIN-protected for testing and production** |
| Bare React Native support | Supported through expo-updates | **First-class support with no Expo dependency** |
| CI/CD automation | EAS CLI, GitHub Actions and EAS Workflows | **CLI and CI/CD automation for OTA releases** |
| Regional data hosting | No published regional EAS Update hosting option | **Regional data hosting for enterprise deployments** |
| Enterprise deployment | Expo-managed EAS cloud service | **Managed cloud, regional hosting or self-hosted/on-premise deployment** |
| Infrastructure control | Expo-managed infrastructure | **Control hosting, infrastructure and data location** |
| Enterprise support & SLA | Enterprise support and SLA | **Dedicated support, enterprise deployment and uptime SLA** |
| Pricing at 50K MAU scale | $199/mo Production — 50K MAU included | **$51/mo Pro — 100K MAU included** |
This comparison focuses on product capabilities rather than suggesting that one platform supports OTA updates while the other does not.
## When Should You Consider Stallion?
Stallion is worth evaluating if one or more of these are important to your team:
### You ship frequent OTA updates
Frequent releases make update size and bandwidth more important. A patch-first delivery model can reduce the amount of data transferred when releases contain relatively small changes.
### You operate at scale
At hundreds of thousands or millions of users, even a few megabytes per update can translate into significant data transfer.
### You need stronger release recovery controls
If your OTA workflow needs staged rollouts, rollback, crash-aware recovery, and release analytics as part of one platform, Stallion is designed around that workflow.
### You have enterprise deployment requirements
Customer-managed signing, SSO, regional hosting, and on-premise deployment can matter when OTA infrastructure goes through enterprise security and procurement reviews.
### You use Expo but want the OTA layer to be independent
You can keep Expo for development and native builds while using Stallion for OTA delivery.
## Is Stallion a Better Alternative to Expo Updates?
EAS Update now supports differential delivery alongside its existing OTA release workflows. The relevant question for teams evaluating an alternative is which platform best fits their requirements for patch delivery, release control, recovery, security, and deployment.
Stallion's differentiation is not simply that it can deliver OTA updates or generate smaller artifacts. Its OTA model combines efficient differential delivery with release, recovery, testing, security, and enterprise deployment controls.
The decision therefore should not be based on whether Expo can deliver OTA updates or whether it can generate patches. The more useful question is what your team wants from its OTA infrastructure.
**Stallion is a strong fit when you want:**
- On-demand differential patch generation
- Flexible version targeting
- Efficient OTA delivery
- Release and recovery controls
- In-app OTA testing
- Native crash-aware recovery
- Customer-managed bundle signing
- Enterprise deployment options
- Regional hosting
- On-premise deployment
- OTA delivery across Expo and other React Native setups
If your application already uses Expo, you can keep your existing development and native build workflow and use Stallion as the OTA delivery layer.
**Keep Expo for the parts of the workflow you need. Use Stallion when you want more control over differential delivery, testing, release, recovery, security, and OTA infrastructure.**
## Pricing and Cost Considerations
OTA cost depends on more than the number of updates you publish. The important variables include number of users receiving updates, update frequency, update artifact size, patch size, bandwidth consumption, storage, rollout strategy, and enterprise requirements.
Because current EAS Update pricing and differential delivery behavior can change over time, compare current pricing against your actual traffic rather than relying on a generic estimate. [Contact us](https://stalliontech.io/contact) for a Stallion cost estimate based on your update frequency and user base.
## Getting Started With Stallion
If you already use Expo, the migration does not require replacing your development workflow.
A typical setup is:
1. Create or configure your Stallion project.
2. Add the Stallion SDK to the native application.
3. Build and distribute the Stallion-enabled native application.
4. Publish compatible OTA updates through Stallion.
5. Use Stallion's release controls to test, roll out, monitor, or roll back updates.
The native build is still distributed through the normal app-store or testing channels. Stallion handles the OTA layer after the compatible native application is installed.
**Migration Guide**
Learn how to integrate React Native Stallion with your Expo app in our [Expo
integration guide](/docs/expo-integration-with-stallion).
[Get Started Free →](https://console.stalliontech.io/auth/signup)
## Frequently Asked Questions
### Is Expo EAS Update still a good OTA option?
EAS Update is a capable OTA service with support for non-native updates, runtime targeting, channels, rollouts, preview workflows, CI/CD automation, and bundle diffing in current SDK configurations. The right choice depends on your team's requirements for patch delivery, release controls, security, deployment, and enterprise infrastructure.
### Does Expo support differential updates?
Yes. Expo SDK 55+ supports bundle diffing. In SDK 56 and later, patches between published updates are enabled by default. Expo documents that a patch is served when it is meaningfully smaller than the full bundle and can be generated efficiently. Fresh-install patching remains experimental and opt-in.
### Does Stallion work with Expo?
Yes. You can continue using Expo for development and native builds while using Stallion as the OTA delivery layer. The Stallion-enabled native build must be installed before it can receive Stallion OTA updates.
### Does Stallion replace Expo?
No. Stallion can replace the OTA delivery layer without requiring you to replace Expo as your development or native build workflow.
### Is Stallion only for Expo applications?
No. Stallion can be used with Expo-based applications as well as other React Native application setups.
### Are Stallion patch updates always 98% smaller?
No. 98% is a verified benchmark result, not a guarantee. Actual patch size depends on the changes between releases and the resulting differential data.
### Do I still need the App Store or Google Play?
Yes, for the initial native application distribution and for native changes that require a new build. OTA updates are for compatible non-native changes after the OTA-enabled native build is installed.
### Can I use Stallion for enterprise or on-premise deployments?
Stallion offers enterprise deployment options including on-premise hosting. Availability and configuration depend on the plan and deployment requirements.
## Ship Smarter OTA Updates
If your team already uses Expo and wants more control over the OTA layer, you do not need to rewrite your application architecture.
Keep your existing React Native and Expo development workflow. Use Stallion when you want efficient differential delivery combined with release, recovery, testing, security, and enterprise deployment controls.
[Get Started With React Native Stallion →](https://console.stalliontech.io/auth/signup)
[View Expo + Stallion Integration →](/docs/expo-integration-with-stallion)
---
# React Native OTA Best Practices 2026 – Stallion
React Native OTA best practices for 2026: staged rollouts, safe recovery, customer-managed signing, differential updates — with real examples.
## Why OTA Best Practices Matter More in 2026
When Microsoft retired App Center and hosted CodePush in March 2025, React Native teams that depended on that hosted OTA workflow had to evaluate replacement release infrastructure. Many teams are still balancing that migration with frequent production releases.
That pressure is exactly when OTA goes wrong. React Native 0.82 made the New Architecture the only architecture for React Native, while the runtime boundary between native code and OTA-delivered JavaScript remains critical. Hermes, Fabric, TurboModules, and native dependencies make a production OTA pipeline more than a simple "push JS and hope" operation.
Teams that ship weekly — or daily — need OTA as core release infrastructure, not a side tool someone configured once and forgot about. A bad OTA strategy causes more production damage than having no OTA at all: silent crashes, bricked sessions, forced uninstalls, and App Store rating drops that take months to recover from.
This guide covers what separates production-grade OTA from dangerous OTA. The first sections apply regardless of which platform you use. Where a concrete implementation helps, we reference React Native Stallion — not as a sales pitch, but as a working example of how these practices look in a real pipeline.
## The OTA Boundary: What Lives in the JS Bundle
The single most common cause of broken OTA updates is shipping changes the runtime cannot apply. Developers fix a bug in JavaScript, push an OTA release, and watch the app crash on launch — because the fix depended on a native module that was never in the binary.
Before you plan any OTA release, draw a hard line between what the JS bundle can change and what requires a new App Store or Play Store build.
| Update Type | Can Update via OTA? (JS Layer) | Requires App Store / Play Store Release? |
| :--- | :---: | :---: |
| React components, screens & navigation | ✅ Yes | ❌ No |
| Business logic, state & API endpoint URLs | ✅ Yes | ❌ No |
| Styles, layouts & animations | ✅ Yes | ❌ No |
| Text, copy & localisation strings | ✅ Yes | ❌ No |
| In-bundle image/asset swaps | ✅ Yes | ❌ No |
| Third-party JS-only libraries (no native bridge) | ✅ Yes | ❌ No |
| Feature flags & A/B test configuration | ✅ Yes | ❌ No |
| New native modules, pods, or Gradle dependencies | ❌ No | ✅ **Yes** |
| Permission declarations (`Info.plist`, `AndroidManifest.xml`) | ❌ No | ✅ **Yes** |
| App icon, launch screen, or splash screen assets | ❌ No | ✅ **Yes** |
| Push notification entitlements or capabilities | ❌ No | ✅ **Yes** |
| Native SDK upgrades (Firebase, analytics SDKs, etc.) | ❌ No | ✅ **Yes** |
| Anything requiring `pod install` or a Gradle sync | ❌ No | ✅ **Yes** |
| Minimum OS version changes | ❌ No | ✅ **Yes** |
**Rule of thumb**
As a rule of thumb, changes that require native dependency installation,
native configuration changes, or recompiling native code require a new
native build. Purely JavaScript and supported asset changes can typically
be delivered through OTA.
**Runtime compatibility implication:** OTA bundles must remain compatible with the native runtime they target. Before promoting an OTA release, verify that the JavaScript bundle, native dependencies, runtime version, and supported configuration match the installed native build. Changes that alter the native runtime should ship through a new native build rather than OTA.
## Never Deploy to 100% of Users at Once
Production environments are unpredictable. Your staging build runs on a handful of devices with fast Wi-Fi and recent OS versions. Your user base spans five-year-old Android phones on 3G, corporate devices with aggressive MDM policies, and iOS versions you stopped testing six months ago.
No amount of internal QA eliminates that spread. Staged rollouts are not optional caution — they are how you convert an OTA release from a binary gamble into a controlled experiment.
**Example rollout ladder:**
1. **1–5% for 2–4 hours** — establish a crash-rate baseline against the previous release
2. **10–20% for 24 hours** — confirm stability across device and OS spread
3. **50% for 24 hours** — monitor adoption velocity and rollback triggers
4. **100%** — only after all stage metrics are green
**What to watch at each stage:**
- **Crash rate vs baseline** — compare relative change, not absolute count. A team with 0.1% baseline crash rate should alarm on a jump to 0.3%, not wait for hundreds of reports.
- **Rollback trigger rate** — any auto-rollback activity warrants investigation before expanding.
- **Download success rate** — failed downloads often indicate bundle size or CDN issues, not app logic bugs.
- **Adoption curve shape** — flat adoption usually means users are not opening the app, not that the update is broken. Sudden adoption drop after a spike is more concerning.
In React Native Stallion, rollout percentage is configured per release in the Console. You can expand from 5% to 20% to 100% without redeploying a new bundle — the same release artifact, wider audience, as confidence grows.
## Automatic Rollback: Your Last Line of Defence
Manual rollback means you detect a problem, build a fix, push a new OTA release, and wait for users to download it. That cycle takes hours at best. Auto rollback means the SDK detects a broken update on the device and reverts to the last known-good bundle — often before the user consciously notices anything went wrong.
These are fundamentally different safety nets. Manual rollback is your incident response. Auto rollback is your circuit breaker.
**Recovery must cover failures that can happen before JavaScript recovery logic is available.** A production OTA system should account for startup failures and other early failures that can prevent the app from successfully loading the new update.
**What good auto rollback looks like:**
- **Crash threshold** — revert after N crashes in M launches (not on the first benign crash from a third-party SDK)
- **Silent revert** — user lands back on the previous version without an error screen or forced reinstall
- **Rollback analytics** — which devices rolled back, what error triggered it, which version they reverted to
React Native Stallion uses native crash detection as part of its automatic recovery workflow. The Console surfaces grouped stack traces ranked by frequency, helping teams investigate the failures driving rollbacks across the user base.
## Internal Testing: Never Ship Without Eating Your Own Dog Food
A staging environment is not production. Different API endpoints, different feature flag defaults, different certificate pinning, different push notification behaviour — staging catches integration bugs, not production-device bugs.
The testing ladder that actually works:
**Developer device → internal team → beta users → production**
On every release, verify at minimum:
- App startup after the update installs (cold start, not just hot reload)
- Critical user flows: authentication, checkout, core feature path
- Low-end device behaviour (not just the latest iPhone on your desk)
- Slow network conditions (3G simulation or network link conditioner)
- Update from version **n-1**, not just from the version you had installed during development
That last point catches more bugs than most teams expect. Users do not all update simultaneously. Someone on a two-week-old bundle will receive your new OTA as a jump across multiple versions.
React Native Stallion's in-app testing modal lets internal users switch to a specific compatible bundle in the production environment using a PIN-protected interface. This allows QA to test the exact OTA release inside a real production app binary without creating another native distribution build. Expo also provides preview builds, channels, and production-runtime testing workflows; Stallion's distinction is the dedicated in-app version-selection workflow.
## Bundle Signing: Don't Ship Updates You Can't Verify
Bundle signing attaches a cryptographic signature to your JavaScript bundle. The device verifies that signature before installation. If the signature does not match, the update is rejected — regardless of whether it arrived over HTTPS.
OTA is a potential attack vector. An unsigned bundle — or a bundle signed with vendor-held keys — can be modified in transit or at rest if any link in the delivery chain is compromised.
**What good signing looks like:**
- **Customer-managed keys** — you generate and hold the signing keypair, not the vendor
- **Signed locally before upload** — signing happens on your machine or CI runner, not on the vendor's server after upload
- **Verified on device before installation** — not just TLS in transit
- **Key rotation support** — you can rotate keys without breaking in-flight updates
**Common mistake:** trusting TLS alone. TLS protects data in transit. It does not protect against a compromised CDN edge, a vendor-side breach, or a man-in-the-middle who controls a corporate proxy. If the vendor holds your signing keys, a vendor-side compromise means an attacker can ship arbitrary JavaScript to your users.
React Native Stallion uses customer-managed keys, signed locally before upload. The vendor does not hold your signing keys, and verification happens on device before installation. Bundle signing is included on all Stallion plans. EAS Update Code Signing is currently available on Expo's Production and Enterprise plans.
> **Note:** Confirm the exact CLI command syntax against your current CLI docs before publishing — key-generation and publish flags should match what's actually shipped, not illustrative examples.
## Environment Separation: Staging Is Not a Safety Net
Treat OTA environments as deployment channels, not folder names in your repo. The three-environment model:
**Development → staging → production**
Each environment should be a separate deployment channel with its own release history, rollout settings, and access controls. The promotion path flows:
**Internal → beta → production**
Never skip straight from a developer's local test to production because "it's just a one-line fix."
**Common mistake:** using the same deployment key for staging and production because a quick test is needed. That test bundle is now eligible to reach production users if someone misconfigures a rollout percentage or promotes the wrong release.
CI/CD should enforce the promotion path — block production uploads from non-release branches, require staging promotion before production, and log which channel every bundle lands in. Developer discipline does not scale; pipeline gates do.
React Native Stallion supports multiple deployment channels per app. One app, three channels (internal / staging / production), with controlled promotion between them directly from the Console. See the [production usage guide](/docs/sdk/production-usage) for rollout defaults and promotion workflow.
## CI/CD for OTA: Automate Everything You Would Otherwise Forget
Manual OTA releases fail in predictable ways: wrong channel, wrong binary target version, missed signing step, promoted to 100% by default, release notes copied from the previous version. Automation removes the steps humans forget under deadline pressure.
**A production OTA CI/CD pipeline, step by step:**
1. **Detect change type.** Check whether the change is JS-only or requires a native rebuild — look for diffs in `ios/`, `android/`, or native dependencies in `package.json`.
2. **Trigger the OTA pipeline (if JS-only).** Build the JS bundle against the correct binary target version, sign it with your customer-managed key, upload to the staging channel at 0% rollout, and attach release metadata (version, notes, binary compatibility).
3. **Run automated smoke tests** against the staging channel bundle.
4. **Promote to production at 5% rollout.**
5. **Monitor for 2 hours.** Expand rollout or trigger rollback based on metrics.
**GitHub Actions: detect JS-only changes**
```yaml
jobs:
detect-change-type:
runs-on: ubuntu-latest
outputs:
js_only: ${{ steps.check.outputs.js_only }}
steps:
- uses: actions/checkout@v4
with:
fetch-depth: 2
- id: check
run: |
CHANGED=$(git diff --name-only HEAD~1 HEAD)
if echo "$CHANGED" | grep -qE \
'^(ios/|android/|package\.json)'; then
echo "js_only=false" >> $GITHUB_OUTPUT
else
echo "js_only=true" >> $GITHUB_OUTPUT
fi
```
Wire the `js_only` output to conditional jobs: native rebuild pipeline vs OTA publish pipeline. React Native Stallion's CLI (`publish-bundle`, `update-release`) integrates cleanly into GitHub Actions — see the [release automation docs](/docs/release-automation) for a full workflow example.
## Release Monitoring: Know Before Your Users Do
Shipping an OTA release without monitoring is flying blind. Errors in your error tracker tell you something broke. Release monitoring tells you **your release** broke it — and how widely.
**Monitor after every OTA release:**
- **Adoption rate** — percentage of active users on the new version over time. A flat curve means users are not opening the app. A sudden drop after initial uptake signals a problem.
- **Download success rate** — failed downloads point to bundle size, CDN, or network configuration issues before any user runs your new code.
- **Crash rate delta** — compare crash rate in the 24 hours after release against the 24 hours before. Relative change matters more than absolute crash count.
- **Rollback rate** — any non-zero auto-rollback rate needs investigation, even if absolute user impact seems small.
- **Time to 95% adoption** — determines how long you must support version n-1 and how quickly you can deprecate old API contracts.
React Native Stallion Console shows release adoption, download counts, and rollback analytics with grouped stack traces. EAS Update also provides update insights including launches, crash rate, unique users, and payload size, so the relevant distinction is the depth and scope of the operational analytics available in each platform.
## Patch Updates: The Bandwidth Equation Your Users Feel
A full-bundle OTA update transfers the complete update bundle. The amount of data can vary significantly by application, release, compression, caching, and assets.
Differential updates can transfer only the changes between a compatible base bundle and a newer bundle, which can make the downloaded payload substantially smaller for relatively small releases.
**The math at scale:**
- 1M users × 20 MB full bundle = **20 TB** egress per release
- 1M users × 400 KB patch = **400 GB** — a **98% reduction**
**When to use each:**
- **Patch** — most releases: bug fixes, UI changes, copy updates, logic changes within the same binary target
- **Full bundle** — first release targeting a new native binary version (no previous bundle to diff from), or when patch generation is unavailable
The user experience difference is measurable. A 20 MB download on mobile data gets deferred or abandoned. A 400 KB patch completes in the background before the user finishes their current session.
React Native Stallion supports binary-safe differential patching with on-demand generation between any two compatible Stallion bundle versions. This allows teams to generate a patch across version gaps when multiple releases remain active in the field. Expo EAS Update also supports bundle diffing with the bsdiff algorithm and can generate patches on demand for requested base versions. See [Patch Updates](/docs/patch-updates) for enablement and workflow.
## Mandatory Updates: Reserve Them for Real Emergencies
A mandatory update blocks app usage until the OTA bundle installs. Users cannot dismiss it, cannot defer it, and cannot access any app functionality until it completes. That is a powerful tool and a trust-destroying weapon if overused.
**Justified:**
- Active security vulnerability in the shipped JavaScript
- Broken API endpoint that renders the app non-functional for all users
- Legal or compliance change that must be enforced immediately
**Not justified:**
- Routine bug fixes
- UI improvements or redesigns
- New feature launches
The UX cost compounds. Users who are interrupted repeatedly during normal usage leave bad reviews, disable auto-updates at the OS level, or uninstall. Reserve mandatory updates for situations where the alternative — users running broken or vulnerable code — is worse.
**Implementation with React Native Stallion's JS API:**
```tsx
import { useStallionUpdate } from "react-native-stallion";
const UpdateGuard = () => {
const { newReleaseBundle } = useStallionUpdate();
if (newReleaseBundle?.isMandatory) {
return ;
}
return null;
};
```
Mark a release as mandatory in the Console or via the CLI `--mandatory` flag only when the criteria above are met. For everything else, use background download with a non-blocking prompt. See [mandatory updates](/docs/codepush-mandatory-updates) for full configuration.
## OTA Platform Comparison 2026
Here's how the major React Native OTA platforms compare across the best practices covered in this guide.
| Capability | React Native Stallion | CodePush (deprecated) | Expo EAS Update |
| --- | --- | --- | --- |
| Differential / patch updates | ✓ Binary-safe differential patches | ✗ Hosted service retired | ✓ Bundle diffing with bsdiff |
| Patch generation | ✓ On-demand between any two compatible versions | ✗ Hosted service retired | ✓ Patch for other base versions can be generated on demand after request |
| Auto rollback / error recovery | ✓ Native crash detection with automatic recovery | ✗ Hosted service retired | ✓ Automatic error recovery for qualifying early launch failures |
| Manual rollback | ✓ One-click release rollback | ✗ Hosted service retired | ✓ Republish a known-good update |
| Rollback analytics (grouped stack traces) | ✓ | ✗ | Update insights and error recovery diagnostics |
| Release adoption analytics | ✓ Day-wise insights | ✗ Hosted service retired | ✓ Launches, crash rate, unique users and payload size |
| In-app testing & beta (PIN-protected modal) | ✓ Dedicated in-app version switching | ✗ Hosted service retired | ✓ Preview builds, channels and production-build testing workflows |
| Bundle signing (customer-managed keys) | ✓ Free on all plans | ✗ Hosted service retired | ✓ Production/Enterprise plans |
| SSO (Okta, Google, Microsoft Entra) | ✓ All paid plans | ✗ Hosted service retired | ✓ Availability depends on EAS plan |
| Regional data hosting | ✓ | ✗ | No published regional EAS Update hosting option |
| On-premise hosting | ✓ Paid add-on | ✗ | No managed on-premise EAS Update deployment documented |
| SLA & uptime guarantee | ✓ | ✗ | ✓ |
| Bare React Native support | ✓ | ✗ | ✓ Supported through expo-updates |
| Free tier | ✓ 10K MAU | ✗ | ✓ 1K MAU |
React Native Stallion combines native crash detection recovery, rollback analytics, dedicated in-app OTA testing, and customer-managed bundle signing across its plans.
## Conclusion
## Ship Faster, Sleep Better
These practices apply regardless of which OTA platform you run today. Draw the JS/native boundary before every release. Roll out in stages. Enable native crash detection rollback. Test in production with real binaries. Sign every bundle with keys you control. Separate environments. Automate the pipeline. Monitor adoption, not just errors. Use patches when you can. Reserve mandatory updates for emergencies.
The goal is making OTA a reliable, automated part of your release process — not a source of production anxiety at 2 AM.
React Native Stallion is free to start — 10K MAU free tier, no credit card required.
---
### Ready for safer, zero-panic React Native releases?
Get binary diffing, native auto-rollback, and customer-managed keys configured in minutes.
[**Get Started Free (10,000 MAU)**](https://console.stalliontech.io/auth/signup) · [**Read the Docs →**](https://stalliontech.io/learn/docs) · [⭐ **Star on GitHub**](https://github.com/stalliontech)
---
# Migrate React Native OTA from CodePush & App Center to Stallion
A step-by-step guide to migrating React Native OTA updates from CodePush and App Center to React Native Stallion — SDK setup, native integration, testing, rollout, and common migration issues.
If your React Native app still uses CodePush, you're likely already thinking about what comes next.
Microsoft retired the hosted App Center CodePush service on March 31, 2025. Hosted App Center CodePush is no longer available. Teams that relied on Microsoft's hosted CodePush service now need to evaluate a compatible CodePush fork or move to another OTA platform.
React Native Stallion provides a managed OTA workflow for teams that want to keep shipping React Native JavaScript updates without operating their own OTA infrastructure.
This guide walks through the migration from CodePush to Stallion, what changes in your application, and how to publish and test your first OTA release.
[**Get Started Free →**](https://console.stalliontech.io/auth/signup)
[**View the CodePush Migration Documentation →**](/docs/migrating-from-codepush)
## Why Move From App Center CodePush?
The important distinction is between **CodePush as a technology** and Microsoft's **hosted App Center CodePush service**.
Microsoft retired the hosted App Center service in 2025. If your application was using Microsoft's hosted CodePush infrastructure, those update services are no longer available.
Teams can continue with compatible CodePush forks or self-hosted implementations, but these become the team's responsibility to operate and maintain, including hosting, storage, networking, availability, monitoring, upgrades, and ongoing compatibility.
Stallion provides a managed alternative while keeping the basic React Native OTA workflow familiar.
Instead of operating the update infrastructure yourself, you can use Stallion's:
- **React Native SDK** for receiving and installing OTA releases
- **CLI** for creating and publishing bundles
- **Console** for managing releases, users, rollouts, and adoption
- **Testing workflow** for validating releases before production
- **Rollback controls** for recovering from problematic releases
- **Patch Updates** for reducing transfer size when applicable
- **Bundle Signing** for cryptographic update verification
The goal of the migration is not to change how your team builds React Native applications. It is to replace the OTA delivery layer with a managed workflow.
Teams evaluating a CodePush migration may also consider Expo EAS Update, which provides a mature OTA workflow with channels, rollouts, runtime targeting, bundle diffing, and code signing on eligible plans. Stallion provides the same core OTA workflow while adding capabilities such as dedicated in-app OTA testing, any-to-any on-demand differential patch generation, regional hosting, and broader infrastructure control.
## What Changes When You Move to Stallion?
The core concept remains the same: your native application contains an OTA-capable runtime, and compatible JavaScript updates can be delivered after the native application has been installed.
The tooling around that workflow changes.
| Capability | CodePush / App Center | React Native Stallion |
|---|---|---|
| Hosted App Center service | Retired | Managed OTA service |
| React Native OTA | ✓ | ✓ |
| Managed OTA infrastructure | App Center service retired | ✓ |
| Differential patch delivery | Hosted CodePush retired; capabilities vary across forks | **Binary-safe differential patches with on-demand generation between compatible versions** |
| Release rollout controls | ✓ | ✓ |
| Release analytics | CodePush deployment/status model | ✓ |
| In-app OTA testing | Not a core CodePush workflow | **Dedicated in-app OTA version testing** |
| Customer-managed bundle signing | Fork/deployment dependent | ✓ |
| CI/CD integration | ✓ | ✓ |
| On-premise deployment | Requires standalone infrastructure | Available on applicable plans |
The migration does **not** mean rewriting your React Native application.
You replace the CodePush SDK and its native integration with Stallion's SDK and configure the Stallion release workflow.
## Before You Start
Before beginning the migration, make sure you have:
- A React Native application currently using CodePush
- Access to the application's Android and iOS native projects
- A Stallion account
- A Stallion project and bucket/environment for your releases
- A plan for testing the first migrated release
- Access to your CI/CD pipeline if OTA publishing is automated
It is also a good idea to keep the existing CodePush integration available until you've successfully validated the Stallion-enabled native build.
### Step 1: Uninstall CodePush
Start by removing the CodePush SDK and its associated configuration.
With npm:
```bash
npm uninstall react-native-code-push
```
Also remove CodePush-specific configuration from the project, including:
- CodePush deployment keys
- CodePush native configuration
- CodePush imports and API calls
- CodePush package configuration
- CodePush Android Gradle/settings configuration
- CodePush iOS configuration
Search your repository for `code-push`, `CodePush`, and `react-native-code-push` to make sure there are no remaining integrations.
### Step 2: Install the Stallion SDK and CLI
Install the React Native Stallion SDK:
```bash
npm install react-native-stallion
```
Or with Yarn:
```bash
yarn add react-native-stallion
```
If you are publishing bundles from CI/CD, also install the Stallion CLI as a dev dependency:
```bash
npm install --save-dev stallion-cli
```
[**Read the Stallion Installation Documentation →**](/docs/sdk/installation)
### Step 3: Configure the Native Application
Stallion requires native integration so the application knows how to obtain the JavaScript bundle that should be executed.
**Android** — configure the Stallion bundle provider in the appropriate application host file for your React Native version. The current Stallion installation documentation specifies the exact file and configuration for each supported React Native setup.
For `MainApplication.java`:
```java
@Override
protected String getJSBundleFile() {
return Stallion.getJSBundleFile(getApplicationContext());
}
```
For `MainApplication.kt`, override `getJSBundleFile()` inside the `reactNativeHost` definition the same way. Follow the current Stallion installation documentation for the exact `MainApplication.kt` configuration.
**iOS** — configure the Stallion bundle provider in the appropriate AppDelegate implementation for your React Native version. The current Stallion installation documentation specifies the exact file and configuration for each supported React Native setup.
For `AppDelegate.mm`:
```objc
- (NSURL *)bundleURL {
#if DEBUG
return [[RCTBundleURLProvider sharedSettings] jsBundleURLForBundleRoot:@"index"];
#else
return [StallionModule getBundleURL];
#endif
}
```
For `AppDelegate.swift`:
```swift
override func bundleURL() -> URL? {
#if DEBUG
RCTBundleURLProvider.sharedSettings().jsBundleURL(forBundleRoot: "index")
#else
StallionModule.getBundleURL()
#endif
}
```
Use the current installation documentation for the exact configuration for your React Native version.
[**View Native Installation Steps →**](/docs/sdk/installation)
### Step 4: Configure Your Stallion Project
Create or select your project in the Stallion Console and configure the appropriate project and application credentials.
Your Stallion configuration connects the native application to the OTA project from which it will receive releases.
Keep production credentials out of source control and use your CI/CD secret manager for credentials used by automated publishing workflows.
### Step 5: Build and Install the Stallion-Enabled Native App
This step is important.
**A native application must contain the Stallion integration before it can receive Stallion OTA updates.**
Installing the Stallion SDK into your source code does not retroactively enable an already-installed CodePush binary to receive Stallion releases.
Your migration therefore has two stages:
1. Release a native build containing Stallion.
2. Use that Stallion-enabled build to receive subsequent OTA releases.
The first Stallion-enabled native build can still be distributed through your normal App Store, Play Store, enterprise, or internal distribution workflow.
Once that compatible native build is installed, supported JavaScript changes can be delivered through Stallion without requiring another native build for every OTA release.
### Step 6: Publish Your First Stallion Bundle
Once the native integration is working, build your React Native production bundle using your existing build workflow, then publish the bundle through Stallion.
A typical publishing workflow looks like:
```bash
npx stallion publish-bundle \
--upload-path=// \
--platform= \
--release-note="Migrated from CodePush"
```
The exact CLI options can change as the CLI evolves, so use the current publishing documentation when configuring your production pipeline.
[**View Bundle Publishing Documentation →**](/docs/cli/usage-api-reference)
After publishing, open the Stallion Console and verify that the release appears in the expected project and bucket.
### Step 7: Test the OTA Release
Don't send the first migrated release directly to your entire production audience.
Use Stallion's testing workflow to validate:
- The correct bundle is downloaded
- The application starts correctly
- Navigation works
- API requests work
- Native integrations continue working
- Assets load correctly
- The update is compatible with the installed native runtime
- Restart and installation behaviour works as expected
Stallion provides an in-app testing workflow that allows authorized testers to work with OTA releases without creating a separate native build for every JavaScript change.
### Step 8: Promote the Release to Production
Once the release has passed testing, promote the same bundle through your production release workflow.
This separation is useful because the artifact tested by QA can be the artifact that eventually reaches production.
Your workflow becomes:
**Build → Publish → Test → Promote → Roll Out → Monitor**
Instead of:
**Build → Upload → Hope**
For teams already using CI/CD, these steps can also be incorporated into an automated release pipeline.
### Step 9: Roll Out Gradually
A production OTA release does not necessarily have to reach every user at once.
Use your release and rollout controls to decide how the update should reach users.
A typical rollout might look like:
```text
Internal testing
↓
Small production rollout
↓
Expanded rollout
↓
100% production
```
Monitor adoption and release behaviour as the rollout progresses.
If the release shows unexpected behaviour, rollback controls can be used to stop or reverse the problematic release according to your configured workflow.
### Step 10: Monitor the Release
After migration, the OTA workflow should not end when the bundle is published.
Monitor:
- Release adoption
- Download activity
- Installation behaviour
- Rollback activity
- Application errors
- User-reported issues
This gives your team visibility into whether a release is actually reaching users and behaving as expected.
## What Happens to Your Existing Users?
This is one of the most important parts of an OTA migration.
An application that is currently running the old CodePush integration does not automatically become a Stallion-enabled application.
The migration therefore normally requires a **native app release containing the Stallion SDK**.
Once users install that Stallion-enabled native build, subsequent compatible OTA releases can be delivered through Stallion.
A simplified migration looks like this:
```text
Existing production app
│
│ App Store / Play Store / other native distribution
▼
Stallion-enabled native build
│
▼
Stallion OTA releases
│
├── Release 1
├── Release 2
├── Release 3
└── Future OTA releases
```
You should therefore plan the migration around your normal native release cycle rather than treating it as a purely JavaScript-only migration.
## CodePush Concepts → Stallion Concepts
The terminology changes slightly, but the underlying workflow remains familiar.
| CodePush concept | Stallion equivalent |
|---|---|
| CodePush SDK | Stallion SDK |
| CodePush CLI | Stallion CLI |
| Deployment | Stallion project / bucket workflow |
| Update | OTA release / bundle |
| Deployment key | Stallion project/application credentials |
| Mandatory update | Mandatory release/update flow |
| Rollback | Stallion rollback controls |
| Deployment rollout | Stallion release rollout |
| CodePush testing workflow | Stallion testing workflow |
The exact implementation is different, so don't copy CodePush API calls into a Stallion integration unchanged. Follow Stallion's current SDK and CLI documentation for the corresponding implementation.
## What You Gain After Migration
Moving away from the retired hosted CodePush service is not just a hosting change.
Stallion adds capabilities around the OTA release lifecycle.
### On-demand differential patch generation
Stallion supports binary-safe differential patches with on-demand generation between any two compatible Stallion versions. This allows teams to generate patches across version gaps when multiple releases remain active in the field.
In Stallion's documented benchmark scenarios, update artifacts have been reduced by up to 98%. Actual patch size depends on the changes between releases.
[**Learn About Patch Updates →**](/docs/patch-updates)
### Regional data hosting
For supported enterprise deployments, Stallion can keep OTA data within a selected geographic region to help teams meet data-residency and infrastructure requirements.
### Enterprise deployment options
Stallion supports managed cloud, regional hosting, self-hosted, and on-premise deployment options, depending on the enterprise deployment requirements.
### Release and rollout controls
Manage releases from the Stallion Console and control how updates move from testing into production.
This gives teams a more structured release path instead of treating OTA publishing as a single upload operation.
### In-app testing
Authorized testers can test available OTA releases from within the application.
This can shorten the feedback loop for JavaScript changes because every test iteration does not require another native build.
### Rollback controls
If a release causes problems, rollback controls provide a way to move users away from the problematic release according to your configured release strategy.
### Bundle signing
Stallion supports customer-managed bundle signing so applications can verify the authenticity and integrity of signed OTA artifacts before installation.
This adds a cryptographic verification layer to the OTA release pipeline.
[**Learn About OTA Bundle Signing →**](/docs/bundle-signing)
### CI/CD integration
Stallion's CLI can be incorporated into existing CI/CD workflows, allowing teams to publish and promote OTA releases as part of their existing engineering process.
You don't need to replace your existing CI/CD platform to automate OTA publishing.
## Migrating From CodePush Doesn't Mean Rebuilding Your Release Process
One advantage of a managed OTA platform is that your existing engineering workflow can remain largely intact.
Your team can continue using:
- React Native
- Your existing source control
- Your existing CI/CD provider
- Your existing native build process
- App Store and Play Store distribution
- Existing monitoring and crash-reporting tools
Stallion becomes the OTA delivery and release-management layer.
For many teams, the practical migration is therefore:
**Replace the OTA layer, not the entire mobile development stack.**
## Common Migration Issues
### The app still loads the Metro bundle
Make sure the Stallion native bundle-loading configuration is applied to the release build.
Debug builds commonly continue using Metro while release builds use the OTA bundle provider.
Check the native integration for your React Native version.
### The OTA update is not downloaded
Check:
- Project configuration
- Application credentials
- Bucket/environment
- Platform
- App/runtime compatibility
- Network connectivity
- Whether the release is available to the current installation
### The update was downloaded but isn't running
An OTA update may need to be applied and the application restarted before the new JavaScript bundle becomes active.
Check the Stallion SDK update state and your application's installation/restart flow.
### The release is incompatible with the installed native app
OTA updates cannot introduce native modules, native configuration, or runtime capabilities that aren't already present in the installed native binary.
If your change requires native code, release a new native application build first.
### Production users are still on CodePush
That's expected until those users install the Stallion-enabled native build.
Plan the native migration release carefully and monitor adoption of the new binary.
## A Safer Migration Strategy
For a production application, don't switch everything at once.
A safer sequence is:
### 1. Integrate Stallion
Add the SDK and native configuration.
### 2. Create a migration build
Release the Stallion-enabled native application through your normal distribution process.
### 3. Test internally
Verify OTA download, installation, restart, assets, APIs, and native integrations.
### 4. Publish a low-risk OTA update
Use a small JavaScript change to validate the complete production workflow.
### 5. Monitor adoption
Confirm that the Stallion-enabled application is reaching your users.
### 6. Move future OTA releases to Stallion
Once the migration is validated, use Stallion as the primary OTA delivery layer.
This approach reduces migration risk while giving your team a clear rollback point at each stage.
React Native Stallion gives you a managed OTA platform with the tools needed to publish, test, roll out, monitor, and roll back React Native releases.
You can start with a small migration, validate the workflow with your existing application, and expand from there.
[**Get Started Free →**](https://console.stalliontech.io/auth/signup)
[**Read the Complete CodePush Migration Guide →**](/docs/migrating-from-codepush)
---
# React Native OTA Rollbacks: Automatic & Manual Recovery with Stallion
Discover how React Native Stallion helps you handle failed OTA updates with powerful auto and manual rollback mechanisms. Ensure safe, seamless React Native deployments.
## Introduction
In the world of mobile app development, **Over-the-Air (OTA) updates** are game-changers—enabling you to ship features, bug fixes, and hot patches instantly without App Store delays. But what happens when something goes wrong?
An unstable update can crash your app, degrade UX, or worse—lock out users entirely.
**React Native Stallion** offers robust **rollback mechanisms**—both automatic and manual—to help you recover instantly and protect your users from broken builds.
In this post, we’ll explore how these rollback features work, why they’re essential, and how Stallion leads the pack in OTA safety.
## Why Rollbacks Are Critical for OTA Updates
OTA updates are powerful—but they come with risk. Bugs can sneak past internal QA. Edge cases only appear in real-world usage. Even a single corrupted file can lead to app crashes.
Without rollback support, an unstable update means:
- Angry users
- App crashes on launch
- Lost revenue and poor ratings
- Emergency hotfix chaos
**React Native Stallion** makes rollback not just possible—but automatic.
## 🚨 Auto Rollbacks with React Native Stallion
React Native Stallion’s SDK automatically detects critical crashes or install failures caused by a new update.
Here’s how it works:
1. A new bundle is downloaded and installed.
2. On next launch, Stallion monitors for crash signals.
3. If the app crashes _immediately after update_—it triggers an **auto rollback**.
4. The app reverts to the last known good version, instantly.
This safety net ensures your users never get stuck in a crash loop. You can even monitor rollback metrics in the Stallion Console.
## 🛠️ Manual Rollbacks When You Need Full Control
Sometimes, you want to take matters into your own hands. React Native Stallion gives you a **Manual Rollback button** in the dashboard.

With just a click:
- Instantly revert an OTA release to its previous version
- Target specific platforms or buckets
- Monitor rollback status and rollout impact
Perfect for responding to user feedback, silent bugs, or performance regressions—**without redeploying your app**.
## 💡 How Rollbacks Work Under the Hood
React Native Stallion keeps track of:
- Last successful bundle
- Currently installed bundle
- Crash or anomaly signals
During launch, if the new bundle shows instability, the SDK automatically swaps it out with the stable one:
- **Auto rollback** uses the previously cached bundle on-device
- **Manual rollback** is triggered from the dashboard and propagates to devices on next app foreground
- **Instantly** (before any UI renders on auto rollback)
- **Quietly** (no user disruption)
This seamless fallback ensures maximum uptime, minimum impact.
## Why Developers Love Stallion Rollbacks
- ✅ **Automatic recovery from crashes**
- ✅ **No user action needed**
- ✅ **One-click manual rollback from dashboard**
- ✅ **Works for both Android and iOS**
- ✅ **Grouped stack traces ranked by frequency for rollback errors, visible in the Stallion Console**
Other tools either skip rollback features entirely or require complex configurations. React Native Stallion makes it simple, reliable, and built-in.
## Best Practices for Safe OTA Rollouts
Combine rollback with these Stallion best practices:
- **Always test internally first** with the Stallion SDK modal
- **Use phased rollouts** to gradually release updates
- **Monitor update health** via rollback and install metrics
- **Sign all bundles** to ensure authenticity and security
- **Use version tagging** to track which build introduced issues
With this approach, even if something breaks—you’re just one click (or crash) away from recovery.
## Conclusion
OTA updates are powerful, but they need protection. **React Native Stallion’s rollback system** gives you the confidence to release fast—without fear.
Whether it’s **auto rollback** from a crash or a **manual rollback** from user reports, Stallion ensures your app always stays in a healthy, working state.
**Pro Tip**
Mistakes happen. What matters is how fast you bounce back. Stallion rollbacks
help you do exactly that—automatically.
---
# React Native over the air (OTA) updates with custom user interface
Add custom modals and popups for React Native OTA updates using Stallion. Guide to building user-friendly update prompts and handling app restarts effectively.
## Introduction
Over-the-air (OTA) updates are a core part of modern mobile release strategies for React Native teams. But shipping an update is just half the job—delivering it with the right user experience is what makes the difference.
This blog walks through how to **build custom UI prompts**—like modals or banners—when a new Stallion OTA update is available. These UI flows can prompt users to restart their app, improving visibility and adoption of your latest releases.
## Why Custom UI Matters for OTA
While Stallion can silently fetch and apply updates in the background, you may want to:
- Show a modal when a new update is downloaded
- Display release notes or update version info
- Prompt users to restart the app manually
This kind of control improves transparency, avoids user confusion, and gives you more flexibility.
---
## Detecting OTA Updates with Stallion
Stallion automatically checks for updates when your app moves from background to foreground.
You can also manually check for updates anytime using:
```tsx
import Stallion from "react-native-stallion";
Stallion.sync(); // Triggers a manual update check
```
Once an update is downloaded, it’s stored in memory. It will be applied on the **next restart**.
---
## Triggering Custom UI with `useStallionUpdate`
You can detect when an update is ready to apply using the `useStallionUpdate` hook.
```tsx
import { useStallionUpdate } from "react-native-stallion";
const MyUpdateChecker = () => {
const { isRestartRequired } = useStallionUpdate();
useEffect(() => {
if (isRestartRequired) {
// Trigger modal or banner here
}
}, [isRestartRequired]);
return null;
};
```
---
## Minimal Example: Restart Modal
```tsx
import React, { useEffect, useState } from "react";
import { Modal, Text, View, Button } from "react-native";
import { useStallionUpdate, restart } from "react-native-stallion";
const UpdateModal = () => {
const { isRestartRequired } = useStallionUpdate();
const [modalVisible, setModalVisible] = useState(false);
useEffect(() => {
if (isRestartRequired) {
setModalVisible(true);
}
}, [isRestartRequired]);
const handleRestart = () => {
setModalVisible(false);
restart(); // Trigger Stallion restart
};
return (
A new update is ready to install.
);
};
```
---
## UX Best Practices
- Only show modals for major updates
- Keep messages simple and clear
- Avoid interrupting critical flows
- Use consistent CTAs like “Restart App”
---
## Full working example video
## Conclusion
Customizing your OTA update flow ensures better transparency and a smoother experience for your users. Stallion’s JS API makes it easy to tailor how and when updates appear.
📘 Full API Docs: https://learn.stalliontech.io/docs/sdk/api-reference
🚀 Start Here: https://stalliontech.io
**Pro Tip**
Let users know when something magical is about to happen—custom UI makes
updates more human.
---
# Patch Updates for React Native — Modern CodePush Alternative with 98% Smaller OTA Updates
React Native Stallion's Patch Updates deliver binary-safe, file-level differential OTA updates. In a verified benchmark, a 20 MB bundle was reduced to a 400 KB patch — 98% smaller. A modern CodePush alternative with rollback, rollout controls, and release analytics.
## The Problem With Full-Bundle OTA Updates
A small JavaScript fix shouldn't always mean sending an entire update artifact to every affected device.
With full-bundle OTA delivery, a tiny code change can still require users to download a much larger bundle. At scale, that means more bandwidth, longer downloads, and more data transferred for releases where only a small part of the application changed.
Microsoft's hosted App Center CodePush service used a traditional full-bundle OTA delivery model. Modern OTA systems, including Expo EAS Update, also support differential delivery in eligible scenarios. Even with differential delivery, teams can still receive full bundles when a suitable patch is unavailable, not yet generated, or not meaningfully smaller.
Stallion Patch Updates supports binary-safe differential delivery with automatic generation for sequential releases and on-demand patch generation between any two compatible Stallion versions. This gives teams more flexibility when multiple versions remain active in the field.
## Meet Stallion Patch Updates
Stallion Patch Updates uses binary-safe, file-level differential patching to reduce the amount of data transferred between compatible releases.
Instead of treating every release as a completely new full-bundle download, Stallion analyzes compatible releases and generates a differential patch containing the data required to move from the source version to the target version.
In Stallion's verified benchmark scenario:
- Full bundle: **20 MB**
- Patch: **400 KB**
- Reduction: **98%**
Actual patch sizes depend on what changed between releases. The 98% figure is a verified benchmark scenario, not a guarantee for every update.
## Why Smaller OTA Updates Matter
### Less data to download
A smaller patch means users transfer less data when receiving an update. This matters particularly for large user bases, frequent releases, and users on slower or metered connections.
### Lower bandwidth consumption
If a release can be delivered as a 400 KB patch instead of a 20 MB full bundle, the difference compounds across users.
For example:
- 1,000 users × 20 MB = 20 GB
- 1,000 users × 400 KB ≈ 400 MB
The exact savings depend on the patch size and the number of users receiving it.
### Faster downloads
Smaller artifacts generally take less time to transfer than larger full bundles, although actual download time depends on network conditions, device performance, and other factors.
### More practical frequent releases
Reducing the amount of data required for small releases can make frequent OTA fixes and feature updates easier to deliver at scale.
## File-Level Differential Updates
Stallion analyzes release contents at the file level and generates a binary-safe differential patch containing the data required for the target version.
This can avoid transferring unchanged content that is already available on the device. For example, if a release changes a single component while leaving most of the application unchanged, the resulting patch can be substantially smaller than the full bundle.
This is particularly useful for:
- small bug fixes
- UI changes
- configuration changes
- incremental feature releases
- frequent JavaScript updates
## How Stallion Patch Updates Work
If Patch Updates are enabled for the project, the normal upload and release workflow remains the same.
1. **Upload the bundle** — Build the React Native bundle and upload it using the existing Stallion CLI workflow.
2. **Promote the release** — Promote the release through the Stallion Console or release workflow.
3. **Generate the differential patch** — Stallion compares the relevant releases and generates the patch when applicable.
4. **Deliver the appropriate update** — A compatible device can receive the smaller patch instead of downloading the entire target bundle when a patch is available.
5. **Verify and apply** — The patch is verified and applied as part of the OTA update process.
## First Release vs Incremental Releases
The initial app bundle is different from subsequent OTA releases. The default bundle shipped with the native app build is already present on the device and is not itself a previously published OTA release available as a patch source.
For an app version:
- **Initial/default bundle:** included with the native app build
- **First OTA release:** may require the full OTA bundle
- **Subsequent compatible releases:** can use differential patches when Patch Updates are enabled and a patch is available
**First Release Note**
For a device without a compatible previous release available for patching, the update may need to be delivered as a full bundle. When a compatible previous release exists, differential patching can be used when Patch Updates is enabled and a patch is available.
## Example: 20 MB Bundle → 400 KB Patch
Consider a React Native application with a 20 MB full update artifact.
### Full-bundle delivery
- **20 MB** transferred per affected user
- Larger download
- Higher bandwidth consumption
### Stallion Patch Update
In Stallion's verified benchmark scenario:
- **400 KB** patch
- **98% less data**
- Smaller artifact to transfer
For 1 million users receiving the same release:
- Full bundle: approximately **20 TB**
- 400 KB patch: approximately **400 GB**
- Difference: approximately **19.6 TB**
This is an illustrative scale calculation based on the verified 20 MB → 400 KB benchmark. Actual traffic depends on the patch size, how many users receive the patch, and which users require a full bundle.
Stallion also supports **on-demand patch generation between any two compatible Stallion versions**. This means a device can move across a version gap without requiring every intermediate release to be the patch source. When the requested source-to-target patch does not yet exist, the initial request may receive the full target bundle while the differential patch is generated for subsequent matching requests.
## Designed for Frequent OTA Releases
Patch Updates fits into the existing Stallion release workflow.
### Existing release workflow
If the team already uses Stallion for OTA releases, Patch Updates is designed to work within that workflow rather than requiring a separate patching system.
### Backward compatibility
Existing full-bundle releases continue to work. Patch delivery is used when the relevant patch is available.
### Patch analytics
The React Native Stallion Console surfaces:
- patch size vs full bundle size
- patch efficiency
- users receiving patches vs full bundles
## Why Teams Moving From CodePush Care
Microsoft's hosted App Center CodePush service is retired. CodePush forks and self-hosted implementations can vary in capabilities, so teams migrating today should evaluate the specific implementation they operate.
**CodePush / App Center**
- Microsoft's hosted App Center CodePush service is retired
- Existing forks and self-hosted implementations vary in capabilities
- Teams operating their own infrastructure own hosting, availability, maintenance, upgrades, and compatibility
**Stallion**
- Managed hosted OTA platform
- Binary-safe differential Patch Updates
- Automatic patches for sequential releases
- **On-demand any-to-any patch generation**
- File-level differential processing
- Release analytics
- Rollback and rollout controls
- Hosted, regional, self-hosted, and on-premise options where applicable
For teams where OTA download size, bandwidth consumption, frequent releases, and version flexibility are important, Stallion's differential patch model provides a more flexible delivery approach than a traditional full-bundle OTA workflow.
**Patch Updates is available on Pro and Enterprise plans**, and requires **React Native Stallion SDK 2.4.0 or later**.
## Getting Started With Patch Updates
If you already use Stallion:
1. Open the project in the [Stallion Console](https://console.stalliontech.io/).
2. Go to **Project Settings → Patch Settings**.
3. Enable **Patch Updates**.
4. Continue using the normal upload and promote workflow.
5. Monitor patch generation and delivery in the Console.
Patch Updates is designed to fit into the existing OTA workflow without requiring a separate application-side patching system.
**SDK Requirement**
Patch Updates is available for React Native Stallion SDK version 2.4.0 and
above. Make sure you're running the latest version to take advantage of
this feature.
## Ship Smaller OTA Updates
If your team ships frequent React Native OTA updates, reducing the amount of data required for each release can make a meaningful difference at scale.
See how Stallion Patch Updates works, review the SDK requirements, and enable it from your project settings.
[Read the Patch Updates Documentation →](/docs/patch-updates)
[Get Started Free →](https://console.stalliontech.io/auth/signup)
Already on CodePush? [View the CodePush Migration Guide →](/docs/migrating-from-codepush)
## Frequently Asked Questions
### What are Patch Updates?
Patch Updates are differential OTA updates that contain the changed content needed to move a compatible release from one version to another. Stallion uses binary-safe, file-level differential processing to reduce update size. In verified benchmark scenarios, updates can be up to 98% smaller than the corresponding full bundle.
### How do Patch Updates compare to CodePush?
Microsoft's hosted App Center CodePush service is retired, while CodePush forks and self-hosted implementations can vary in capability. Stallion Patch Updates can deliver a substantially smaller differential patch when the relevant patch is available, with automatic sequential patches and on-demand generation between any two compatible versions.
### Can I migrate from CodePush to Stallion?
Yes. Stallion provides a [CodePush migration guide](/docs/migrating-from-codepush) for React Native teams, covering the SDK and release workflow changes required for your project.
### Are Patch Updates available for all React Native apps?
Patch Updates is available for projects using the supported React Native Stallion SDK version and an eligible Stallion plan. Current documentation lists SDK 2.4.0+ and Pro or Enterprise plans. Check the current documentation before implementation.
### Can Stallion generate a patch between non-consecutive versions?
Yes. Stallion supports on-demand patch generation between any two compatible Stallion bundle versions. This allows teams to generate patches across version gaps when multiple releases remain active in production. If the requested source-to-target patch has not yet been generated, the first request may receive the full target bundle while the patch is generated for subsequent matching requests.
### How much smaller are Patch Updates?
Patch Updates can be up to 98% smaller than a corresponding full bundle. In Stallion's verified benchmark scenario, a 20 MB update was reduced to a 400 KB patch. Actual patch size depends on what changed between releases.
---
# React Native CI/CD for OTA Updates: Automate, Test & Roll Out With Stallion
Connect React Native Stallion to your CI/CD pipeline to publish, test, promote, and roll out OTA updates automatically — with CI tokens, GitHub Actions, rollout controls, and in-app testing.
OTA releases should not depend on someone manually uploading a bundle after every merge.
With React Native Stallion, your CI pipeline can publish a bundle, promote the exact artifact you tested, configure rollout percentage, and control whether the release is mandatory.
Stallion also includes an in-app testing workflow that lets authorized testers switch between published OTA releases without creating a new native build for every JavaScript change.
This guide shows how to connect Stallion to CI/CD and build a workflow like:
**Code merge → Publish → Test → Promote → Roll out**
## Why Automate OTA Releases?
A manual OTA workflow creates repetitive work:
1. Build or prepare the update.
2. Upload the bundle.
3. Select the target app version.
4. Configure the release.
5. Ask QA to test it.
6. Change the rollout percentage.
7. Monitor the release.
A CI/CD pipeline can automate the repetitive parts while keeping production release decisions behind the approval gates that make sense for your team.
You can trigger publishing from a merge, release branch, tag, manual approval, or another deployment event depending on your release process.
## A Production-Ready OTA CI/CD Workflow
A typical Stallion workflow can be split into four stages:
### 1. Publish
CI generates and publishes the OTA bundle.
### 2. Test
QA validates the published artifact using Stallion Testing.
### 3. Promote
The exact bundle hash that passed testing is promoted to the target app version.
### 4. Roll out
The release is gradually exposed to users using rollout controls.
This gives teams a repeatable path:
**Publish → Test → Promote → Roll out**
The same published artifact can move through the release process without rebuilding the JavaScript bundle between QA and production.
## Automate Releases With CI Tokens
Stallion supports CI tokens designed for automated workflows.
Store the token in your CI provider's secret manager rather than committing it to the repository or exposing it in source control.
Use the narrowest available credential scope for the workflow, and rotate or revoke the token if it is exposed.
### Step 1: Generate a CI Token
From the Stallion Console:
1. Go to **Project Settings**.
2. Open **Access Tokens**.
3. Generate a **CI Token**.
### Step 2: Store the Token as a CI/CD Secret
Store the token in your CI provider's encrypted secret store, such as GitHub Secrets, Bitrise Secrets, or the equivalent in your CI platform.
For GitHub Actions, for example, create:
`STALLION_CI_TOKEN`
You can also store the project ID as a CI secret when you do not want environment-specific identifiers in the workflow.
### Step 3: Use the Token From the CLI
```bash
npx stallion publish-bundle \
--upload-path=org-name/project-name/bucket \
--platform=android \
--release-note="your release notes" \
--ci-token="$STALLION_CI_TOKEN"
```
The exact upload path and platform values depend on your Stallion project and release setup.
## Publish First, Release Later
One of the useful patterns in Stallion's CI/CD workflow is separating artifact publishing from production release.
Publishing uploads the bundle and gives you a bundle hash.
You can then validate that exact artifact before promoting it to a target app version.
Once you're ready, the pipeline can release that hash and configure its rollout percentage.
This creates a workflow like:
**Build → Publish → QA → Promote → Roll out**
You do not need to rebuild the JavaScript bundle between QA and production. The same published artifact can move through the release process.
### Publishing a Bundle
```bash
stallion publish-bundle \
--upload-path=orgname/project-name/bucket-name \
--platform=android \
--release-note="Your release note here" \
--ci-token="$STALLION_CI_TOKEN"
```
### Promoting a Bundle
```bash
stallion release-bundle \
--project-id="$STALLION_PROJECT_ID" \
--hash="$BUNDLE_HASH" \
--app-version="$TARGET_APP_VERSION" \
--release-note="Your release note" \
--ci-token="$STALLION_CI_TOKEN"
```
### Updating a Release
```bash
stallion update-release \
--project-id="$STALLION_PROJECT_ID" \
--hash="$BUNDLE_HASH" \
--release-note="Updated release note" \
--rollout-percent="$ROLLOUT_PERCENT" \
--is-mandatory="$IS_MANDATORY" \
--ci-token="$STALLION_CI_TOKEN"
```
## Automate OTA Publishing With GitHub Actions
If your team already uses GitHub Actions, OTA publishing can be another step in your existing release workflow.
The example below publishes an OTA bundle after changes reach `main`. Your team can adapt the trigger to use tags, release branches, manual approvals, or another deployment event.
```yaml
name: Publish OTA with Stallion
on:
push:
branches:
- main
jobs:
publish:
runs-on: ubuntu-latest
steps:
- name: Checkout code
uses: actions/checkout@v6
- name: Setup Node.js
uses: actions/setup-node@v6
with:
node-version: 20
- name: Install dependencies
run: npm ci
- name: Publish OTA Update with Stallion
env:
STALLION_CI_TOKEN: ${{ secrets.STALLION_CI_TOKEN }}
STALLION_PROJECT_ID: ${{ secrets.STALLION_PROJECT_ID }}
run: |
COMMIT_MSG=$(git log -1 --pretty=format:"%s")
echo "Publishing with commit message: $COMMIT_MSG"
npx stallion publish-bundle \
--upload-path=my-org/my-project/prod \
--platform=android \
--release-note="$COMMIT_MSG" \
--ci-token="$STALLION_CI_TOKEN"
```
Store your CI token as a GitHub secret named `STALLION_CI_TOKEN`.
If your workflow also promotes releases automatically, keep the project ID and other environment-specific values in CI secrets or environment configuration rather than hard-coding them into the repository.
## Control Rollouts From CI/CD
Publishing an OTA artifact does not have to mean sending it to 100% of users immediately.
Stallion separates release promotion from rollout configuration, allowing your pipeline to control how quickly a release reaches users.
For example:
**Publish → QA → Promote → 10% → Monitor → 50% → 100%**
The rollout percentage can be updated through the CLI as confidence in the release increases.
This makes CI/CD more than an automated upload step. It becomes part of the release-control process.
### Example rollout progression
```bash
# Start with a small rollout
stallion update-release \
--project-id="$STALLION_PROJECT_ID" \
--hash="$BUNDLE_HASH" \
--rollout-percent=10 \
--ci-token="$STALLION_CI_TOKEN"
# Increase after validation
stallion update-release \
--project-id="$STALLION_PROJECT_ID" \
--hash="$BUNDLE_HASH" \
--rollout-percent=50 \
--ci-token="$STALLION_CI_TOKEN"
# Complete the rollout
stallion update-release \
--project-id="$STALLION_PROJECT_ID" \
--hash="$BUNDLE_HASH" \
--rollout-percent=100 \
--ci-token="$STALLION_CI_TOKEN"
```
Use the rollout stages that match your team's risk tolerance. Critical fixes may need a different rollout strategy from routine UI changes.
## Test OTA Releases Without Building a New Native App
Once a Stallion-enabled app build is installed on a tester's device, QA can switch between published OTA releases from the Stallion Testing modal.
That means a JavaScript change does not require another native build just to test the OTA release.
The native Stallion-enabled build is still required initially. After that, authorized testers can install and switch between compatible published OTA releases without creating another native distribution package for every JavaScript release.
Stallion's testing workflow is designed to let teams validate OTA updates in under 60 seconds.
### Integrate the Stallion Testing Modal
```tsx
import { useStallionModal } from "react-native-stallion";
const MyDebugScreen = () => {
const { showModal } = useStallionModal();
return ;
};
```
### Restrict Testing With a Security PIN
Set a **security PIN** in the Stallion Console to restrict access to internal testers.
Authorized testers can open the Stallion modal, select an available OTA release, download it, and restart the app to validate the version.
The testing workflow is intended for a Stallion-enabled native application build. It does not replace the initial native build or app distribution process.
**Learn More**
See the full [Stallion Testing documentation](/docs/sdk/stallion-testing)
for setup details and configuration options.
## A Practical QA-to-Production Workflow
A team can combine the CI and testing workflows into a release pipeline like this:
### Developer
Merge the JavaScript or TypeScript change.
### CI
Publish the OTA artifact and capture its bundle hash.
### QA
Use a Stallion-enabled app build to switch to the published release and validate it.
### Release approval
Promote the exact bundle hash that passed QA to the target app version.
### Controlled rollout
Start with a small percentage of users and increase the rollout after monitoring the release.
### Recovery
If the release causes problems, use the available release and recovery controls to limit its impact and roll back when appropriate.
This avoids rebuilding the native application for every compatible JavaScript release while still giving the team control over the production rollout.
## Secure Your CI/CD Pipeline
CI automation should never depend on credentials committed to source control.
Store your Stallion CI token in your CI provider's encrypted secret store and expose it only to the workflows that need it.
For additional OTA security, Stallion also supports bundle signing through the CLI, allowing bundles to be signed with a private key before publishing.
Good CI/CD security practices include:
- Store CI tokens in your provider's secret manager.
- Avoid printing credentials in workflow logs.
- Use the narrowest available credential scope.
- Rotate or revoke credentials if they are exposed.
- Keep production publishing behind the appropriate branch, environment, or approval gates.
- Separate development, staging, and production credentials where appropriate.
## What This CI/CD Workflow Changes
### Merge code without manual OTA uploads
Your existing CI pipeline can publish OTA artifacts as part of your release workflow, removing repetitive manual uploads.
### Test without rebuilding for every JavaScript release
Once a Stallion-enabled native build is installed, authorized testers can switch between compatible published OTA releases without creating another native build for each JavaScript change.
### Promote the exact artifact that passed QA
Publishing and releasing are separate steps, so the bundle tested by QA can be the same bundle promoted to production.
### Control rollout from the pipeline
Your CI workflow can automate or gate rollout percentage, mandatory-update decisions, and other release actions according to your team's process.
### Keep credentials out of source control
CI tokens remain in your CI provider's secret manager rather than being committed to the repository.
## Works With Your Existing CI/CD Stack
Stallion CLI commands can be run from CI environments that support command-line workflows.
Common setups include:
- **GitHub Actions**
- **Bitrise**
- **CircleCI**
- **Jenkins**
- **Codemagic**
- **Appcircle**
- Other CI/CD systems that can run the Stallion CLI
The goal is not to replace your CI/CD platform. Stallion becomes another step in the release pipeline you already operate.
## Expo and React Native CI/CD
If your application uses Expo, you can continue using Expo for development and native builds while using Stallion for OTA delivery.
Your CI workflow can build the native application with Expo and then use Stallion's CLI and release workflow for compatible OTA updates.
The Stallion-enabled native build still needs to be distributed through the appropriate app-store or testing channel before it can receive Stallion OTA updates.
This lets teams keep their existing application build workflow while using Stallion for patch-first OTA delivery and release controls.
## Related Resources
- [**Release Automation Documentation →**](/docs/release-automation)
- [**Stallion Testing Documentation →**](/docs/sdk/stallion-testing)
- [**React Native Patch Updates →**](/blogs/react-native-patch-updates-codepush-alternative)
- [**CodePush Migration Guide →**](/docs/migrating-from-codepush)
- [**Expo EAS Update Alternative →**](/blogs/expo-updates-alternative)
## Frequently Asked Questions
### How do I automate React Native OTA updates with CI/CD?
Use the Stallion CLI from your existing CI/CD pipeline. A typical workflow publishes the bundle, captures its hash, validates the artifact, promotes it to the target app version, and then controls rollout percentage.
### Does React Native Stallion support GitHub Actions?
Yes. Stallion CLI commands can be run from GitHub Actions workflows using a CI token stored in GitHub Secrets.
### Can I use React Native Stallion with Bitrise?
Yes. Stallion CLI commands can be integrated into Bitrise workflows using a CI token stored in Bitrise's secret management system.
### Does Stallion support other CI/CD platforms?
Yes. Any CI/CD environment that can run Stallion CLI commands can be integrated into the release workflow. Common setups include GitHub Actions, Bitrise, CircleCI, Jenkins, Codemagic, and Appcircle.
### How do I secure CI tokens in my CI/CD pipeline?
Store CI tokens in your CI provider's encrypted secret manager. Do not commit them to source control or print them in workflow logs. Use the narrowest available credential scope and rotate or revoke exposed credentials.
### What is the Stallion Testing Framework?
Stallion Testing provides an in-app workflow for authorized testers to switch between compatible published OTA releases from a Stallion-enabled native application. A security PIN can be configured to restrict access to internal testers.
## Automate Your React Native OTA Releases
Your CI/CD pipeline should do more than upload an OTA bundle.
With Stallion, you can publish an artifact, test it, promote the exact version that passed QA, control its rollout, and recover when something goes wrong.
Keep your existing CI/CD platform. Add Stallion where your OTA release workflow needs it.
[**Get Started Free →**](https://console.stalliontech.io/auth/signup)
[**Read the Release Automation Documentation →**](/docs/release-automation)
---
# React Native Stallion is Now Available on AWS Marketplace
Buy React Native Stallion on AWS Marketplace — Enterprise, Enterprise+ & On-Premise OTA plans with consolidated AWS billing and private offers. How to subscribe.
React Native Stallion is now available through AWS Marketplace, giving enterprise teams another way to procure Stallion — a production-ready React Native OTA platform **built from the ground up for enterprise requirements** — through an AWS purchasing workflow they may already use.
For teams evaluating OTA infrastructure, this can remove a practical barrier to adoption: getting a new software platform through procurement, legal, finance, security, and platform teams.
But AWS Marketplace is only the procurement path. The bigger advantage is what enterprises get after purchase: a production OTA platform designed around **security, governance, data residency, operational reliability, and infrastructure control** — from managed cloud deployments to self-hosted and on-premise environments where applicable.
👉 **[View React Native Stallion on AWS Marketplace →](https://aws.amazon.com/marketplace/pp/prodview-rj3bpizhyigg4)**
## What Does Buying Stallion on AWS Marketplace Mean?
AWS Marketplace gives organisations a way to purchase third-party software through AWS and manage the associated commercial transaction through their AWS account.
For Stallion, the main change is **how enterprise customers can buy the platform**. You still use Stallion's Console, SDK, CI/CD workflows, and OTA release infrastructure after purchase — AWS Marketplace simply provides another commercial path for organisations that prefer to manage software purchases through AWS.
The product itself remains focused on enterprise OTA: secure update delivery, controlled releases, testing, recovery, data residency, and deployment models that can adapt to an organisation's infrastructure and compliance requirements.
For teams with established AWS procurement processes, this can mean:
- **Simpler procurement.** Purchase Stallion through AWS Marketplace as part of an existing AWS purchasing workflow.
- **Consolidated billing.** Marketplace charges are managed through AWS billing for the purchasing account.
- **Private offers.** Enterprise teams can negotiate custom pricing and terms with Stallion through an AWS Marketplace private offer.
- **A familiar channel.** Teams can use AWS Marketplace when their organisation already relies on it for third-party software procurement.
For eligible Marketplace transactions, the spend may contribute toward applicable AWS commitment programs, depending on your AWS agreement and the product's eligibility. Confirm eligibility with your AWS account team.
**AWS Marketplace plans**
Stallion's **Enterprise** offerings are available through AWS Marketplace
via private offers. Specific deployment options, including on-premise
configurations, depend on the negotiated plan and commercial offer. Talk to
us to have an offer prepared for your AWS account.
## The Same Stallion, With a Different Procurement Path
Buying Stallion through AWS Marketplace changes the **procurement path**, not the product.
| | Direct Stallion purchase | AWS Marketplace purchase |
|---|---|---|
| OTA platform | Stallion | Stallion |
| Differential OTA delivery | ✓ | ✓ |
| Enterprise capabilities | ✓ | ✓ |
| Infrastructure options | Managed cloud, regional hosting, self-hosted, on-premise where applicable | Same Stallion deployment options available under the purchased plan |
| Billing | Direct Stallion commercial agreement | AWS Marketplace billing |
| Procurement path | Direct vendor procurement | AWS Marketplace |
| Private offer | Available where applicable | AWS Marketplace private offer |
| Product workflow | Stallion Console | Stallion Console |
You're not buying a separate AWS version of Stallion — it's the same platform, with another way to procure it.
## Why Procuring Through AWS Marketplace Matters
For a developer, choosing an OTA platform usually starts with technical requirements. For an enterprise organisation, there's another question: can we actually procure and approve it? Security reviews, legal agreements, purchase orders, and finance approvals can all become part of adopting a new platform.
- **A workflow you already have.** Instead of standing up a separate purchasing path, teams can route the purchase through AWS Marketplace when that channel already fits their procurement process.
- **Consolidated AWS billing.** Marketplace purchases are billed through AWS, giving finance teams one place to manage AWS Marketplace charges alongside their AWS billing.
- **Custom enterprise terms.** Private offers let Stallion and the customer agree on custom pricing and terms before the offer is accepted.
The important distinction: AWS Marketplace makes Stallion easier to procure — it doesn't change how Stallion delivers OTA updates or the enterprise controls available in the purchased plan.
## What You Get From Stallion
The Marketplace purchase doesn't create a reduced or separate version of Stallion. Your team gets the capabilities included in the purchased plan.
Stallion is designed from the ground up for enterprise OTA requirements, with security, governance, controlled releases, data residency, and infrastructure flexibility built into the platform. Stallion also maintains an independent SOC 2 Type I attestation for its security controls.
The commercial route changes. The Stallion product does not.
## How to Procure Stallion on AWS Marketplace
Subscribing and connecting Stallion to your organisation takes just a few steps:
### Step 1: Open the AWS Marketplace listing
Head to the [React Native Stallion listing on AWS Marketplace](https://aws.amazon.com/marketplace/pp/prodview-rj3bpizhyigg4). If we've already prepared a **private offer** for your negotiated pricing, open it from the **Private offers** section of your AWS account instead — [contact us](https://stalliontech.io/contact) if you'd like one set up.
### Step 2: Subscribe (or accept your private offer)
Choose **View purchase options** and subscribe, or accept the private offer in your AWS account. Review the pricing and terms. Depending on the Marketplace pricing model and private-offer terms, billing may be upfront, scheduled by installments, or usage-based through AWS Marketplace.
### Step 3: Set up your account
Once the subscription is active, click **Set up your account** on the AWS Marketplace page. You'll be redirected to Stallion to finish onboarding.
### Step 4: Sign in and link your organisation
Log in to Stallion — or create an account — and select the organisation to link the subscription to.
**Linking is permanent**
A subscription links to **one organisation** and can't be changed later. If
you ever need to move it, [contact support](https://stalliontech.io/contact).
### Step 5: You're activated
Linking activates your plan — **Enterprise**, **Enterprise+**, or **On-Premise** — on the organisation you chose. You're ready to ship OTA updates with your full plan entitlements.
## The Same Stallion, Now Easier to Buy
AWS Marketplace doesn't replace the Stallion platform or introduce a separate AWS version of it. Your team keeps using Stallion for its OTA release workflow, including the capabilities included with the purchased plan — only how your organisation purchases and manages the commercial agreement changes.
For teams already standardised around AWS procurement, that can be a meaningful operational improvement.
Want an AWS Marketplace private offer for your team? [Contact us](https://stalliontech.io/contact) and we'll prepare one for your AWS account.
## Frequently Asked Questions
### Can I buy React Native Stallion on AWS Marketplace?
Yes. React Native Stallion is available on AWS Marketplace. You can subscribe directly from the listing or accept a private offer in your AWS account, and the subscription is billed through AWS billing mechanisms for the purchasing account.
### Which Stallion plans are available on AWS Marketplace?
Stallion's Enterprise, Enterprise+, and On-Premise plans can be procured through AWS Marketplace via private offers. Contact the Stallion team to have an offer prepared for your AWS account.
### What is an AWS Marketplace private offer?
A private offer is a negotiated AWS Marketplace purchase with custom pricing and commercial terms agreed between your organisation and Stallion. You accept the offer in your AWS account, and the accepted offer establishes the applicable pricing and terms.
### How does billing work when I buy Stallion through AWS Marketplace?
Stallion charges are billed through AWS Marketplace/AWS billing mechanisms for the purchasing account, alongside the rest of your AWS costs.
### Can an AWS Marketplace purchase use our existing AWS commitment?
This depends on your organisation's AWS agreement and the eligibility of the Marketplace transaction. For eligible arrangements, Marketplace spend may contribute toward applicable AWS commitment programs. Confirm eligibility with your AWS account team.
### How do I connect my AWS Marketplace subscription to Stallion?
After subscribing, click "Set up your account" on the AWS Marketplace page. You'll be redirected to Stallion, where you sign in (or create an account) and select the organisation to link the subscription to. Linking activates your purchased plan on that organisation.
### Can I change the organisation linked to my AWS Marketplace subscription?
A subscription links to one Stallion organisation during setup. If you need to move it to a different organisation, contact Stallion support at stalliontech.io/contact.
## Get Started with Stallion on AWS Marketplace
Ready to buy React Native Stallion through AWS?
[View the listing on AWS Marketplace](https://aws.amazon.com/marketplace/pp/prodview-rj3bpizhyigg4) or [contact us](https://stalliontech.io/contact) for a private offer tailored to your team.
React Native Stallion is also free to start — 10K MAU free tier, no credit card required.
[Get Started Free →](https://console.stalliontech.io/auth/signup)
---
# React Native Stallion is Now SOC 2 Type I Compliant
React Native Stallion is now SOC 2 Type I compliant, attested across Security, Availability & Confidentiality. What it means for secure OTA updates + how to get the report.
We're excited to announce that **React Native Stallion has completed a SOC 2 Type I compliant** — an independent attestation of the controls protecting Stallion's systems and customer data as of the examination date, covering the security safeguards behind your React Native OTA updates, bundles, tokens, and account data.
For teams evaluating a [CodePush alternative](/blogs/codepush-alternative), the hardest part of adopting an over-the-air (OTA) update platform usually isn't the feature list — it's getting security sign-off. SOC 2 gives security and vendor-review teams an independently examined report they can use during their evaluation, alongside their normal vendor-assessment process.
## What Is SOC 2 Type I Compliance?
SOC 2 is an independent audit of how a service organisation handles customer data, based on the AICPA's Trust Service Criteria. A **SOC 2 Type I** report is an attestation, by an independent auditor, that an organisation's controls are **suitably designed and in place** as of a specific date.
Stallion's SOC 2 Type I report covers three Trust Service Criteria:
- **Security** — protecting systems and data against unauthorised access.
- **Availability** — keeping the OTA platform operational and accessible.
- **Confidentiality** — safeguarding information designated as confidential.
In practice, that means the controls protecting your OTA updates — access controls, encryption, logging, and change management — aren't just described in a sales deck. They've been examined and attested by a third party.
**SOC 2 Type I vs Type II**
SOC 2 Type I attests that controls are suitably **designed and in place** at a
point in time. SOC 2 Type II additionally tests that those controls operate
**effectively over a period** (typically 3–12 months). Stallion's Type II
observation window is already in progress.
## Why SOC 2 Compliance Matters for OTA Updates
Over-the-air updates ship code directly to production devices, so the platform delivering them sits on a sensitive part of your supply chain. That makes independent security assurance essential — not optional.
- **Audited, not asserted.** A SOC 2 Type I report gives your security reviewers something concrete to work from during vendor assessment, instead of a questionnaire full of "trust us" answers.
- **A standardised reference point.** Security teams can evaluate Stallion against a recognised, standardised report as part of their normal vendor-assessment process.
- **Transparency by default.** Our security policies, subprocessors, and compliance documentation live in our [Trust Center](https://stalliontech.io/trust) — open for review before you ever talk to sales.
- **Point-in-time assurance.** It provides additional assurance that the controls protecting Stallion's systems and customer data were designed and implemented appropriately as of the examination date.
## How We Achieved SOC 2 Compliance
SOC 2 isn't a checkbox you tick the week before an audit. Getting here meant hardening how Stallion operates, day to day:
- **Access controls** — least-privilege access to production systems, with access reviews and strong authentication for the team.
- **Encryption** — data encrypted in transit and at rest, with OTA bundle payloads served through signed, time-limited URLs. Encryption protects data confidentiality; it doesn't by itself verify who authored an update.
- **[Bundle signing](/blogs/bundle-signing-security-in-ota-updates-with-react-native-stallion)** — cryptographic verification of an update's origin and integrity before installation, so every OTA update is origin-verified and tamper-evident before a device installs it. Free on every plan.
- **Audit logging** — comprehensive logs across critical systems for monitoring, incident investigation, and access accountability.
- **Vendor risk management** — documented risk assessments before onboarding any subprocessor that touches customer data, with periodic reviews thereafter.
- **Security training & policy** — company-wide security policies and training so the same standard is applied consistently across the team.
If you want the detail, our public [Information Security Policy](https://stalliontech.io/security) walks through how each control works.
## What's Next for Stallion's Security Roadmap
Compliance is a direction, not a destination. What we're working on next:
- **SOC 2 Type II.** The Type II observation window is underway — extending the attestation from "controls are designed correctly" to "controls operate effectively over time."
- **Data residency & GDPR.** Enterprise customers can choose regional data hosting to keep bundle updates and related data within a specific geography, supporting GDPR and other data-residency requirements.
- **On-premise for regulated industries.** For organisations with the strictest requirements — HIPAA, or internal policies that prohibit third-party cloud — Stallion offers [on-premise OTA hosting](/blogs/codepush-on-premise-alternative) behind your firewall, with the same feature set as the cloud product and complete data sovereignty.
## How to Request Stallion's SOC 2 Report
Our SOC 2 Type I report is available under NDA. Evaluating Stallion for an enterprise deployment? Request the SOC 2 Type I report through our contact form and we'll provide it under NDA — and browse our published security posture anytime at the [Trust Center](https://stalliontech.io/trust).
[**Request SOC 2 Report →**](https://stalliontech.io/contact)
## Frequently Asked Questions
### Is React Native Stallion SOC 2 compliant?
Yes. React Native Stallion has completed a SOC 2 Type I attestation, independently examined across the Security, Availability, and Confidentiality Trust Service Criteria as of the examination date. SOC 2 Type II is in progress.
### What is the difference between SOC 2 Type I and Type II?
SOC 2 Type I attests that a company's security controls are suitably designed and in place at a specific point in time. SOC 2 Type II goes further and tests that those controls operated effectively over a period, usually three to twelve months. Stallion holds Type I today and has its Type II observation window underway.
### Does React Native Stallion support HIPAA-related requirements?
Stallion does not claim HIPAA compliance or certification. For organisations with HIPAA-related or other strict regulatory requirements, Stallion offers on-premise deployment where appropriate, giving teams greater control over where the OTA infrastructure and data are hosted. Organisations should evaluate their own compliance requirements with their legal and compliance teams.
### How do I get Stallion's SOC 2 report?
Stallion's SOC 2 Type I report is available under NDA. Enterprise customers and teams in active evaluation can request it through the contact form at stalliontech.io/contact, and review published security documentation at the Trust Center.
### Does Stallion support GDPR and data residency?
Yes. Enterprise customers can choose regional data hosting to keep React Native bundle updates and related data within a specific geographic region, supporting GDPR and other data-residency requirements. On-premise deployment is also available for full data sovereignty.
### Are React Native OTA bundle updates encrypted and signed?
Yes. OTA bundles are encrypted in transit and at rest and served through signed, time-limited URLs. Stallion also supports customer-managed bundle signing, so every update is cryptographically origin-verified and tamper-evident before a device installs it — free on every plan.
## Ship Fast, Stay Compliant
Great OTA infrastructure shouldn't force a trade-off between shipping speed and security review. React Native Stallion gives you staged rollouts, native crash-detection rollback, in-app testing, and customer-managed bundle signing — now backed by an independent SOC 2 Type I attestation.
React Native Stallion is free to start — 10K MAU free tier, no credit card required.
[Get Started Free →](https://console.stalliontech.io/auth/signup)
---
# Stallion - Ultimate React Native OTA management system
A quick guide on harnessing React Native Stallion, the leading React Native OTA(over the air) update management system. Learn about its features, installation, and usage to streamline your app update workflow.
## Introduction
Stallion is an end-to-end testing and deployment framework for React Native apps, enabling over-the-air (OTA) updates without rebuilding your entire app each time.
With its CLI, SDK, and console, Stallion helps you quickly create, distribute, and manage releases—making it easier than ever to keep your testers and users up to date.
## Why Stallion?
- **Instant OTA Updates**: Share new features and fixes with production users in real time—no waiting on app store reviews or manual installs.
- **End-to-End Testing**: Eliminate the need to recreate full app builds. Download and test updates directly within your app.
- **Adoption Analytics**: Monitor how quickly users adopt each release and make data-driven decisions.
- **Safety Features**: Automatically roll back unstable updates to keep your app functioning smoothly, and manually roll back if needed.
- **Phased Rollout**: Control the rollout percentage of a Stallion Release. Gradually scale and monitor releases.
- **Fully Managed & Productivity-Oriented**: Skip the hassles of hosting and version control—Stallion takes care of it all so your team can ship features faster and focus on building great products.
## Getting Started
Install the Stallion CLI and SDK to enable seamless OTA updates in your React Native app. With just a few commands, you can bundle, upload, and deliver updates instantly.
### Installation
Install the CLI and SDK inside your React Native project.
```bash
npm install react-native-stallion
npm install --save-dev stallion-cli
```
Follow the native installation steps mentioned [here](/docs/sdk/installation) to complete the SDK installation.
After completing the installation, you should be able to open the Stallion SDK modal.
### Sending your first Stallion Release
Use the Stallion CLI to publish your first React Native bundle.
Simply run the [Publish Bundle command](/docs/cli/usage-api-reference#publish-bundle) to upload your update to Stallion servers.
```bash
npx stallion publish-bundle --upload-path=// --platform= --release-note=""
```
Once successful, you should see an output similar to the screenshot below:
Head over to your bucket in the [Stallion Console](https://console.stalliontech.io/) to verify the uploaded bundle.
You’ll see it listed inside your bucket, where you can review its metadata, release notes, and other details.
### Testing the Stallion Release
With your bundle now published, you can install it on any released app that has the Stallion SDK integrated.
Inside the app, head to the **Testing** tab provided by the Stallion SDK to browse all available buckets.
Simply select your target bucket, download the bundle, and once the download is complete, restart the app to apply the update.
### Promoting a Stallion Release to production
Once your bundle has been fully tested, Stallion allows you to seamlessly promote it to production.
With a single click, your update is distributed to users across your entire app base.
Head over to the [Stallion Console](https://console.stalliontech.io/) and then follow the steps mentioned in the
[Stallion Production](/docs/sdk/production-usage#step-2-promote-build-to-production) section of the docs.
**Tip**
You can manually control [distribution parameters](/docs/sdk/distribution) for
a Stallion Release like rollout percentage, rollback and paused states. These
controls can be accessed inside Manage Release section of [Stallion
Console](https://console.stalliontech.io/).
### Tracking release adoption
The **Adoption Stats** section inside [Stallion Console](https://console.stalliontech.io/) gives you a quick overview of your release’s performance, showing:
- **Downloads**: Total completed downloads.
- **Installs**: Total successful installations.
- **Rollbacks**: Total automatic rollbacks triggered.
These metrics help you track how many users have received the update, installed it, and, if needed, reverted to a previous version.
## Conclusion
Stallion streamlines the entire OTA update process for React Native apps—giving you the tools to build, test, release, and monitor updates with ease. Whether you’re shipping hotfixes or feature updates, Stallion helps you move faster while maintaining control and stability across your user base.
By combining the power of the CLI, SDK, and Console, you can drastically reduce your release cycles, minimize operational overhead, and deliver a seamless experience to your users.
Ready to take your React Native deployments to the next level? Dive deeper into the [full documentation](/docs/introduction) and start building with Stallion today!